
Grout has always been seen as the weakest link in the tile industry's installation procedure. There have been reports of it cracking more readily, changing colour more rapidly, and wearing out more rapidly than the tile it is sandwiched between.
This occurs rarely in the modern world and can be prevented by using high-quality components and expert installation.
It is common for individuals to assume that defective grout is to blame when it begins to flake away from tile joints.
More often than not, the issue is with the substrate, and the grout failure is just a symptom. Many contractors skip the step of reinforcing and underlaying the subfloor in order to save money in the near term.
Because of the motion that results from this, the grout will eventually wear out and give the impression that there is an issue with the grout. To permanently fix grout that is eroding from the joints, it is likely that the entire tile floor will need to be replaced.
This is especially true if the grout is coming out in sections. We have a wide range of property Melbourne regrouting services at Hitch Property Constructions.
Providing the tile substrate and installation were completed to standards in the industry, grout should last a lifetime with the right care and maintenance as long as it is kept clean.
There are a few different kinds of grout that may be bought: epoxy grout, cementitious grout, and single-component grout.
Cementitious grouts are applied to tiles with a combination of water and the grout's cement foundation.
Most people have this type of grout in mind when they think about grout (especially dirty-looking grout). While today's technology is unquestionably more advanced than that of yesteryear, it is nevertheless constrained in many ways.
Cementitious Grouts:
- The one having the smallest initial outlay.
- The most costly over a lifetime
- In certain situations, it may dry unevenly or blotchy.
- Stains can easily penetrate the porous surface.
- Maintenance sealing is required.
- Minimal flexibility
- Prone to installation errors
- Quality and cost can shift far from one another.
Epoxy Grouts:
- It is impenetrable to water.
- Stain-resistant
- Uniform coloration Costly initial setup is required
- Yellowing occurs in sun-exposed areas.
- All of the batch must be used for repairs and alterations.
Single Component Grouts:
- Modern, ground-breaking methods of grout application
- The greatest stain resistance
- Flexible
- Vinyl installation is less expensive than epoxy installation.
- Extensive drying durations are required before usage (in wet areas)
- Use as a repair or touch-up material for up to two years.
- From one pail to the next, everything is the same.
Home Repair FAQs
You can always test the caulk before starting a project by running a small bead of caulk on a scrap piece of wood, cardboard, etc. If after approximately 15-20 minutes the product has not formed a “skin”, the product is most likely expired and will not fully cure.
Silicone caulks are among the best caulks for sealing windows. Silicone helps provide a long-lasting seal that can be applied against interior or exterior windows and its flexible material will not crumble in hot or col
Caulk tends to harden as it ages, usually breaking away from its surface leaving moisture to accumulate beneath. Without sufficiently removing old caulk you risk leaving old moisture on the surface of the window.
Put a tube of caulk in the caulk gun. Use the razor knife to cut off the tip of the tube at a 45-degree angle in order to make a hole about 1/4-inch wide. Push a long nail into the tip of the tube to break the seal inside. Squeeze the trigger of the gun to start the caulk flow.
Caulking can and will shrink as it dries. Sometimes a second layer of caulk is required and will produce a neater surface instead of overfilling a crack with caulk. If caulking is to be applied over existing and previous sealed joints, removing old caulk is essential and need to be done carefully.
How Much Does Regrouting A Ceramic Tile Cost?
Grout discoloration or deterioration can diminish the aesthetic value of otherwise lovely ceramic tile. If you have ceramic tile on your floor or walls, you know that it is a durable material.
However, the underlayment can be damaged if the grout changes colour or develops fractures, rendering it unable to maintain its original function. Cleaning up the area by scraping out the damaged grout and replacing it with fresh grout should fix the problem.
You can either hire a tile installer or handyman to do the work for you, or you can buy the necessary supplies and equipment and do it yourself.
Caulk should be latex-based or prepared especially for the tiles that need fixing. In order to manually remove the old grout, you can either invest in a multi-tool or a drill attachment made for the operation, or you can make do with a utility knife and a grout saw.
Removal of the old grout, cleaning of the grout joints, application of the new grout, and final smoothing of the joint are all necessary steps for a successful outcome.
A glaze forms on the tile and must be cleaned off before it can be used again. Caulking all of the gaps and cracks to ensure a tight seal is the last step before the job is done. It is predicted that the job will take around two days to complete because of the drying time required for the grout and the curing time required for the caulk.
The cost to hire a handyman service to remove the old grout and replace it on an 80-square-foot section of ceramic tile is $1037. Using a multi-tool and buying the required materials for $75 will allow you to finish the task at a savings of 82% of the original cost.
The typical cost to regrout ceramic tile is included in the above-mentioned cost breakdown and can be used to evaluate the relative merits of professional assistance versus DIY. Hitch Property Constructions has the best range of renovations services to help you create your dream house.
Include your ZIP code to customise the data and get a price quote specific to your location.
Prices For Grouting And Regrouting: Things To Know.
Experts in grouting and regrouting analyse a number of criteria before providing an estimate. Among these are: Typical instances of this include the following:
The Area's Size
Pricing for grouting and regrouting services is often based on the square footage of the area being worked on.
You should, then, prepare a more comprehensive budget for maintenance if you have a large area.
Type Of Grout
Grout comes in various varieties, each with its own set of advantages and disadvantages, durability rating, and cost.
Unsanded grout is commonly used in smaller tile joints or areas between individual tiles on floors and walls.
When, on the other hand, the spaces between the tiles are somewhat larger, a grout that has been sanded very finely is utilised. If money isn't an issue, you have more flexibility by using epoxy grout on tiles instead of traditional grout.
This grout is not only extremely durable, but it also prevents liquids from penetrating, eliminating the need for sealants.
Additional Services
If you don't use epoxy grout, you'll need to apply sealant once you're done grouting to keep water and other unwanted substances out. This may not be included in the standard plan; in which case you'll need to pay extra.
Remove Or Salvage Grout?
Before getting started, you should evaluate if the grout can be salvaged so that you can avoid the more labour-intensive step of removing it.
Grout can be "revived" by cleaning it with mould removers and then applying one of the many treatments available on the market today that is made expressly for grout revitalisation.
When it comes to quality and longevity, certain varieties are just better than others, which means that the product itself is crucial to their success.
Among the many products from Grout Shield that we have tried and loved; the grout regeneration system stands out as a clear winner. With this kit, you can give your grout a fresh look that will stay for a long time by cleaning, reconditioning, recoloring, and finally colour sealing it.
Grout cleaning solution can also be made at home by mixing a few common household products in the right amounts.
As could be predicted, the success rates of the many different recipes found on the internet vary widely. A few typical recipes are:
- Make a paste with your cleaning solution and apply it to the grout in small parts. After waiting around 10 minutes, scrape it with a green scourer, old toothbrush, or a nail brush. The grout in your home should now be bright white. Depending on how severe the mould or staining is, you may need to repeat this method more than once. The job isn't done until you've given it a good rinse with clean water. Always use caution when working in bleach, and protect yourself with old clothes, gloves, and goggles.
- Create a paste by combining 1/4 cup of hydrogen peroxide, 1/2 cup of baking soda, and 5 mL of liquid dish soap. The next step is to spread the paste over the grout, wait five to ten minutes, and then wipe it clean. After applying the mixture, scrub it in with an old toothbrush and then rinse everything with clean water.
You shouldn't bother trying homemade grout cleansers if you don't want to accept the fact that they won't restore your grout lines to the condition they were in when you originally placed them.
However, we found that certain homemade grout cleaners actually do the job. In order to achieve the desired "as good as new" appearance, a specialised product such as the one described in the previous paragraph is recommended.
It is worth your time to look into these products if cleaning the grout can save you the trouble of removing and replacing it; but, if you are reading this article, you are probably already past this stage, and removal and replace of the grout may be your only alternative.
Reasons For Removing The Grout Between The Tiles
When determining whether or not to re-grout a wall, there are several things to take into account. Some of the most common are as follows:
- You should have replaced the current grout with a different shade.
- The grout has developed major fractures and is starting to break out of the joints, suggesting that it was not put correctly to begin with.
- Mould, discoloration (brown or black), and stains have set into the grout, and none of the aforementioned cleaning methods have helped.
To reiterate, if the grout is mouldy and stained, you should take the effort to remove the mould before you start raking out the grout.
This is a necessary step before you can begin raking the grout. It is possible that you may not need to re-grout the area if the mould is black, and you have cleaned the area sufficiently.
A mould problem is another issue that needs to be addressed.
While cleaning, removing, and replacing the grout may make your bathroom appear brand new again, it will only be a temporary repair if you don't address the underlying cause of the mould. Check out our range of Melbourne bathroom renovation here.
Brown mould could mean water is getting beneath the tiles through the cracks.
If the water is originating from somewhere else, this is a distinct possibility. The water will carry salts from the wall beneath the tiles, staining the joint a brownish colour.
If you discover a possible entry point for water, there is no use in rerouting because you cannot fix the leak until you do so.
Removing Grout By Hand
You can find a grout rake at any hardware shop, and it is the only instrument you'll need to successfully remove grout.
It was manufactured and built for this exact purpose, and its blades are easily replaced when they become dull or broken. In the past, a nail would have been used for this purpose, but now you can get the job done in a fraction of the time with this instrument.
Cleaning grout with a rake
Taking away the tile grout using a rake - The rakes sold in our virtual hardware store are made for the purpose of removing grout, and you can find them here.
It doesn't matter where you start when renovating a whole kitchen or bathroom, but starting in a corner of one wall and working clockwise is the most efficient strategy.
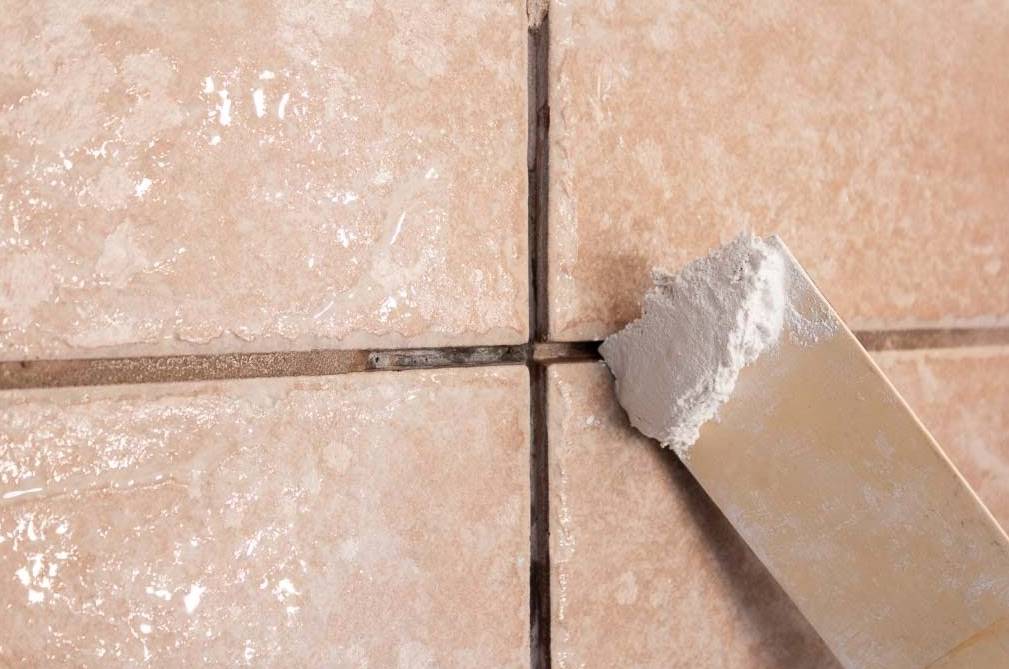
You should start by inserting the grout rake into the grout line. By rocking the rake back and forth (with a good deal of pressure applied to the joint), the grout can be broken up and powdered.
It takes a long time to finish this job because grout is so challenging to work with. To make room for the new grout, at the very least 2 mm of the old grout must be scraped out of the joints.
As replacement blades for grout rakes can be found for as little as $5, it's a good idea to stock up if you'll be working on a sizable area.
Having a rake that can accommodate two blades side by side is useful when dealing with grout that is in bigger gaps between the tiles. This function is available on some models of rake. You can see all of our Grout Rakes on this page.
Careful, deliberate motion is required while utilising a rake. If you trip and land on an adjacent tile, you can easily score or mark it. In addition, you may need to repair the tiles themselves in addition to the grout if you happen to crack any of them.
Tips For Using Power Tools To Remove Grout In Between Tiles
It may not be viable to use a grout rake by hand if you need to cover a big area, as this could take a very long time.
A grout rake may be less efficient for cleaning the grout if the gap between the tiles is rather considerable.
There may come a time when you consider using a power tool to remove the grout, but you should be aware of the risks involved in doing so.
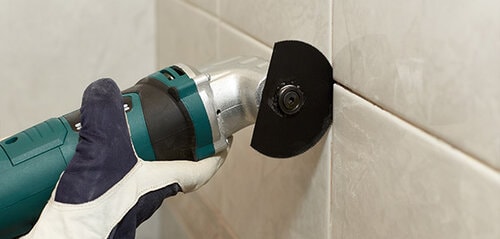
Care must be taken to avoid damaging the tiles with the power tool you choose; therefore, it is recommended that you initially practise in an inconspicuous place before going on to more public spaces.
The removal of grout requires specialised equipment. The oscillating or vibrating motion of these tools will force the tool's tip into the grout, making removal much easier. In most cases, professionals and homeowners won't utilise grout removal equipment unless they have to remove a large amount of grout frequently.
Conclusion
The grouting process has traditionally been considered the weakest part of the tile industry's installation process. It has been said to crack more easily and to change colour more quickly. However, Grout should last forever as long as it is regularly cleaned. Deterioration or darkening of the grout between tiles can detract from the beauty of otherwise good tiles. Therefore, the first step towards a successful conclusion is always the removal of the old grout, cleaning the grout joints, applying the new grout, and the final smoothing of the joint.
Different types of grouts have different strengths and weaknesses. "Reviving" grout entails washing it using mould removers and adding remedies. Grout Shield is a product used to clean, recondition, recolour, and colour-seal grout, giving it a like-new appearance. Some considerations go into deciding whether or not to re-grout a wall. Grout has become stained, discoloured (brown or black), and mouldy.
You should use a specialised product as the one indicated there. It is useless to reroute until the leak in the grout has been repaired. So, a rake is the only tool you'll need for efficient grout removal. The rakes are available at any home improvement store, and they are designed specifically for the task of cleaning grout. Grout rakes can be purchased for as little as $5, so if you plan on working on a significant area, it is prudent to store them up. A rake with two blades side by side is helpful when dealing with grout in larger spaces between tiles.
Content Summary
- Grout has always been seen as the weakest link in the tile industry's installation procedure.
- This rarely occurs in the modern world and can be prevented using high-quality components and expert installation.
- It is common for individuals to assume that defective grout is to blame when it begins to flake away from tile joints.
- More often than not, the issue is with the substrate, and the grout failure is just a symptom.
- The entire tile floor will likely need to be replaced to fix grout eroding from the joints permanently.
- Providing the tile substrate and installation were completed to standards in the industry, and grout should last a lifetime with the right care and maintenance as long as it is kept clean.
- Most people have this type of grout in mind when they think about grout (especially dirty-looking grout).
- If you have ceramic tile on your floor or walls, you know it is durable.
- Cleaning the area by scraping the damaged grout and replacing it with fresh grout should fix the problem.
- Removal of the old grout, cleaning the grout joints, applying the new grout, and final smoothing of the joint are all necessary steps for a successful outcome.
- The cost to hire a handyperson service to remove the old grout and replace it on an 80-square-foot ceramic tile is $1037.
- The typical cost to regrout ceramic tile is included in the above-mentioned cost breakdown and can be used to evaluate the relative merits of professional assistance versus DIY.
- Experts in grouting and regrouting analyse some criteria before providing an estimate.
- You should prepare a more comprehensive budget for maintenance if you have a large area.
- Before getting started, you should evaluate if the grout can be salvaged to avoid the more labour-intensive step of removing it.
- The grout regeneration system stands out as a clear winner among the many products from Grout Shield that we have tried and loved.
- With this kit, you can give your grout a fresh look that will stay for a long time by cleaning, reconditioning, recolouring, and finally, colour sealing it.
- A few typical recipes are: Make a paste with your cleaning solution and apply it to the grout in small parts.
- Create a paste by combining 1/4 cup hydrogen peroxide, 1/2 cup baking soda, and 5 mL of liquid dish soap.
- The next step is to spread the paste over the grout, wait five to ten minutes, and then wipe it clean.
- It is worth your time to look into these products if cleaning the grout can save you the trouble of removing and replacing it. Still, if you are reading this article, you are probably already past this stage, and removing and replacing the grout may be your only alternative.
- When determining whether or not to re-grout a wall, there are several things to take into account.
- To reiterate, if the grout is mouldy and stained, you should make an effort to remove the mould before you start raking out the grout.
- It is possible that you may not need to re-grout the area if the mould is black and you have cleaned the area sufficiently.
- While cleaning, removing, and replacing the grout may make your bathroom appear brand new again, it will only be a temporary repair if you don't address the underlying cause of the mould.
- If the water originates from somewhere else, this is a distinct possibility.
- The water will carry salts from the wall beneath the tiles, staining the joint a brownish colour.
- If you discover a possible entry point for water, there is no use in rerouting because you can only fix the leak once you do so.
- You can find a grout rake at any hardware shop; it is the only instrument you'll need to remove grout successfully.
- Cleaning grout with a rake Taking away the tile grout using a rake - The rakes sold in our virtual hardware store are made to remove grout, and you can find them here.
- The grout can be broken up and powdered by rocking the rake back and forth (with a good deal of pressure applied to the joint).
- It takes a long time to finish this job because grout is so challenging to work with.
- To make room for the new grout, at least 2 mm of the old grout must be scraped out of the joints.
- As replacement blades for grout rakes can be found for as little as $5, it's a good idea to stock up if you'll be working on a sizable area.
- Having a rake that can accommodate two blades side by side is useful when dealing with grout that is in bigger gaps between the tiles.
- Careful, deliberate motion is required while utilising a rake.
- Using a grout rake by hand may not be viable if you need to cover a big area, as this could take a very long time.
- A grout rake may be less efficient for cleaning the grout if the gap between the tiles is rather considerable.
- There may come a time when you consider using a power tool to remove the grout, but you should be aware of the risks involved.
- The removal of grout requires specialised equipment.
- In most cases, professionals and homeowners will only utilise grout removal equipment if they have to frequently remove a large amount of grout.