
When a ceramic tile installation begins to show signs of wear and grime, prior to giving up and installing new tile, you should give some thought to completely removing the grout from the seams and packing them with fresh, new grout. This should be done before you decide to give up and install a new tile.
Before giving in and installing new tiles, this is something you should think about doing. Regrouting tile may make an old installation look like new again if the tiles are in good shape and the adhesive is still holding them in place.
The tasks are not especially challenging, either. In addition to some effort on your part, the right equipment, and the necessary materials are all that are required. The task does not require any unique skills.
Cleaning grout from 16 square feet of 6-inch tiles, which is about the size of a kitchen backsplash, takes around two hours.
It takes another hour or so to apply new grout. Obviously, the time required will grow proportionally with the size of the area being tiled or the size of the tiles themselves, since the latter will have more grout lines.
You can save a lot of money by doing the work yourself, and it's not too difficult to implement the necessary approaches. Looking for regrouting services in Melbourne? Look no further! Hitch Property Constructions has you covered.
In order to begin the regrouting procedure, the old, hardened grout must be scraped out of the tile joints and seams with an oscillating tool and by hand.
An oscillating tool is recommended. The next step is to mix up some new grout, spread it over the tiles with a grout float, and wipe it all down with a damp sponge. The murky residue left by the grout is removed from the tiles once it has dried.
Home Repair FAQs
To apply the new grout, it is optional to remove all of the old grout first. Then, the fresh grout can be applied directly on top of the previously applied grout. You are going to require a grout removal tool, which is a little instrument with a sharp blade that is designed to chip the grout away.
Sometimes, you can put fresh grout directly on top of the old grout without having to remove it first. However, where the grout has crumbled or grown too unclean, it should be removed before new grout is applied.
After 15 to 30 minutes, use a grout sponge saturated with water to remove any excess grout. You may need to work in smaller portions if you anticipate needing more than 30 minutes to grout all of the tiles and be ready to move on to clean up.
If you want to use a homemade solution, you can clean grout by combining three-quarters of a cup of baking soda, one-fourth of a cup of hydrogen peroxide, and one tablespoon of mild dish detergent. Then, take a grout brush and some grouts paste and clean up the grout.
A Grout Getter can remove the grout between 1/8" and 3/16" below the tile's top edge. Because of this, the new grout can fill the grout voids. However, to ensure that the new grout adheres well to the joints, leaving some old grout in place is important.
Tile Regrouting Tips
Tile has long been a popular choice for tiling walls, floors, and other surfaces due to its durability and low maintenance requirements.
In most cases, the grout will fail or reveal its age before the tile itself does, and when grout is unclean or worn, the entire tile surface might look old and worn. Having your tile professionally repaired is the greatest way to give it a second chance at life.
Cleaning Grout
Some floors' grout may simply be stained or unclean, especially if they get a lot of use. Although there is no shortage of tile and grout cleaners on the market, you may find that a combination of baking soda and hydrogen peroxide does the trick.
- Using a grout brush, push a little amount of hydrogen peroxide into the grout lines and let it sit for a few seconds.
- After that, sprinkle with baking soda and brush as if your life depended on it.
- After you've finished covering the space, you may clean the tile and grout with water to make it look like you just put it in.
Colouring Grout
If your grout's colour is merely old and faded, you can restore its youthful appearance with a grout colourant. Applying grout colourants over top of pre-existing grout is not difficult per se, but it is a multi-step process that may be tiresome and time-consuming. Remember that your tile and grout must be nonporous and your grout must be porous for this to function.
Coloured silicone caulk is occasionally used in place of grout in places where tile meets other surfaces like flooring or bathtubs because grout colourant won't function there. Check out Hitch Property Constructions for a huge range of melbourne home painter services.
Avoid using white or other light colours for the grout between the tiles, as these will show every stain and fingerprint. The grout won't fade as much from the sunlight and foot activity if you use a darker tile.
Replacing Grout
If your tile grout is chipping, cracking, or loose, you can remove it and replace it with fresh grout. It's important to use brand new grout if you go this route. To the untrained eye, this may appear to be an insurmountable challenge; yet, the adage "the right tool for the right job" applies here.
If you've ever tried to remove grout with any of the other equipment on the market, you know how difficult and risky it can be, not to mention how it can harm your tile. Carbide tips are safe to touch even when in use and may fit into areas that are otherwise inaccessible. In other words, once the grout is gone, you may want to consider installing a deeper colour that won't show dirt as quickly.
Grout Sealing
After you've completed cleaning, colouring, or repairing the grout, you should seal it to prevent stains and dirt from seeping in. This will prevent future damage to the grout and make future cleanup much easier. Grout sealants not only protect grout from moisture and mildew, but they also assist prevent stains from appearing on the grout's surface.
After having your tile cleaned and revived, it is wise to invest a small amount of time and money in protecting your hard work and the surface of your tile. Therefore, you should look into the option of updating your grout before you start tearing out your tile.
The grout can be fixed by following the steps in this article, and the results should be comparable to those of replacing the tile.
Steps For Regrouting Ceramic Flooring
Grout can lose its appeal over time as it becomes stained, cracked, chipped, and covered in grime from contact with water and foot traffic.
The only way to revitalise a tiled floor is to remove the old grout and replace it with new grout when the old grout has deteriorated beyond the point of being restored through cleaning, recoloring, or resealing. When the grout's condition has deteriorated beyond repair, certain measures must be taken.
Remove Old Grout By Grinding
You can use an oscillating tool to get rid of grout by attaching a blade designed for the task. This purpose-built blade is available for purchase from the majority of blade manufacturers. Blades coated in tiny diamond chips may easily pulverise cementitious grout in no time.
Once the device is activated, the blade should be moved over the grout lines while staying perpendicular to the tile's surface. Be careful not to nick or chip the ceramic tile with the blade, and take your time.
When making your first pass, don't worry about getting every last bit of grout out; instead, focus on getting the majority of it out.
When dust or debris accumulates, stop what you're doing and empty the shop vac.
For less money, you may get a manual grout saw that works just as well for smaller jobs or when you have more time and patience.
Clean The Grout Lines
Once the bulk of the grout has been removed, run the oscillating tool through the grout lines again to polish them.
This time, you'll need to tilt the blade slightly to get as close to the tile's edges as feasible. It is important to avoid damaging the tiles by placing too much weight or standing for too long on the grout lines.
The blade's movement will rapidly reduce the grout to a powdery mess. Do not use too much force to the blade if you encounter stubborn grout; it will be removed by hand afterwards. Maintain the cleanliness of the grout while you work.
Manually Remove The Remaining Grout
Once the power tool has removed as much grout as possible, go back over the area with a flat-head screwdriver or utility knife (a dull blade is good) to remove any lingering fragments. Don't want to ruin the walls or floors by scratching the tiles.
Vacuum Thoroughly
The old grout in the joints should be removed, and then the area should be thoroughly cleaned using a shop vac to get rid of any leftover dust and dirt. Grout lines must be completely cleaned and allowed to dry before fresh grout can be put.
Mix The Grout
You can buy tile grout in the form of a dry powder that must be mixed with water, or you can buy a semi-liquid paste that has already been mixed and is sold in a variety of sized tubs. Blend the powdered grout with water in a small bucket using a margin trowel to form a paste.
For the best results when mixing dry grout, start by filling a plastic bucket halfway with water, then add half the amount of dry grout powder called for in the instructions. Combining in a thorough manner. After the powder and water have been mixed thoroughly, gradually add additional water until you have a full batch, which should be enough to cover an area three to four feet square. The correct mixture should be smooth, almost like a paste, and pourable.
Some types of grout require a little resting period (or "slaking") before they may be applied. In such a scenario, it is recommended that you stick to the manufacturer's guidelines.
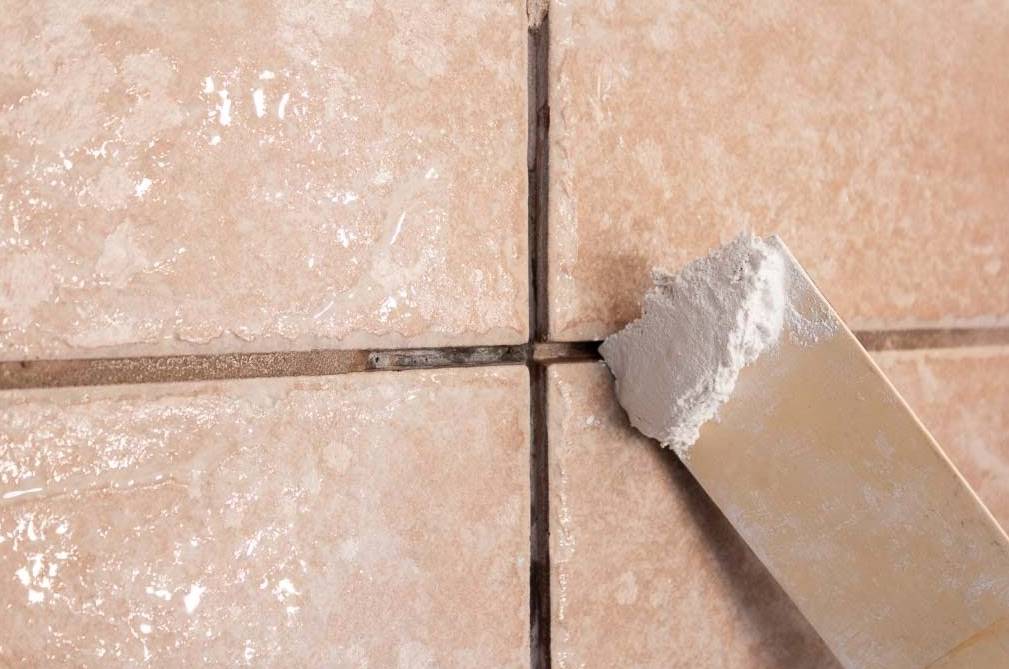
Complete The Grout Joints
Gather a good amount of grout with a rubber grout float, and then evenly distribute it on the tile. Grout should be applied to joints by holding the float at a sixty-degree angle and pressing the grout into the joints.
If you want to make sure that all of the cracks are properly sealed, you should work in opposite directions. If there is any grout left over, scoop it up and move it to the next tile row or reload the tile. Repeat this step until you have filled every joint.
It is necessary to move the grout float in a diagonally position towards the joint lines to ensure a uniform fill. If the tiles have a chamfered or bevelled edge, the joints may need to be tooled.
When the top layer of grout is removed through tooling, the connection looks thinner and more consistent. Specialised tools are available for this purpose, but the round eraser attached to a pencil can also be used by dragging it over the grout's joint lines once it has dried slightly.
Apply Sponge To The Joints And Tiles
Using a sponge dipped in water, wipe away any extra grout once the grout lines have been filled. Too much water will cause the grout to be dragged out of the joints, so make sure the sponge is only slightly damp before using it. Without applying too much pressure, move the sponge in a light, feathery motion across the tile surface.
This process takes a long time to complete. Move the sponge back and forth across the tile surface, wiping up the extra grout as you go, until the tile is spotless.
You shouldn't stress about wiping down all the time right now; that will be done afterwards. Give the sponge a good soak in clean water and change the water out anytime it becomes soiled.
Remove The Grout Haze
There will still be a faint haze over the tiles even after the recommended drying time for the grout has passed. Any remaining haze can be wiped away by buffing the tile surfaces with a soft cloth. You can buy a substance that will remove the haze from the tiles, and then polish them if you want to.
Selecting The Best Grout For Your Project
Grout is a dense filler product used between tiles to make your floor or wall look more finished and sturdy. However, grout's primary functions are as a sealer to keep water out from between and underneath tiles and as a space-filler to keep tiles from slipping.
On the other hand, the mortar utilised between the bricks acts like cement and gives the building its structural strength.
Grout is traditionally made by mixing a powdered substance with water to form a pourable paste. The paste can be used to quickly and simply fill the gaps between tiles, and then it dries firm in about 24 hours.
Grout is utilised not only for the goal of filling gaps, but also for the purpose of correcting for minute changes in the dimensions of individual tiles, the thickness of the tiles, and imperfections in the substrate that lies underneath.
To enhance the overall visual appeal of the tiles, the colour of the grout is also an essential component to consider. Regrouting is just one of the many services that Hitch Property Constructions provides.
Small-format tiles, such as those up to 8 inches by 8 inches, will often have 1/16- or 1/32-inch grout lines. There will be a grout line every 1/8 of an inch if you use tiles with a standard format ranging in size from 12 by 12 inches to 16 by 16 inches.
Since the grout lines between tiles of this size are only 1/16 of an inch broad, the overall effect is one of greater consistency than with tiles of a smaller size (16x16 inches).
Most tile installers would rather not install tiles thicker than 3/16 inches. Slate and other heavy quarry materials are an exception to the rule, as they can have grout lines as wide as an inch.
Cement Grout That Is Not Sanded
This standard grout is often used for grout lines that are 1/8 inch or less in width.
Sanded grout can't be utilised since its granules are too large to fit into the tiny crevices between the tiles.
Typically available in various tones of grey or off-white, non-sanded cement grout is made primarily of Portland cement.
Grout can be made in an infinite number of colours simply by adding colourants and mixing them in. It is always advisable to choose a type of grout that does not contain sand when working with certain varieties of polished stone, such as granite and marble, which are readily scratched during the grouting process due to the sand content of sanded grout.
Epoxy Grout
When there will be a lot of people walking over it, a lot of water being splashed on it, and a lot of wear and tear, epoxy grout could be the answer.
The recipe has two or three parts, such as resin, hardener, and colourant, and it needs to be blended in a precise ratio before it can be applied. For the vast majority of epoxy formulations, this is the recommended method.
Epoxy has greater hardness (often harder than the tile's surface), durability, and resistance to water and stains, and it is often harder than the tile's surface. Additionally, it is not susceptible to the development of microorganisms like mildew.
In its early iterations, epoxy was famously difficult to alter for use in grouting applications because of the rapid curing time of the formula after mixing.
It was often challenging to apply the mixture before it hardened, which was a major drawback. Newer generations of epoxy grouts solidify more gradually, providing more time to get the job done. Not only that, but unlike previous iterations, this one can be cleaned up with just water and detergents.
Epoxy is often used as the appropriate grouting material in difficult, high-traffic areas like kitchens and bathrooms that are prone to water exposure and stains. In other places of the house, though, you can use regular cement grout for the tiles.
Sealing Grout
No matter whether it is sanded or unsanded, cement grout can be said to be water-resistant.
The use of unsealed cement grouts can have the drawback of being stained by any liquids that come into contact with them. Mildew can also flourish after being introduced to wetness.
For this reason, after the new grout has dried for a few days, it is standard practice to apply a commercially available sealant to the grout lines. It is possible to employ either a membrane sealant or a penetrating sealer over cement grout.
The membrane variant only seals the grout's surface and does not permeate it deeply. Penetrating sealants are typically preferred above others since they permeate the grout's pores without altering the grout's colour or becoming hazy over time.
Sanded Cement Grout
The Portland cement in this variety is mixed with fine sand that has been assessed for the specific task at hand. Though a 1 to 1 ratio is employed for joints as narrow as 1/8 inch, the amount of sand required is increased for joints that are broader.
A high sand component is necessary for wide joints as the grains of sand provide bulk to the slurry. Additionally, sand strengthens the cohesiveness of the grout cement and hence its hold on the tile.
Adding sand to the grout prevents the grout from shrinking as much, which would normally happen with broader grout lines. Grout is less likely to break or "loosen" up as a result of this.
The two components of concrete, sand and cement, can be mixed together on-site, or the pre-mixed variety can be purchased with the addition of colourant and other additives already included in the bag.
Polymers added to either type of sanded cement grout increase the cement's hydration, making the surface more resistant to abrasion. Further, they prevent the grout lines from becoming mottled and from developing a white haze once the grout has set.
Conclusion
Remove the grout from the joints when your ceramic tile installation shows signs of wear and dirt. Do this before installing a new tile. Regrouting helps restore an outdated tile installation. Loose, cracked, or chipped grout can be replaced. Grout colourants are simple to use, but the multi-step method is tiresome.
Water and foot traffic can discolour, break, chip, and filthy grout. Removing and replacing grout refreshes a tiled floor. Clean and dry the existing grout lines before applying new grout. Squeezing the grout float into joints at a sixty-degree angle applies grout. Chamfered or bevelled tiles may require tooled joints.
Grout is used between tiles to finish and strengthen a floor or wall. Grout seals and fills spaces between tiles to prevent water from leaking in. Non-sanded cement grout is mostly Portland cement. For 1/8-inch grout lines. Epoxy grout, which is harder than tile, may be appropriate for heavily worn tiles. Epoxy is great for bathroom and kitchen grouting. Tiles in other rooms can utilise cement grout. However, liquids may discolour unsealed cement grouts.
Content Summary
- When a ceramic tile installation begins to show signs of wear and grime, before giving up and installing new tile, you should give some thought to completely removing the grout from the seams and packing them with fresh, new grout.
- This should be done before you give up and install a new tile.
- To begin the regrouting procedure, the old, hardened grout must be scraped out of the tile joints and seams with an oscillating tool and by hand.
- The next step is mixing up some new grout, spreading it over the tiles with a grout float, and wiping it down with a damp sponge.
- Although there is no shortage of tile and grout cleaners on the market, you may find that a combination of baking soda and hydrogen peroxide does the trick.
- Using a grout brush, push a little hydrogen peroxide into the grout lines and let it sit for a few seconds.
- After that, sprinkle with baking soda and brush as if your life depended on it.
- After you've finished covering the space, you may clean the tile and grout with water to make it look like you just put it in.
- If your grout's colour is old and faded, you can restore its youthful appearance with a grout colourant.
- Remember that your tile and grout must be nonporous, and your grout must be porous for this to function.
- If your tile grout is chipping, cracking, or loose, you can remove it and replace it with fresh grout.
- In other words, once the grout is gone, you may consider installing a deeper colour that won't show dirt as quickly.
- Therefore, you should look into the option of updating your grout before you start tearing out your tile.
- The only way to revitalise a tiled floor is to replace the old grout with new grout when the old grout has deteriorated beyond being restored through cleaning, recolouring, or resealing.
- You can use an oscillating tool to eliminate grout by attaching a blade designed for the task.
- Don't nick or chip the ceramic tile with the blade; take your time.
- Once the bulk of the grout has been removed, run the oscillating tool through the grout lines again to polish them.
- Once the power tool has removed as much grout as possible, go back over the area with a flat-head screwdriver or utility knife (a dull blade is good) to remove any lingering fragments.
- Blend the powdered grout with water in a small bucket using a margin trowel to form a paste.
- Gather a good amount of grout with a rubber grout float, then evenly distribute it on the tile.
- Moving the grout float in a diagonal position towards the joint lines is necessary to ensure a uniform fill.
- Using a sponge dipped in water, wipe away any extra grout once the grout lines have been filled.
- Move the sponge back and forth across the tile surface, wiping up the extra grout as you go until the tile is spotless.
- There will still be a faint haze over the tiles even after the recommended drying time for the grout has passed.
- Any remaining haze can be removed by buffing the tile surfaces with a soft cloth.
- You can buy a substance that will remove the haze from the tiles and then polish them if you want to.
- Grout is a dense filler product used between tiles to make your floor or wall look more finished and sturdy.
- However, grout's primary functions are as a sealer to keep water out from between and underneath tiles and as a space-filler to keep tiles from slipping.
- Small-format tiles, such as those up to 8 inches by 8 inches, often have 1/16- or 1/32-inch grout lines.
- There will be a grout line every 1/8 of an inch if you use tiles with a standard format ranging in size from 12 by 12 inches to 16 by 16 inches.
- Since the grout lines between tiles of this size are only 1/16 of an inch broad, the overall effect is one of greater consistency than with tiles of a smaller size (16x16 inches).
- This standard grout is often used for grout lines 1/8 inch or less in width.
- Available in various tones of grey or off-white, non-sanded cement grout is made primarily of Portland cement.
- It is always advisable to choose a type of grout that does not contain sand when working with certain varieties of polished stone, such as granite and marble, which are readily scratched during the grouting process due to the sand content of sanded grout.
- For the vast majority of epoxy formulations, this is the recommended method.
- Newer generations of epoxy grouts solidify gradually, providing more time to finish the job.
- In other places of the house, you can use regular cement grout for the tiles.
- No matter whether it is sanded or unsanded, cement grout can be said to be water-resistant.
- For this reason, after the new grout has dried for a few days, applying a commercially available sealant to the grout lines is standard practice.
- It is possible to employ either a membrane sealant or a penetrating sealer over cement grout.
- Additionally, sand strengthens the cohesiveness of the grout cement and hence its hold on the tile.
- Adding sand to the grout prevents the grout from shrinking as much, which would normally happen with broader grout lines.
- The two components of concrete, sand and cement, can be mixed on-site, or the pre-mixed variety can be purchased by adding colourant and other additives already included in the bag.