
In order to successfully tile your bathroom, you will need to plan for the placement of the toilet. There is a significant amount of preparation work involved whenever you are installing ceramic tiles or other stone tiles. You can't just cut around the toilet because the thickness of the tiles and the underlayment add too much height to the floor. After the floor is installed, your toilet will feel too low and become uncomfortable if you cut around it. When you try to sit on it, you might even get the sensation that you're going to fall off. If you have enough time and are willing to be patient, you will be able to successfully complete this project, despite the fact that it is difficult.
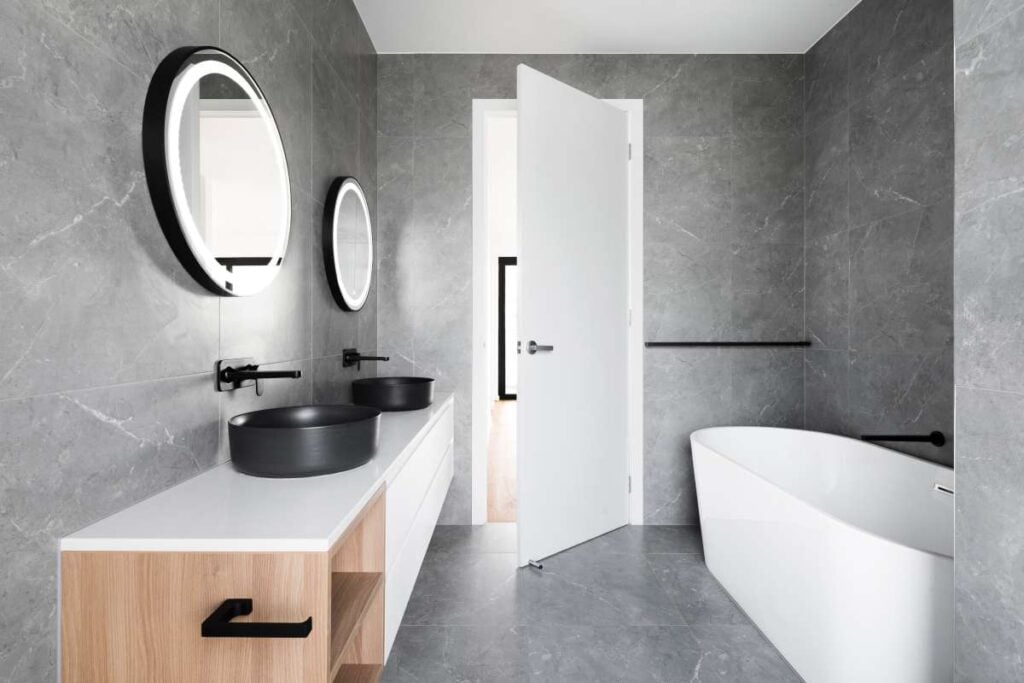
Immediately elevating the look of your bathroom floor can be accomplished by tiling it. Because they are durable, resistant to stains, and able to withstand the moisture and temperature fluctuations that are common in bathrooms, tile floors are an excellent choice for those rooms. The placement of the new tile in relation to your vanity will be one of the first considerations you will need to give attention to. Either choice is valid; however, there are a number of considerations to take into account before settling on the one that will serve your project the most effectively.
When it comes to the planning of your new bathroom, the chances are good that you will have a lot of questions to ask, unless you are an experienced installer.
When you are renovating your bathroom, unlike when you are remodelling your bedroom or living room, you will need to hire a tradesperson to instal many of the items that you purchase for your bathroom. Because of this, it is beneficial to have a basic understanding of the task at hand.
You have the option to consult with industry professionals regarding the remodelling of your bathroom. And to get you started in the right direction, we've compiled a list of the questions that are asked the most frequently and gathered some answers from industry professionals that you can use.
Should I instal the toilet before or after tiling the floor? That is the question that we will address in this post as part of our ongoing series of blog entries titled "ask the experts."
When tiling a bathroom, the toilet is an obstacle that must be overcome at some point. It is necessary to secure the tile to the floor underneath the fixture in order to instal it correctly around the toilet. As a result of the fact that toilets are installed on top of the tile, any rough cuts are concealed, which makes it simple to create the impression that the tile has been cut specifically for your bathroom.
Looking for the best tiling renovations? Look no further! Hitch Property Constructions has you covered.
Should You Remove the Toilet When Tiling the Bathroom Floor?
Many homeowners who choose to do their own bathroom renovations do so in an effort to cut costs. People often ask if the toilet needs to be taken out before a new bathroom floor can be put in. A new linoleum or ceramic tile floor can be installed in a bathroom without removing the toilet, but this is not recommended. It may result in more man hours being needed to complete the task at hand. In this article, we'll examine the myriad factors that make it a bad idea to lay new flooring near an existing restroom.
Appearance
A bathroom remodel can be very costly, even if you do all of the work yourself. It's not a good idea to risk your hard-earned cash by taking short cuts that will only get you halfway through the job. Any attempt to cut corners on labour by not properly tiling around a toilet will be immediately noticeable to any visitors you may have. Flooring, especially ceramic tile or wood, is notoriously difficult, if not impossible, to cut precisely enough to fit snugly around the base of a toilet. An additional layer of caulk or grout is usually required to hide the inevitable thick, uneven joint that forms around the base of the toilet when the job is done.
Difficulty
It can be difficult to remove the toilet before installing new flooring. Remove the toilet yourself or hire a plumber; either way, the job will be much easier than you might think. Most toilets have unusually shaped bases with lots of curves and rounded corners. Cutting floors around these obstructions is difficult for even the most skilled floor layers. The toilet must be removed before the tile can be brought up to the flange and then around it. Once the toilet is reinstalled, your project will look more polished because the base of the toilet will sit squarely on the new floor, hiding any rough edges around the flange.
Future Problems
In addition, if you don't take the toilet out before installing the new flooring, you'll have a much harder time removing or replacing the bathroom if and when the time comes. Since manufacturers use a wide variety of toilet base footprints, finding a replacement that matches the old one's is highly improbable. If your current toilet ever stops working, you might have to replace the flooring or settle for a poorly installed new toilet.
Should I fit the toilet before or after tiling the floor?
Always tile the floor first if you want to achieve a high-quality finish that also provides a better seal against water damage. This recommendation comes from all of the bathroom fitters we consulted. It ensures that tiles do not need to be cut into awkward shapes in order for them to fit, and it also ensures that there is a layer of tile underneath the toilet that will protect the floor from water in the event that the sealant fails.
Toilet options
Now that you know how to get your floor ready for the installation, you should probably start thinking about the kind of toilet you want to put in there.
If you haven't done any research on the subject just yet, the following are some of the different kinds of toilets you could go with:
Close-coupled toilet
This is by far and away the most common kind of toilet that can be purchased today. When something is said to be "close coupled," it means that the pan and the cistern are joined together to form a single unit. There are additional options available, such as a fully shrouded design that hides all of the components so that they can be cleaned more easily.
Back to wall toilet
One of two configurations are possible when using a toilet that is "back to wall":
OR Combined with a furniture unit that contains the concealed cistern and is positioned against a false wall with the cistern concealed behind it Positioned against a false wall with the cistern concealed behind it
In either case, it is an extremely modern way to maintain the clean appearance of your toilet while also coordinating flawlessly with the design of the rest of your bathroom. In addition to that, it makes cleaning much simpler.
Wall hung toilet
A wall-hung toilet gives the appearance of floating above the floor for a more minimalist design. This type of toilet is an excellent choice for designer bathrooms. In order to accomplish this, you will need to combine with a cavity wall space that will be used to house a cistern as well as a mounting frame. The advantages include not taking up any of your floor space and maintaining an incredible appearance.
High-level toilets
Installing a toilet at a higher level than the surrounding fixtures is a great way to give your bathroom a more classic appearance. The cistern is attached to the wall in this configuration, which places it well above the toilet. The cistern and pan are connected by a flush pipe, and a pull chain is used to operate the flush mechanism on the toilet.
Tiling Bathroom Floor: Vanity Future
When deciding how to instal the tile, one of the most important considerations to take into account is whether or not you intend to reuse the bathroom vanity. During the process of installing tiles, it is not necessary for you to remove your vanity if you have decided that you like it in its current location and intend to keep it there permanently. It is possible to tile around it.
Consider tiling the area underneath the vanity if it is outdated, damaged, doesn't match your design, or is located in the incorrect location for your newly renovated bathroom. After the tiling project is finished, you won't have to worry about the floor tile when you replace your existing vanity because you'll be able to get a new vanity in any size or shape you want.
If you are planning to replace your vanity in the not-too-distant future, you should probably tile the area underneath it even if you don't have any immediate plans to do so. If you tile around your existing vanity with the intention of replacing it in the future, you may need to do additional tile work at that time to cover the floor, depending on the size of the new vanity you choose to instal.
Amount of Materials Needed
When you remove the vanity from the bathroom before tiling the floor, you free up more space to work in the bathroom because the vanity is no longer in the way. However, this does mean that you will require additional material than you would if you were to tile around the vanity. It's possible that the additional material won't make much of a dent in your project budget if your vanity is on the smaller side. When it comes to tiling under a large vanity, you might need a lot more tile, mortar, and grout than you originally anticipated.
Tile Cutting and Detail Work
When tiling the floor of a bathroom, the amount of cutting and detail work that must be done is directly proportional to whether or not the vanity is removed first. When working around the installation, removing the vanity reduces the amount of tile and backer board trimming that needs to be done.
When you aren't installing the tile around a vanity, you can instal it wall-to-wall, which typically requires fewer cuts because you don't have to go around the bathroom cabinetry like you would if you were working around a vanity. Because the vanity covers up the tile that runs along the wall, it is able to conceal any imperfections or uneven cuts that might occur. Any cracks or uneven cuts made while cutting tiles to go around the vanity will be visible, so you will need to take extra care in cutting the tiles precisely.
In most cases, additional sealing is required after tiling the area around the vanity. Because the tile terminates at the edge of the vanity, you will need to ensure that a good seal is created between the tile and the vanity. In the event that you do not, water may seep down into the gap, causing damage to the flooring as well as the vanity.
Tile Under Vanity
Imagine that you take out the vanity and tile the floor directly underneath it in the same manner that you tile the rest of the floor. When it is time to reinstall the vanity, instal the new piece of hardware by first drilling holes through the tiles and then into the floor. Using linoleum or vinyl tiles makes this process much simpler. Because drilling into ceramic tiles can cause serious cracks and splits in the tiles, you should either tile around the new vanity before you begin to tile or instal the new vanity before you begin to tile. If you are using ceramic tiles, drilling into the tiles to instal the new vanity can cause serious cracks and splits in the tiles.
Tile Around Vanity
In the event that you do not intend to remove the vanity, you will need to cut the backer board and tiles so that they can be fitted around the base of the vanity. When cutting to instal around objects, you must ensure that you follow the instructions provided by the manufacturer. Some manufacturers of tiles require a gap between the tiles to accommodate expansion caused by changes in temperature and humidity. After the installation has been finished, use bathroom caulk to seal the gap between the tiles and the vanity to prevent water leaks and damage caused by moisture to the base of the vanity or the backer board.
Check out our range of tiling renovations Melbourne at Hitch Property Constructions.
Installing Tile Around a Toilet
Shut off the water supply.
Turn off the toilet's water supply and flush the water in the bowl.
Remove the Toilet
To remove the toilet, first remove the retaining bolts, then disconnect the supply line, and finally lift the toilet up and out of its hole in the floor. When the toilet is lifted, the wax ring that seals it should break. This should be a feature of the toilet. After the lid has been lifted, it is not uncommon for a small amount of water to continue to drip from the toilet.
Remove the Wax Sealing Ring
Remove the wax ring from the bottom of the toilet and place the toilet in a safe location. The bathtub is a good place to store the toilet while you work.
Clean the Floor
Before you begin laying tile, make sure the floor is clean and dry. You might want to consider covering the toilet's drainage pipe to prevent anything from falling into it if there is a lot of debris on the floor. However, this decision will depend on how much debris there is on the floor.
Lay the Tile
Tile should be laid all the way up to the retaining ring of the drainage pipe. Tile cutters are what you need to cut the pieces so that they closely surround the retaining ring; the gap should be no more than a quarter of an inch. To ensure that the tiles are cut correctly, lay them down without using any adhesive.
Apply the Tiles
After placing the tiles, wait for the adhesive to completely dry before proceeding. After that, proceed to apply the grout. Do not fill in the space with grout that separates the tiles and the retaining ring.
Replace the Wax Ring
Replace the wax sealing ring with a new ring.
Reinstall the Toilet
It's possible that you'll need longer retaining bolts, but that will depend on the thickness of the tile.
Reconnect the Water Supply
After reconnecting the supply line, flush the toilet in order to bring water back into the bowl.
Are You Supposed To Tile Under Cabinets In General?
The response to this question cannot be reduced to either black or white. A significant portion of it is determined by the composition of your subflooring and the amount of weight it is able to support. It is possible that it would be more beneficial for the cabinets to sit directly on the subflooring if they were made of hardwood and had a slab of granite placed on top of them. The installation of fixtures and other components of home systems is facilitated as a result of this.
Regarding the price, it's anyone's guess. If you don't like tile underneath, you'll spend less money on the tile, but you'll spend more money on labour to make the cuts to ensure a seamless fit up the bottom of the cabinets if you don't like tile underneath.
Should You Tile First Or Add All Fixtures First?
To avoid having to drill through ceramic tile, you will want to finish all of your plumbing rough-in work before beginning the installation of ceramic tile. If you are going to tile the area under your vanity after making the decision to do so, you will want to complete this step before installing your vanity. The same can be said for the restroom. However, before you begin tiling your shower and bathroom, you will need to make sure that your shower pan and bathtub are installed.
Does Tile Go Under The Toilet?
Yes. However, you should have the rough plumbing done and the area where the toilet flange will be marked. It is possible to retile a bathroom while the toilet is still installed, but doing so will make your work more difficult because you will need to cut the new flooring to conform to the contours of the toilet. It will save you a lot of time and effort if you just get rid of it.
We have a wide range of Melbourne tiling renovations to help you choose in creating a new design for your house.
How To Clean Tiles Around The Bathroom Vanity?
If, after reading this, you've come to the conclusion that you won't be retiling, then perhaps you'll want to just tidy up and modernise what you already have. However, the tiles around your outdated vanity look awful and should be replaced. What is the most effective method for getting them thoroughly clean?
You have to deal with two different surfaces, namely the ceramic tile itself and the grout lines that separate them. There is no single factor that contributes more to the unclean appearance of a bathroom space than discoloured grout. The tiles themselves will frequently take on a filmy appearance as a result of soaps and lotions being spilt on them.
To clean the grout, you will need a brush with a good amount of stiffness and a cleaner such as Grout-EEZ. To get the most out of your cleaner, use it exactly as directed, which usually entails letting it sit on your grout lines for ten minutes so that it can penetrate. After that, scrub the area using the stiff brush, and then clean it using warm water, a mop, or a cloth made of microfiber.
This kind of microfiber mop performs exceptionally well on tile floors. The head of the mop can be removed so that it can be washed when it becomes dirty. Additionally, additional heads can be purchased so that you are never required to wait for a head to become clean. Additionally, a couple of cleaning cloths made of microfiber are included in this package. Because the handle can pivot, it is much simpler to manoeuvre in and around the various bathroom fixtures.
You will want to make sure that you use a product that is able to cut through soap scum as well as lotion residue when cleaning the tiles. Products that contain citrous are not only effective but also smell wonderful while you are using them. Apply it with a spray, wait a few moments for it to settle, and then clean it up. When wiping up a particularly sticky area, dampening your rag with hot water before wiping it will help further dissolve any scum or residue that may be present.
We hope that this article was helpful in answering your questions regarding the tiles that should go under your bathroom vanity. If you still have questions regarding bathrooms, please let us know. Or perhaps you are looking for some ideas to inspire the redesign of your bathroom.
It is totally up to you to decide. However, if you keep the toilet in its current location, you will have to perform additional labour when you tile the area around it because you will need to cut the tiles to the appropriate shape around the base of the toilet. Because the majority of toilet bases are oval shaped and have unparalleled curves, tiling expertise is required in order to achieve a nice fit.
Conclusion
Many of the fixtures and fittings you buy for your bathroom remodel will need to be professionally installed. For your convenience, we have compiled a list of frequently asked questions along with answers provided by experts in the field. The toilet is an obstruction that must be worked around when tiling a bathroom. It is not necessary to remove the toilet from the room in order to lay down new linoleum or ceramic tile. More time and effort from more people may be required to finish the job if you do this.
The toilet can be removed by the homeowner or a plumbing service. The bottoms of most toilets are round or otherwise irregular in shape. It will be much more difficult to remove or replace the bathroom if you don't remove the toilet before installing the new flooring. You can give your bathroom a more traditional look by placing the toilet a few inches higher than the other fixtures. In this installation, the cistern is mounted on the wall above the bowl.
The benefits include not requiring any extra room on the ground, and keeping up a stunning visual impression at all times. If you remove the vanity from the bathroom before tiling the floor, you will have more room to work. Removing a vanity can cut down on the amount of tile and backer board trimming required when working around a vanity. After tiling the space beneath the vanity, extra sealing will be necessary. Tiling the Walls and Floors Near a New Toilet.
Cut off the water. Flush the water from the bowl and then turn off the water supply to the toilet. Take off the wax ring and clean the bowl. The space between the tiles and the vanity can be sealed using bathroom caulk. Be sure the floor is dry and clean before laying tile on it.
You'll need tile cutters to trim the tiles so they snugly fit around the retaining ring. The thickness of the tile will determine if you need longer retaining bolts. It's best to wait until the plumbing rough-in is complete before installing ceramic tile so that you don't have to drill through it. Having soaps and lotions spilt on them causes the tiles to get a filmy appearance. When the mop head gets dirty, you can take it off and wash it.
This set comes with two microfiber cleaning cloths, perfect for wiping down your new microfiber couch. The ability of the handle to rotate makes it much less of a hassle to work around the various fittings in a bathroom.
Content Summary
- In order to successfully tile your bathroom, you will need to plan for the placement of the toilet.
- You have the option to consult with industry professionals regarding the remodelling of your bathroom.
- It is necessary to secure the tile to the floor underneath the fixture in order to instal it correctly around the toilet.
- People often ask if the toilet needs to be taken out before a new bathroom floor can be put in.
- In this article, we'll examine the myriad factors that make it a bad idea to lay new flooring near an existing restroom.
- It can be difficult to remove the toilet before installing new flooring.
- Now that you know how to get your floor ready for the installation, you should probably start thinking about the kind of toilet you want to put in there.
- One of two configurations are possible when using a toilet that is "back to wall":OR Combined with a furniture unit that contains the concealed cistern and is positioned against a false wall with the cistern concealed behind it Positioned against a false wall with the cistern concealed behind itIn either case, it is an extremely modern way to maintain the clean appearance of your toilet while also coordinating flawlessly with the design of the rest of your bathroom.
- In most cases, additional sealing is required after tiling the area around the vanity.
- Turn off the toilet's water supply and flush the water in the bowl.
- If you don't like tile underneath, you'll spend less money on the tile, but you'll spend more money on labour to make the cuts to ensure a seamless fit up the bottom of the cabinets if you don't like tile underneath.
- To avoid having to drill through ceramic tile, you will want to finish all of your plumbing rough-in work before beginning the installation of ceramic tile.
- However, the tiles around your outdated vanity look awful and should be replaced.
- This kind of microfiber mop performs exceptionally well on tile floors.
- The head of the mop can be removed so that it can be washed when it becomes dirty.
- Additionally, a couple of cleaning cloths made of microfiber are included in this package.
- We hope that this article was helpful in answering your questions regarding the tiles that should go under your bathroom vanity.
- However, if you keep the toilet in its current location, you will have to perform additional labour when you tile the area around it because you will need to cut the tiles to the appropriate shape around the base of the toilet.
Tiles Floor FAQs
The three toughest tiles are granite, ceramic, and porcelain with porcelain winning hands down as the toughest. However, porcelain can be hard to work with when installing, so it's possible you'll have uneven cuts in some sections.
The bathroom fitters are unanimous—if you're looking for a high quality finish, with a better seal against water damage, then always tile the floor first.
The three toughest tiles are granite, ceramic, and porcelain with porcelain winning hands down as the toughest. However, porcelain can be hard to work with when installing, so it's possible you'll have uneven cuts in some sections.
Grout doesn't last forever. You can expect a lifespan between eight and sixteen years. Its lifespan will vary depending on how you treat your shower. Odds are, you have no idea when your grout was installed.
How long after installation do you need to wait before using the area grouted? The installation can be walked on at 24 hours. Grout mixed with Grout Boost needs to cure for 10 days after installation before exposing it to water from mopping, showers, rain, etc.