

All of us are intrigued by the possibility of transforming our current surroundings by adding bricks. After all, nobody wants to live in a rundown home that lacks character.
We'd love to have a home that's the envy of the block so we can throw the best neighbourhood parties and entertain our loved ones.
When it comes down to it, none of us is all that enthused about the idea of tackling a DIY house project on our own and reaping the advantages of a spotless home on the inside and out. You can get help from Hitch Property Constructions in a wide range of service areas with their specialised selection of home renovations.
Especially in regards to the brick exterior, this is a 100% correct assessment.
One of the most high-maintenance elements of a brick exterior is the caulk that is used in the spaces between and around the bricks. If you are wondering about caulk but would rather not ask about it, allow us to refresh your memories.
To prevent dust and moisture from getting into the crevices between the bricks at the start of the building process, a sticky substance called caulk is applied with a gun.
It's probable that, at some point, you'll need to scrape that sticky gunk off the bricks of your home's façade.
Numerous basic home maintenance jobs, which we will not go into detail about, may have contributed to this, such as the caulk becoming cracked or the likelihood that you may wish to instal a window and hence need to remove some bricks.
Don't worry; we'll show you the safest, most efficient ways to peel external caulk off a brick one by one.
An Easy Guide to Caulk Removal
Taking off caulk from windows is a simple and quick process. It takes time and a little bit of effort, but in the end it's worth it. It's possible to remove caulk with minimal effort with only a few common tools.
- Knife for cutting putty with a lot of force. To begin, you'll need a way to remove the hardened caulk in huge pieces. This can be done using a putty knife or a flat-head screwdriver. To pry the caulking off from the seam, you'll need a tool with a bit of leverage that can scrape through the caulk line. Something with a sharp edge can be used for this purpose. When working on windows, putty knives are also useful for removing caulk that has dried and stuck to the glass. Scraping off caulking carefully and at an angle will remove it from the glass surface without damaging the surface.
- To clean, use a brush with wire bristles. To clean up the mess after using a putty knife, a wire bristle brush works wonders. Use the wire brush to thoroughly clean the area. It is imperative that all the little particles be removed so that the new caulking may be applied to clean seams.
- Get out the heat gun! Remove stubborn or hardened caulk with the help of a heat gun. Some caulk, despite your best efforts with the putty knife, simply refuses to come off the wall. The heat gun softens the caulk, making it easier to scrape off the wall. Caulking might melt if heated for too long, so be careful. When it melts, it sticks very strongly to surfaces such as brick, siding, or windows.
Each of these items is readily available at your local hardware shop or any location of a national home improvement retailer selling the aforementioned merchandise in bulk. Once you've finished cleaning the entire surface, you may wipe it off with a damp rag or sponge. First, make sure the area is clean and free of any food remnants that could contaminate the fresh caulk.
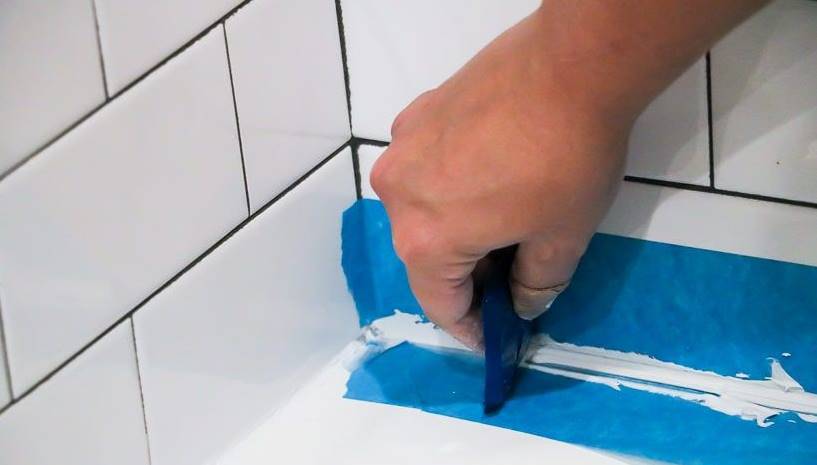
Removing Old Caulk From Brick
Caulking residue can leave behind an unattractive and seemingly insurmountable mess.
Dried caulk that has clung to brick can be very challenging to remove. Caulk's resistance to common cleaning agents means that removing it from brick will take some extra time and work, but it can be done.
For a comprehensive selection of caulking services in the Melbourne area, check out Hitch Property Constructions.
Step 1
The caulk can be reshaped like putty if you warm it with a heat gun. Carefully scrape the caulk from the brick without damaging the surface. Keep scraping to remove any leftover caulk. You should never direct a heat gun towards a window.
Step 2
Use a paint scraper or a strong wire brush to remove the old caulk, but be careful to wear gloves at all times.
Step 3
To facilitate removal with a wire brush, mineral spirits can be used to soften the caulk. Use as much mineral spirits as you think you'll need to dissolve the old caulk. Assure yourself that you are doing this in a well-ventilated space.
Removing Caulk From Carpet
In order to stop water from dripping behind tile and porcelain fixtures, caulk is commonly used to seal the joints.
As an alternative to tape, caulk can be used to keep things together. Caulk can easily be spilt on flooring in the kitchen or bathroom.
If you can't get the caulk out of the carpet before it dries, you'll have to get it out later. Once the caulk has dried, it can be removed from the carpet or rug in a manner not unlike to that of removing glue.
Step 1
Spray some WD-40 on the caulk to lessen its hold on the carpet fibres. Please wait at least 15 minutes before applying more WD-40.
Step 2
Get rid of the caulk in the seam with a razor. If at all possible, you should avoid slicing into the carpet's fibres.
Step 3
Spray more WD-40 over the carpet to re-wet the stubborn bits of caulk. Wait fifteen more minutes and then scrape off the leftover caulk.
Step 4
When you're done with the WD-40, grab a sponge, spray some carpet cleaner into it, and scrub the area. Any remaining product should be removed because it poses a risk to both animals and children. The afflicted area should be treated with carpet cleaner and given time to soak before walking on it.
Step 5
Cleaning the area using a cloth that has been wet with water and then letting it air dry is the best method.
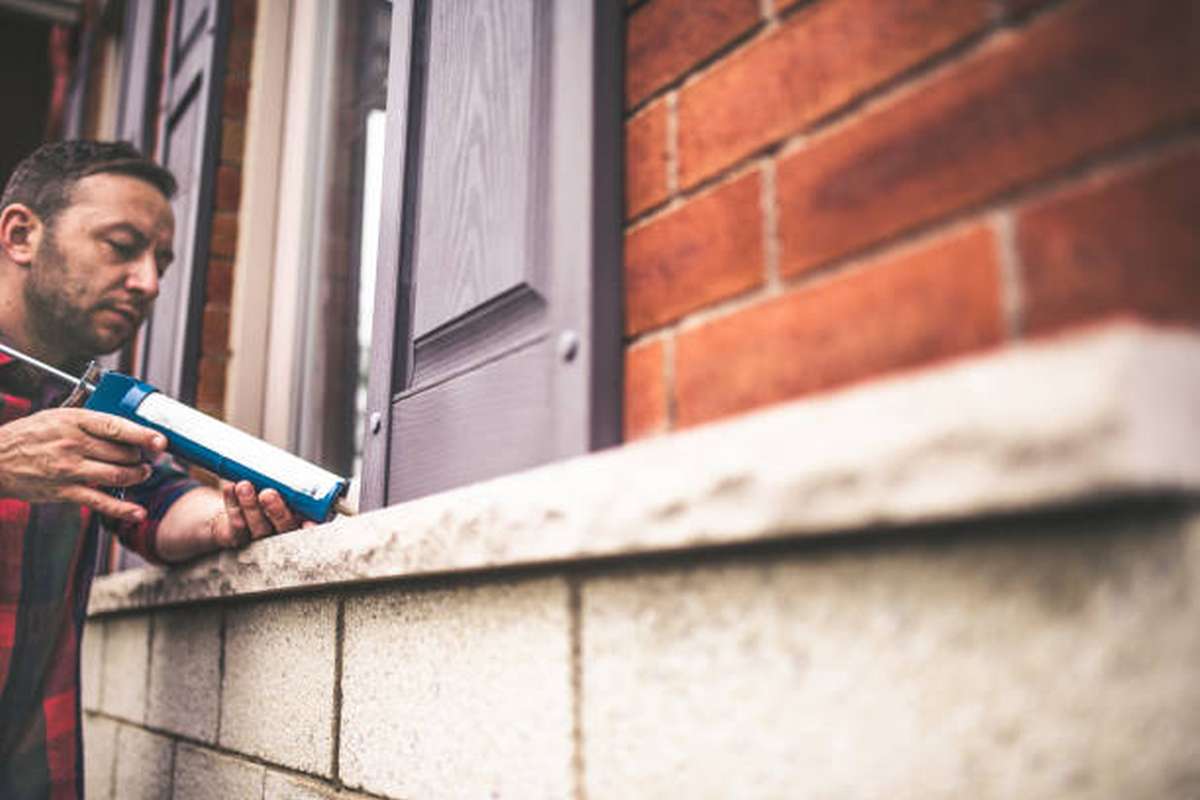
How to Remove the Caulking From the Windows
To seal the gap between the window's frame and the house's exterior, caulking is typically used. Caulk is essential to protecting windows from the elements and preventing draughts and entry of tiny objects.
Caulking is only one of the many small things that help keep a house together. There are many different kinds of materials used in its construction, but silicone, rubber, latex, and polyurethane make up the bulk of the parts.
Like the majority of things, caulking will eventually wear out. Depending on its position, caulk can be severely compromised.
Caulking on the outside of a house shields it from the sun, rain, and snow every day.
With enough time, it will harden, crack, and eventually break. There are sometimes significant, obvious holes in the caulk lines of older homes because large portions of the caulk have hardened and fallen out. It's simple to identify these voids. Homeowners should pay special attention to the caulking around their windows since it is easily dislodged when the windows are opened and closed.
A house's exterior is only as strong as its weakest link. Insects, water, and even small rodents can get in through cracks in the caulking around a window.
Homeowners should check the caulk around their windows often and replace it if it has worn out.
Caulking windows to make them look finished (on the inside and outside) and to prevent draughts and leaks is a frequent DIY project.
If it is not executed properly, though, it can come across as sloppy and amateurish. Caulk isn't supposed to stand out, but rather blend in with the window's frame.
Caulking, also known as "running a bead," is a method that needs some skill because it involves applying a long, narrow strip throughout the entirety of the seam.
To learn how to caulk like an expert, keep reading.
Those who choose to remove caulk on their own can benefit from a few commercial products that can make the process easier. These items can be useful in completing the task.
Numerous commercially available compounds are capable of dissolving and removing caulk and other sealants in a short amount of time.
Homeowners may rest assured that they will not damage the siding or brickwork while using them on their windows.
In order to get the best results, caulk removal products should be used on caulk that has become embedded within seams. The basic actions outlined in this article should always be followed as a starting point.
After that, use the caulk remover to get rid of any remnants in the cracks between the glass or other surfaces.
These removers are typically applied to the caulk and permitted to set for a few minutes to soften the caulk before removal.
After that, use the putty knife to scrape away the softened caulk, and then wash the area off with soap and water to remove any remaining residue. To get rid of all the caulk, you'll need to do this several times.
Keep in mind that you can't re-caulk the windows until they've dried completely. Caulking a wet area will result in sloppy, unsightly seams because the caulk will spread more easily.
When homeowners or professionals apply new caulk before the surface is dry, they often face the hassle of having to remove it and start over.
How to Know When It’s Time for New Caulking
Replacement of caulk is not difficult to foresee. The homeowners should check the framing and sash of the windows for rot.
Visible cracks in caulk lines are a telltale sign that the caulk has deteriorated and has to be removed and replaced with new caulk.
It can also be replaced if there is severe cracking along the caulk seams, as in the previous case. It's time for new caulk if it looks like it might fall out or water might get inside.
In addition, some people opt to replace their caulking because they aren't fond of the way dried-out, old caulk looks.
What to Consider When Buying Adhesive Remover
If you want to buy adhesive remover, you may pick from a wide variety of products. Despite the fact that all of these solutions can loosen and remove adhesive, choosing the proper one can be difficult due to the sheer number of them.
The adhesive remover's composition explains the variations. Hitch Property Constructions provides a variety of services, including caulking.
Citrus
Some of the greener forms of adhesive remover were made with citric acid. There isn't much of a stench to them, and you can wash off the majority of them with just water.
Because of this, they are not only simple to employ, but also call for a very small quantity of ingredients.
Look for the ingredient citric on food and drink labels the next time you go shopping. Citrus adhesive remover is sold in two forms: a paste and a liquid.
The paste will stay put as you pry items from vertical surfaces, so pick that up instead of the liquid. When dealing with flat areas like floors, either choice will do the trick.
Soy-Based
When removing old glue, a soy-based adhesive remover is the most successful in softening it so that it can be rinsed away with water.
After applying the glue, it may take a few minutes for it to become malleable enough to use. After the adhesive has had time to harden, you can peel it off.
Solvent-Based
The solvent-based adhesive remover is the more dangerous of the two, despite the fact that the other items are water-based and can be cleaned up with water.
Stronger odour means the product should be used only in well-ventilated places to cut down on the amount of noxious vapours released.
Wearing protective gear, such as gloves and a mask that covers your mouth and nose, is recommended when working with this adhesive remover. Products based on solvents are notoriously combustible, therefore take extra precautions to ensure that the space is fireproofed.
However, in comparison to water-based alternatives, these adhesive removers tend to be more effective and quick-acting. In some cases, this could prove helpful.
Instructions
Before making a purchase, make sure you read the adhesive remover's directions thoroughly. Some will perform noticeably better than others on selected substrates.
Depending on the individual, specific circumstances are required. Read the directions thoroughly before using the adhesive remover in high wind or direct sunshine. Some products can evaporate when exposed to both of these conditions.
The correct time to apply the adhesive remover should be noted and adhered to at all times. Adhesive can solidify, so don't leave it for too long before going back to it.
Specialised Adhesive Removers
Adhesive removers come in a wide variety of types, but some are designed specifically to remove specific materials. Usually you'll hear the phrase "several varieties of this" in a hardware store. If you're in need of a nonstandard item, you can find a variety of resources online to help you accomplish your project, and you can read reviews written by previous buyers to learn more about the product's quality and usefulness.
You'll be able to order it from your favourite hardware store or place an online purchase. At Hitch Property Constructions, we provide a wide range of home maintenance services.
Conclusion
Caulk removal from windows is a fast and easy task. However, the time and work put in are well worth it in the end. We'll demonstrate the quickest and most secure methods for removing exterior caulk from individual bricks. Caulking residue can be unsightly and difficult to clean up. Use a heat gun to melt away caulk that is particularly resistant to removal.
In order to remove the caulk from the wall, a heat gun is used to soften it. Caulk could melt if exposed to high temperatures for too long. Caulk is typically used to seal the space between tiles and porcelain fixtures to prevent water leaks. The bathroom and kitchen are two places where caulk is most likely to be spilt. Caulk, after dry, can be removed from carpeting in a manner analogous to that of removing glue.
Caulking windows is a common do-it-yourself project that adds a polished look and helps keep out draughts and moisture. Caulking, or "running a bead," requires some skill because it entails applying a long, narrow strip along the entirety of the seam. Remember that you can't recaulk the windows until the caulk has dried completely. Wet areas are not ideal for caulking because the caulk will spread and create ugly gaps. If your caulking is old and dried out, you may want to consider replacing it.
There is a large variety of adhesive removers, some of which are optimised for the removal of specific substrates. Before using the adhesive remover in strong wind or intense sunlight, be sure to read the directions carefully. Avoid leaving adhesive alone for too long, as doing so can cause it to harden.
Content Summary
- One of the most high-maintenance elements of a brick exterior is the caulk that is used in the spaces between and around the bricks.
- It's probable that, at some point, you'll need to scrape that sticky gunk off the bricks of your home's façade.
- Don't worry; we'll show you the safest, most efficient ways to peel external caulk off a brick one by one.
- Taking off caulk from windows is a simple and quick process.
- Use the wire brush to thoroughly clean the area.
- Remove stubborn or hardened caulk with the help of a heat gun.
- Spray some WD-40 on the caulk to lessen its hold on the carpet fibres.
- Homeowners should check the caulk around their windows often and replace it if it has worn out.
- To learn how to caulk like an expert, keep reading.
- Keep in mind that you can't re-caulk the windows until they've dried completely.
- Visible cracks in caulk lines are a telltale sign that the caulk has deteriorated and has to be removed and replaced with new caulk.
- Some of the greener forms of adhesive remover were made with citric acid.
- The solvent-based adhesive remover is the more dangerous of the two, despite the fact that the other items are water-based and can be cleaned up with water.
- Before making a purchase, make sure you read the adhesive remover's directions thoroughly.
- Read the directions thoroughly before using the adhesive remover in high wind or direct sunshine.
Home Repair FAQs
Not removing the old sealant before applying a new one
Over time, sealant tends to harden and detach from the surface on which it was applied. If you don't remove the old sealant properly, water and moisture can seep in. Use a putty knife or sharp tool to remove it, then clean the surface with 99% rubbing alcohol.
You can caulk over caulk. Just make sure that the old caulk is dry, clean, and oil and dust-free. Also, apply the new caulk to extend beyond the old, onto clean caulk-free surfaces to which it can adhere. However, for best results, you should remove the old caulk before applying a new caulk.
It has a life span of 10 to 20 years but may need to be replaced after 2 or 3 years. Rubberized thermoplastic caulking is popular because it is very inexpensive, available in small quantities, and comes in many colors. However, the life span of a thermoplastic window sealant is very short.
Use a knife to cut up the caulk. If any residue remains, use an alcohol-drenched rag to soften the remainder and remove with a sharp putty knife. If your interior windows are in the kitchen or the bathroom, you should try pulling out the caulk with fine pliers.
Caulking can and will shrink as it dries. Sometimes a second layer of caulk is required and will produce a neater surface instead of overfilling a crack with caulk. If caulking is to be applied over existing and previous sealed joints, removing old caulk is essential and need to be done carefully.