

Caulking has many vital uses for painters, including covering up imperfections in the siding or walls of a building before they are painted.
Caulking is useful for both weatherproofing and airtightness since it seals gaps and cracks. However, if the caulking isn't done properly, it will not only degrade the overall quality of the project, but it may also negate the objective of what you've been working so hard to accomplish.
In case you were wondering, yes, there is a need for caulking experts in the building sector.
Several companies specialise in caulking, sealing, and waterproofing buildings; most of their customers are builders of commercial constructions.
However, the point is that caulking is a skill that may even be regarded an art form, and it is well worth your time to learn how the professionals do it if you want your next painting project to turn out perfect.
Caulking is used to seal the seams between unlike or similar materials. Preparedness is the backbone of a good paint job, and painters know it.
Inexperienced painters often don't bother to acquire caulking or patching as a trade skill. It's understandable that a beginner painter would be eager to get started using a brush and roller right away.
The worth of the prep work typically isn't apparent until years later, when the painting project's longevity is evaluated. Hitch Property Constructions provides home painting services to help you paint the home of your dreams.
How is Caulking Used in Interior and Exterior
Caulking is used to seal the seams between unlike or similar materials. Preparedness is the backbone of a good paint job, and painters know it.
Inexperienced painters often don't bother to acquire caulking or patching as a trade skill. It's understandable that a beginner painter would be eager to get started using a brush and roller right away.
The worth of the prep work typically isn't apparent until years later, when the painting project's longevity is evaluated.
Outside caulking protects a home from water damage by sealing cracks and gaps. Wetness is dangerous to the house because it promotes the growth of mould and decay in wood and other building materials.
Within a house, caulking is utilised around the shower and tub inclosures, as well as the kitchen and bathroom worktops.
This caulk effectively closes cracks and crevices to keep moisture out, and it also has mold-preventative ingredients.
To a large extent, silicone is used on a regular basis in domestic settings, especially in the kitchen and the bathroom. Silicone has better adherence than other materials and allows for greater flexibility. Since silicone cannot be painted, it is rarely employed in the painting industry.
Caulking is used indoors to improve a building's visual appeal. Caulking the seams between wood panels in a newly constructed building is a prerequisite to painting.
In the same way, you should seal any gaps between the drywall and wood, especially along the baseboards and casings.
Caulking protects the building from weather and draughts, saving the homeowner money in both ways.
Quality of Caulking Materials
Variety of quality caulking materials
You can find caulk in a wide variety of materials and finishes, such as polyurethane, stretchy varieties, acrylic, Silicone, latex, paintable, and many more.
Different caulks are optimised for certain tasks. The better ones usually allow for as much as 25 percent of leeway, perhaps more. The construction materials used in Toronto endure phases of expansion and contraction due to the city's extreme temperature swings.
The more pliable the caulk is, the better it can cover the cracks and gaps between materials that are subject to movement. There are watertight sealants, and there are also those that can withstand brief submersion.
Interior caulking products cannot be evaluated exclusively on the basis of their pliability. Besides being paintable and watertight, sealants for interior painting must be easy to apply and work with.
Quick-drying and curing materials can assist the contractor get the job done faster when time is of the essence.
If we disregard all other differences, the more expensive products are the best option. Every producer provides several tiers, some of which are categorised by the number of years they are predicted to last.
The 25-year grade is superior to the 15-year grade, but you shouldn't expect it to endure that long.
Types Of Caulking
Let's speak about the "why" and the significance of picking the right caulking material for your project before we get into the "how" of this post.
You can classify caulking materials into adhesives and sealants.
Adhesives are precisely what their name implies: they are used to adhere two different surfaces together.
This is a simple concept to grasp, and while there are many different types of adhesives, each of which arguably deserves an explanation article of its own, we will focus on sealants for the purposes of this discussion.
Cracks, gaps, and joints can be sealed off from water and air by using sealants to fill in the spaces.
They also make the final paint job look more professional and smooth. There are many different kinds of sealants, each one designed for a particular task.
Latex Caulk or Acrylic Latex Caulk (Also known as "painter's caulk")
Since it is the most accessible type of caulking, it is also the type most people use. It's cheap, versatile (you can paint it!) and widely available (you can find it just about anywhere), and it's easy to maintain (simply use soap and water to clean it): in short, it's perfect for just about any project.
I think the manufacturer is merely trying to be funny by including a 20- or 25-year warranty on the label. Check out our Melbourne caulking services here.
The problem is that it is used way too often and, to be very honest, is not a very good sealer. There is no discernible difference in performance between a $0.89 tube of caulk and a $5.00 tube of caulk, regardless of price.
However, you will likely see this when some time has gone and the caulking has aged.
Low-quality caulks tend to shrink and separate from the seam as they dry, making a good job of sealing it impossible.
However, even if they pass the initial shrink test, most will lose their flexibility as they age, causing them to crack and pull apart from the joint.
The expansion and contraction of materials (such siding, trim, windows, and doors) due to seasonal and environmental changes make latex caulks a poor choice for exterior use.
Acrylic Latex Caulk *Plus Silicone
In interior painting projects, this is the bare minimum of sealant that should be used in places like the seams between baseboards, door and window casings, and crown moulding and the walls. As such, it is the applicable benchmark as well.
Despite this, we do not recommend it for use in any applications that involve the outdoors.
While it shares many of the benefits of latex and acrylic-latex caulks, the inclusion of silicone makes it more adaptable and increases its longevity.
The price is almost identical to that of regular latex or acrylic-latex, but it comes with a longer label warranty (usually 35 years), for what that's worth. The guarantee applies to any problems with the product that occurred during production.
Premium Sealants, High-Performance Sealants, Indoor/Outdoor Sealants, Window & Door Sealants, etc.
As you progress up the performance ladder, you'll find a plethora of high-performance sealant options.
Among these caulks are acrylic-latex caulks that have been modified with particular ingredients to increase their pliability, elastomeric caulks, and polyurethane caulks (usually considered the top-of-the-line).
They go by many names and serve many functions, but their relative costs reveal their relative quality.
Pay special attention to the label when selecting a high-quality sealant to guarantee that it will perform for your intended purpose.
Depending on your needs, the sealant's label should tell you whether it is waterproof, paintable, indoor/outdoor, quick-drying, designed for only horizontal or vertical use, may be applied in a larger temperature range, etc.
Investing in high-performance sealants is highly recommended if you want to avoid the cost and hassle of having to recaulk the entire job.
Because of their varying rates of expansion and contraction, they are particularly excellent for sealing joints on differing surfaces, although remaining much more flexible than their cheaper equivalents (i.e. wood-to-brick, wood-to-metal, etc.)
High-quality products like these aren't perfect because they can be trickier to use than similar options.
Many of them are more difficult to clean up without using a solvent like mineral spirits (or paint thinner) or another type of cleaner.
In spite of this, if you can put up with a little extra pain the first time around in order to save me from having to redo my work, it will be well worth your effort.
100% Silicone
This kind of product is most frequently used in the kitchen (typically around the sink and backsplash), the bathroom (typically around the bathtub, shower, sink, and toilet), and the exterior (typically around the doors and windows). Practically anyplace a watertight and moldproof seal is needed.
Many items marketed as "kitchen & bath sealant" or "window & door sealer" are, in reality, comprised entirely of silicone.
A sealer made of 100% silicone is impervious to water, keeps off mildew and mould, and retains its pliability eternally.
The only real limitations of silicone are that it usually can't be painted and usually needs to be cleaned with mineral spirits. Any hardware store ought to have mineral spirits available for purchase.
Getting Ready To Work
We've covered the fundamental caulking options you'll face at the hardware store; now it's time to put that knowledge to work!
Tools & supplies you'll need:
- An effective caulking gun (if you're going to pay the additional money, you might as well get one with a dripless design so the tube doesn't keep dripping even after you let up on the trigger). You should also consider investing in a weapon with a high thrust ratio. The reduced force required to pull the trigger means that your hand won't experience fatigue or discomfort. When working with a thick substance like urethane sealant or when you have a lot of caulking to do, this is really helpful.
- Soaking a cotton cloth in water and placing it in a small bucket.
- On the roll, paper towels
First, you'll need to open the caulk tube and squeeze some of the caulk into the gun's chamber. An effective caulking gun will have a cutter on the side of the device, usually close to the trigger, for severing the end of the tube of caulk. To use, insert the tip of your caulk tube into the hole, and pull the trigger on this cutter.
One of the best kept secrets that will make your work much simpler is cutting the end of the tube at an acute angle, so that it is as close as possible to the very tip of the tube.
The smaller the hole, the more precise you'll be able to regulate the caulking's flow, and the more easily you'll be able to steer it in the desired direction thanks to the angle.
Puncture the seal of the newly opened tube by inserting the puncture wire from the underside of the barrel into the hole you just made on your end of the tube.
A piercing wire that swings out from the underside of the barrel is a handy feature, although some firearms lack this and require an alternative approach.
If your firearm doesn't have a piercing wire, a long nail or wire from a coat hanger can work just as well. Just pop the tube into the pistol, and you're good to go.
Use a Good Caulking Gun for Professional Results
Our sealants are applied with special instruments known as caulking guns. There are two primary sizes to choose from: the massive industrial size, and the more manageable standard size.
Inexpensive caulking guns are readily available. If you go to a big box retailer, you can find a high-quality option for under $20.
High-quality firearms not only make the task easier, but also yield more impressive and expert outcomes. The truly valuable ones are easy in operation and maintenance.
They let the operator to exert uniform force on the tube and to prevent the liquid's progress before a mess is made. Several of them boast about being dripless, and they do an excellent job.
A cheaper pistol will be harder to use and even more difficult to control the flow of. As a result, a lot of caulk is wasted, the job looks sloppy, and no one is happy.
A high-quality caulking gun is a worthwhile addition to any painter's toolkit because of its inexpensive cost and long lifespan.
Whenever possible, use caulking that is absolutely smooth and free of any bumps or textures. The trim profiles shouldn't be caulked.
- Assert that all surfaces have been prepped properly by washing, scraping, priming, patching, and sanding as needed. Surfaces should be free of debris such as dust, grime, paint chips, and loose caulking. Caulking around the edges of the surfaces must also be secure. (Be cautious of getting slivers in your skin.)
- Any spaces larger than 3/8 inch (10 mm) in depth or 3/8 inch (7 mm) in width should be filled with backing material (6 mm).
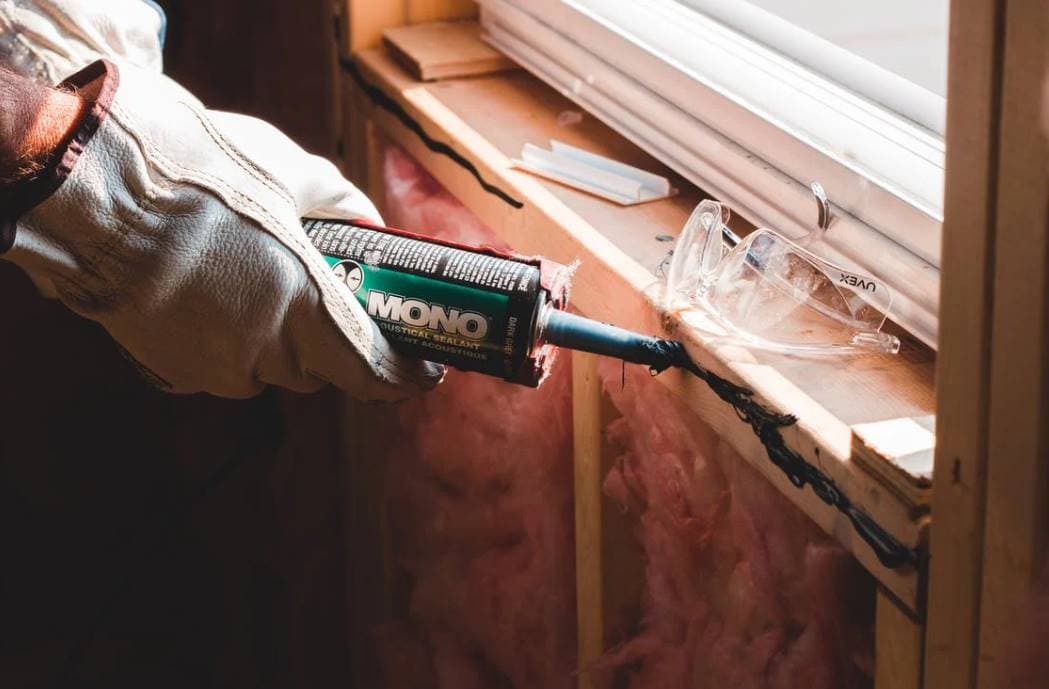
- The caulking gun is loaded with a tube of caulk that is inserted into the gun and the trigger is pulled back until the plunger is pressed firmly against the base of the tube. The nozzle tip of the caulk tube should be snipped at an angle of 30 degrees to 45 degrees to get the required caulk bead thickness. Take care to avoid making it too big. The nozzle's inner seal can be pierced if absolutely necessary.
- Carefully insert the caulk tube's nozzle into the joint. Caulk should be kept flowing into the joint by pressing the flat, open side of the nozzle tip on the surface of the joint or the substrate.
- Squeeze the trigger of the caulking gun while moving it in a straight line along the joint to pull a bead of caulk through the gap. Simply releasing the trigger will stop the beads from shooting out of the joint.
- The caulk bead can be made smooth with a damp finger, cloth, sponge, or caulk smoothing tool. The caulk needs room to bridge and attach to the two surfaces, so give it some. A clean cloth or a pitcher of water can be used to remove any extra substance from your finger.
- Molding corners, etc., can have buildup that needs to be removed. A fingertip or a thin towel can be used for this purpose.
- It's important to wait until the caulk has dried and cured as per the manufacturer's instructions before painting.
- When painting too quickly, the surface may break or change colour.
How To Maintain Caulk Gun
Tips for Keeping Your Caulk Gun in Good Working Order If you want your caulk gun to keep running well in the future, appropriate maintenance is a must.
Take a close look at the weapon to see whether it shows any indications of damage or wear. Inspect it for damage, such as chips or cracks. Look for symptoms of minor damage to be sure it won't be too difficult to fix.
When you're done using caulk for a project, scrape off the excess. This will prevent caulk from building up, which, without this precaution, would harden and make the instrument impossible to use.
One of the most crucial things to remember is to clean it after each use. Carefully removing the tube and cleaning the gun properly is necessary to prevent the buildup of dirt and caulk, both of which will hinder the gun's ability to fulfil its intended job.
You can scrub it with a brush or wipe it down with a wet rag. You must also take care to scrub the handle thoroughly. After you've completed washing it, your next step is to check that it's totally dry.
You also need to know how to load and unload the weapon safely. If you want to know how to operate it properly, look at the handbook it came with.
Are you planning any major renovations? Check out HP Constructions Melbourne's extensive range of home renovations.
If you're going to use caulking, make sure you get the right-sized tube. It is not a good idea to try to fit more gear into the rifle at the same time. Be sure that it is out of the reach of any minors as well.
Applying high-quality oil will make using the ratchet easier. It will also help keep the gun from being clogged up.
The caulking gun will have a longer useful life if it is kept in a cool, dry place when not in use.
If you want to be extra cautious, you could also keep the tube in a safe place. You should fill any holes you find in the caulk before it hardens.
Conclusion
Caulking's ability to fill in crevices and cracks makes it an effective weatherproofing and airtightness measure. Professional painters know that preparation is the key to a successful paint job. To ensure that your next painting job is a success, it is important to study the techniques used by experts. Before a new building can be painted, the joints between its wood panels must be caulked. There are many caulks that perform better in specific situations.
Caulk's pliability determines how well it seals joints that may open and close with time and temperature changes. Most people choose latex caulk because it is inexpensive and easy to find. Because of their tendency to shrink and pull away from the seam as they dry, low-quality caulks are not suitable for effectively sealing seams. As people get older, they become less pliable and more prone to cracking and separation at the joint. Several high-efficiency sealant choices are at your disposal.
Choosing a high-quality sealant requires careful attention to the label. 100% silicone is watertight, mold- and mildew-proof, and supple for all time. Numerous window and door sealing products are actually made entirely of silicone despite the misleading labelling. A quality caulking gun will contain a cutter that allows you to quickly and easily sever the end of the caulk tube. Due to the low effort required per push, your hand will not tyre.
The enormous industrial size and the more manageable standard size are the two basic options. Any painter would benefit from purchasing a high-quality caulking gun. You should only use caulking that has no bumps or textures. Say that you've washed, scraped, primed, patched, and sanded all the surfaces that need it. Snip a 30 to 45 degree angle into the caulk tube's nozzle tip.
Caulk needs space to spread across and adhere to the two surfaces. If absolutely necessary, the inner seal of the nozzle can be broken. Check the weapon over carefully for signs of damage or wear. Verify that the damage isn't too severe to repair, such as chips or cracks. To avoid grime and caulk accumulation, the tube must be removed and the gun cleaned thoroughly.
Content Summary
- In case you were wondering, yes, there is a need for caulking experts in the building sector.
- Preparedness is the backbone of a good paint job, and painters know it.
- Let's speak about the "why" and the significance of picking the right caulking material for your project before we get into the "how" of this post.
- While it shares many of the benefits of latex and acrylic-latex caulks, the inclusion of silicone makes it more adaptable and increases its longevity.
- As you progress up the performance ladder, you'll find a plethora of high-performance sealant options.
- Pay special attention to the label when selecting a high-quality sealant to guarantee that it will perform for your intended purpose.
- Investing in high-performance sealants is highly recommended if you want to avoid the cost and hassle of having to recaulk the entire job.
- An effective caulking gun will have a cutter on the side of the device, usually close to the trigger, for severing the end of the tube of caulk.
- To use, insert the tip of your caulk tube into the hole, and pull the trigger on this cutter.
- The truly valuable ones are easy in operation and maintenance.
- A cheaper pistol will be harder to use and even more difficult to control the flow of.
- A high-quality caulking gun is a worthwhile addition to any painter's toolkit because of its inexpensive cost and long lifespan.
- Caulking around the edges of the surfaces must also be secure.
- Carefully insert the caulk tube's nozzle into the joint.
- Squeeze the trigger of the caulking gun while moving it in a straight line along the joint to pull a bead of caulk through the gap.
- If you want your caulk gun to keep running well in the future, appropriate maintenance is a must.
- The caulking gun will have a longer useful life if it is kept in a cool, dry place when not in use.
Home Repair FAQs
You also need to cut the tip of the caulk tube so the hole at the end of the tube is no bigger than 1/8 inch. The goal is to lay down a bead of caulk that is just enough to fill the gap, allowing no excess to be removed.
Gorilla silicone sealant remains flexible during its entire life, so it won't crack or split during the normal movement that buildings generally experience. The silicone surface is resistant to mold and mildew, and it keeps its clean, white finish (but remember that 100 percent silicone cannot be painted).
What are common uses for silicone caulk? Silicone sealants can be used to bond many common materials, including plastic, metal, glass, and ceramic.
Caulking has been around since ancient times, and it is even referred to in the Bible. It is the use of a bonding material to create a watertight and airtight seal. Caulking compounds are flexible and waterproof, and used to seal cracks, joints or seams.
Caulking can and will shrink as it dries. Sometimes a second layer of caulk is required and will produce a neater surface instead of overfilling a crack with caulk. If caulking is to be applied over existing and previous sealed joints, removing old caulk is essential and need to be done carefully.