
Do you agree that tiling is simple? There are a great number of people who hold this opinion, and the evidence of their efforts can be found written on the walls and floors of restrooms all over the country. The tiling is crooked, poorly cut, has enormous grout lines, and generally looks like the work of an amateur. There is nothing more unappealing than gleaming new bathroom accessories that have been affixed to an unevenly tiled wall. A comprehensive instruction manual for tiling a bathroom is provided for your use.
When you have made an investment in high-quality bathroom products like a new bathtub, sink, or toilet, the last thing you want to do is mess up the tiling job by installing it poorly. It is common knowledge that remodelling a bathroom can be a costly endeavour over the long term, and that it is essential to select a bathroom set that complements the design of the room. If you do a poor job tiling your bathroom, however, you will never be able to see the returns that you desire from this investment. This is because you will have let down your bathroom.
A lot of people don't feel very confident about their abilities when it comes to doing things on their own, like tiling a bathroom. On the other hand, mastering the art of tiling a bathroom doesn't have to be difficult! It shouldn't be too difficult to figure out how to tile a bathroom as long as you give yourself plenty of time to get ready and practise your technique. You don't need to have a lot of experience, but our helpful hints and suggestions will ensure that you stay on the right path.
If you are interested in becoming an expert tiler, all you have to do is follow the instructions in our step-by-step guide to tiling a bathroom. You always have the option of employing a local tiler to help speed up the process if you don't have enough time to dedicate to this project on your own.
Looking for the best tiling renovations? Look no further! Hitch Property Constructions has you covered.
Which Bathroom Tiles Are Right for Me?
When you are tiling a bathroom, the first thing you need to keep in mind is that the size of the room should have a significant impact on many of the decisions you make. Large bathroom tiles are not a good choice for smaller bathrooms because they have the potential to make the space appear even smaller. Tiles of a medium or small size are a far superior choice for use in bathrooms with limited space.
The majority of tiles found in bathrooms are made of porcelain or ceramic. They are typically options for tiling that are more cost-effective. There are positive aspects to either choice you make. The durability of porcelain tiles is typically superior to that of ceramic tiles. On the other hand, this characteristic can make them more expensive than ceramic tiles in some cases. It is not necessary to select tiles that are able to withstand a significant amount of wear if you are going to be tiling a wall in a bathroom. Therefore, you are free to select the type of tile that best suits your preferences.
In addition, tiles made of natural stone are gaining popularity for use in bathrooms. It is recommended that you steer clear of using these tiles if you are new to the process of tiling a bathroom and are in the learning stages. When compared to their counterparts made of ceramic or porcelain, tiles made of stone or limestone have a much higher porosity and absorption rate.
In essence, tiles made of natural stone will need to be sealed significantly more frequently. Because they require a significant amount of maintenance, you should probably avoid them if you are inexperienced in DIY projects or if you have a limited amount of spare time.
Before beginning to tile a bathroom, you should always order some sample tiles first. When you are looking at tiles in a bathroom store or on the internet, it can be difficult to visualise the size of a tile. However, taking the tiles home and living with them for a while will increase your certainty that you've selected the appropriate colour and size for the space.
How Many Tiles Do I Need?
When it comes to successfully tiling a bathroom, having the appropriate number of tiles is essential. Before you start working on the bathroom, it is essential to take accurate measurements of the space. Checking the tile's measurements more than once may seem like an unnecessary step, but it's important to be sure. Whether you use centimetres or inches to measure the size of your bathroom, you need to make sure that the tiles you select are the right size for the space.
You can find a number of different calculators online that will be able to assist you in determining the precise quantity of tiles that will be required to cover your bathroom. Always keep in mind that you need to verify that your measurements are accurate before moving forwards with the project.
Always purchase at least ten percent more tiles than you believe you will require, especially when working with flooring. When you tile a bathroom, it is almost inevitable that some of the tiles will get broken or wasted. When you're in the middle of your project, having extra tiles on hand will save you a lot of time and money because you won't have to go out and buy more tiles. This will be a very useful asset.
How to Tile a Floor
Planning & preparation
- This is where you'll begin; from here, we'll go over the fundamentals of tiling a floor, including how to measure and cut tiles to fit around obstacles, how to grout and seal them, and so on.
- Preparation is the key to getting a long-lasting, high-quality finish. Before you start laying tiles, you need to make sure the floor is stable, level, clean, and dry.
- Depending on the type of flooring you have in mind for the bathroom, a subfloor installation may be necessary. We used exterior-grade plywood for the subfloor because it was the most cost-effective option.
- Keep in mind that you'll need to prime the plywood and any other porous surfaces and wait for them to dry before you can start laying tiles.
- Certain surfaces, such as a flat concrete floor, can have tiles installed directly onto them without first requiring a subfloor, provided the old adhesive is removed.
- Always refer to the manufacturer's guidelines when deciding which tile adhesive to use and where to apply it for the best results. When tiling onto plywood, a flexible adhesive is typically chosen, while a strong, high-bond adhesive is typically chosen when tiling onto concrete floors.
- In order to calculate how many boxes of tiles are needed, first calculate the square footage of the area in metres (length times width equals square footage in meters). For safety's sake, it's suggested you tack on an extra 10%.
- To ensure an exact colour match, it's best to buy tiles from the same production run (the batch number is printed on the box).
- Few rooms are truly square, so it's important to visualise how your tiles will fit together before you start laying them.
- Filling in tiny cracks is time-consuming and can make things look sloppy, so you should try to avoid doing it if you can.
- Because of the high cost of tile installation, it is essential that the tiles be inspected thoroughly before they are put into place.
Do it right
- If you're using tile adhesive or grout from a previous project, make sure you check the expiration date and throw it away if it's past its prime. Some grouts and adhesives dry in a matter of minutes, so plan accordingly when determining the amount to mix.
- While sealing may be necessary for natural stone tiles, it is not necessary for most ceramic or glazed porcelain varieties. Limestone, marble, and slate are just a few examples of the natural stones that can be used to make tiles. In most cases, sealing should be performed after the tiles have been laid but before the grout has been applied. Check the manufacturer's instructions to learn if your tiles need sealing, how often you should seal them, and what kind of sealant to use.
- After the tiles have been laid in a new bathroom, the fixtures like the toilet, sink pedestal, and bathtub (if it is a freestanding design) can be put in place. Following this sequence is how you should set things up.
- There should always be some extra tiles on hand in case any of the current ones ever need to be replaced.
- Mould-proof grout is ideal for use in a bathroom. Don't forget that grout comes in a wide range of colors; choose the one that complements the tiles you've picked out.
- Tiles should not be walked on or stepped on until the adhesive has dried completely.
Staying safe
- Use a pipe and cable detector to make sure there are no buried pipes or cables in the areas you plan to drill.
- Always wear safety goggles and gloves when cutting tiles, and always pick up any shards that fall to the ground.
- Dust masks and safety glasses should be worn whenever a powder adhesive is being mixed.
- Since you will be spending a lot of time on your knees in this position, protective knee pads are optional but highly recommended.
Aftercare
- Using a spray made for protecting grout can increase the longevity of your tiles and make cleaning the grout much simpler. Read the manufacturer's guidelines before using the product.
- Use only cleaning products that are safe for the tile's material when cleaning, as doing otherwise could result in irreparable damage.
How to Tile a Bathroom Wall
To help you determine where you need to set out your tiles:
- Create a gauging stick as your first step.
- Take a piece of lumber and place it horizontally on the ground.
- Mark the spot on the timber where the edge of the tile meets, having first positioned it so that it is flush with one of the ends of the stick.
Measure up for lengths of tiles
Mark the location where this tile comes to an end and then place another tile in line with the first one, keeping them spaced apart with tile spacers. Repeat the process as many times as necessary until all of the space on the stick has been utilised. Remove any extra pieces of wood with a saw, then fashion another stick to fit the width of the tiles.
Find the centre point of the wall.
Take a measurement of the width of the first wall that you will tile. Cut this in half to locate the exact middle of the wall. Before locating and marking the horizontal centre line, use a spirit level and a pencil to draw a vertical line starting at this point and going all the way up to the ceiling.
Use gauging stick
By holding the gauging stick up to the lines that you've drawn on the wall, you can determine where the tile installation will begin and end. Make appropriate cuts after the tile locations have been marked out. In order to achieve a satisfactory finish, you should strive to make cuts that are even at the wall's extremes (top and bottom; left and right).
Prop up the first tile
Your first tile should be raised slightly off the floor using spacers so that there is room for grout in between it and the floor. Mark the tile for the first cut by pressing it up against the line on your wall while you do so. Place the tile in the cutter, making sure the blade is perfectly aligned with the line that was marked on the tile.
How to use a tile cutter
To make the cut:
- Make a single pass over the front of the tile with the scoring wheel while dragging the blade along the front of the tile.
- Just the right amount of pressure is needed to score along the surface.
- After positioning the wheel so that it is centred on the tile, pull down on the handle to cause the tile to snap along the line you scored.
Spread tile adhesive
Utilizing a notched trowel, spread adhesive on the reverse side of the tile that was cut. Place the tile where you want it on the wall and apply pressure in a gentle but steady manner. Because the wall in this project has cuts around a bathtub, we decided to instal the tiles in a single column vertically with spacers in between each individual tile.
Mark tile locations on the wall
Take your spirit level and, at the point where the top of the tiles is higher than the top of the bath, draw a horizontal line above the tub. Any tiles that are laid below this line will need to have their sizes adjusted accordingly.
Mark for shaped tile cutting
It is possible that you will need to make a shaped cut at the point where the tiles meet the lip of the bathtub. Put the tile up for sale to the area in the market that corresponds to the position of the lip and the depth of the cut. Make the template for the cut by extending these guides with a square and using it as a guide.
Use a diamond wheel cutter.
While protecting your eyes and hands with safety goggles and gloves, cut the tile with the tile saw along both sides of the lip that you previously marked out. Continue to make cuts through the section with a distance of 10 mm between each one, and then use tile cutters to remove these "fingers." Smooth out any rough spots with a file.
Check out our range of tiling renovations Melbourne at Hitch Property Constructions.
Use tile spacers
After spreading adhesive onto the back of the cut tile and pressing it into position, using spacers along the top of the bath to make room for the sealant, you can finish the installation. Finish up by trimming the remaining tiles to size and affixing them to the wall along the top of the bathtub, using spacers once more.
Spread adhesive on the wall
Now that the intricate cuts have been completed, you are free to apply the adhesive directly to the wall. Take on an area no larger than one square metre at a time. Place the tiles carefully, making sure to use spacers in both the horizontal and vertical directions. Finish building the wall, making any necessary cuts in the tiles along the perimeter.
Use a spirit level
Using a spirit level, continue along the line of the lowest cut on the wall that is adjacent to you. Follow steps 3 and 4, then cut and instal the first tile along the top of the bath, positioning its centre along the vertical line. Remove the remaining tiles by cutting them.
Bed in the wall trims
Wall trims are essential at the exterior corners of a building, both for reasons of safety and aesthetics. Trim to the desired length, apply a very thin line of adhesive to the wall, and then insert the trim into the adhesive. Remove any leftover adhesive and wipe down the surface of the trim with a damp sponge before you continue.
Cut around the soil pipe.
Mark the height and width of the cut you need to make on a square tile in order to cut tiles around pipes. First, you'll need to outline the shape with your square, and then you can draw a circle with an offcut of the pipe. Make a mark in the middle, drill a hole with the tile hole cutter, and smooth any rough edges with the file.
Prepare grout
After the walls have been tiled, wait until they are completely dry before grouting. Put some water in a clean bucket, add the grout one piece at a time, and mix it until it has the consistency of cream cheese. Leave for five minutes before using.
Apply the grout
Make a scoop of grout using your trowel, and place it on a squeegee. Apply to the surface of the tiles, making sure to work the mixture thoroughly into the joints to eliminate any air pockets. After you have finished painting one section of the wall, wipe away any excess and continue.
Wipe off excess grout
After allowing it to sit for 10 to 15 minutes, wipe it down with a damp sponge while holding it flat to prevent the grout from being pulled out of the joints. Always make sure to rinse the sponge. After finishing the wall, wait for five minutes and then start again. After waiting for thirty to sixty minutes, polish using a soft, dry cloth.
Top tips
- When it comes to the corners of a bathroom, you should never use grout but instead always use flexible sanitary silicone. In a setting that has a lot of moisture, the junction point between two walls might experience differential movement, which could lead to the grout breaking apart.
- Before beginning the process of sealing around a bathtub, make sure the tub is at least half full of water. After applying the silicone and allowing it to cure for the night, you should clean out the bath the following morning. In the future, the silicone will no longer break apart as a result of this.
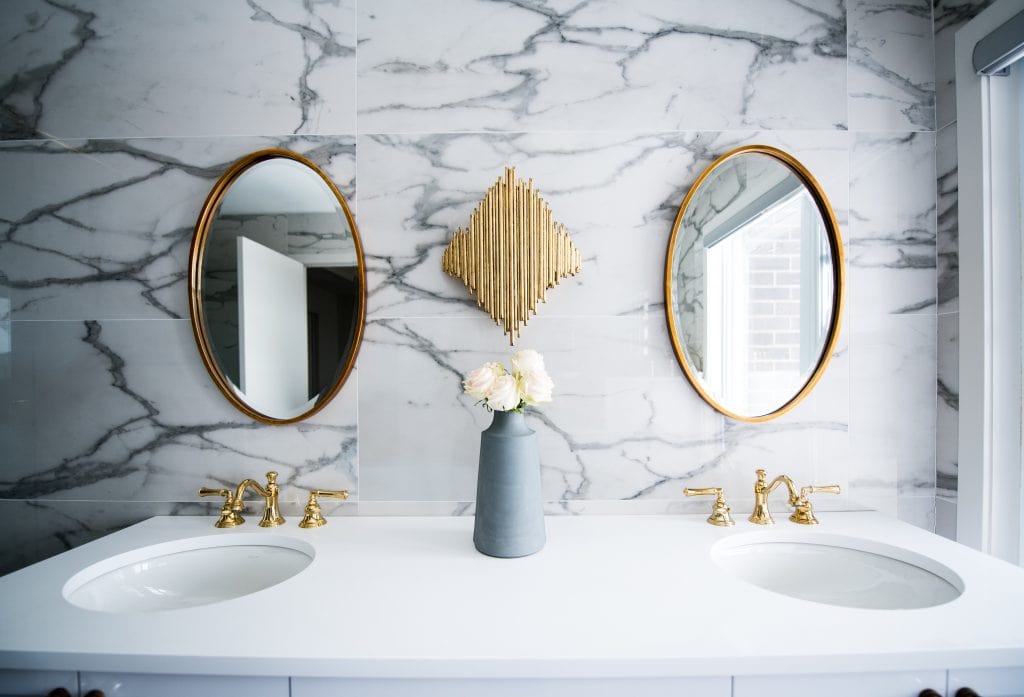
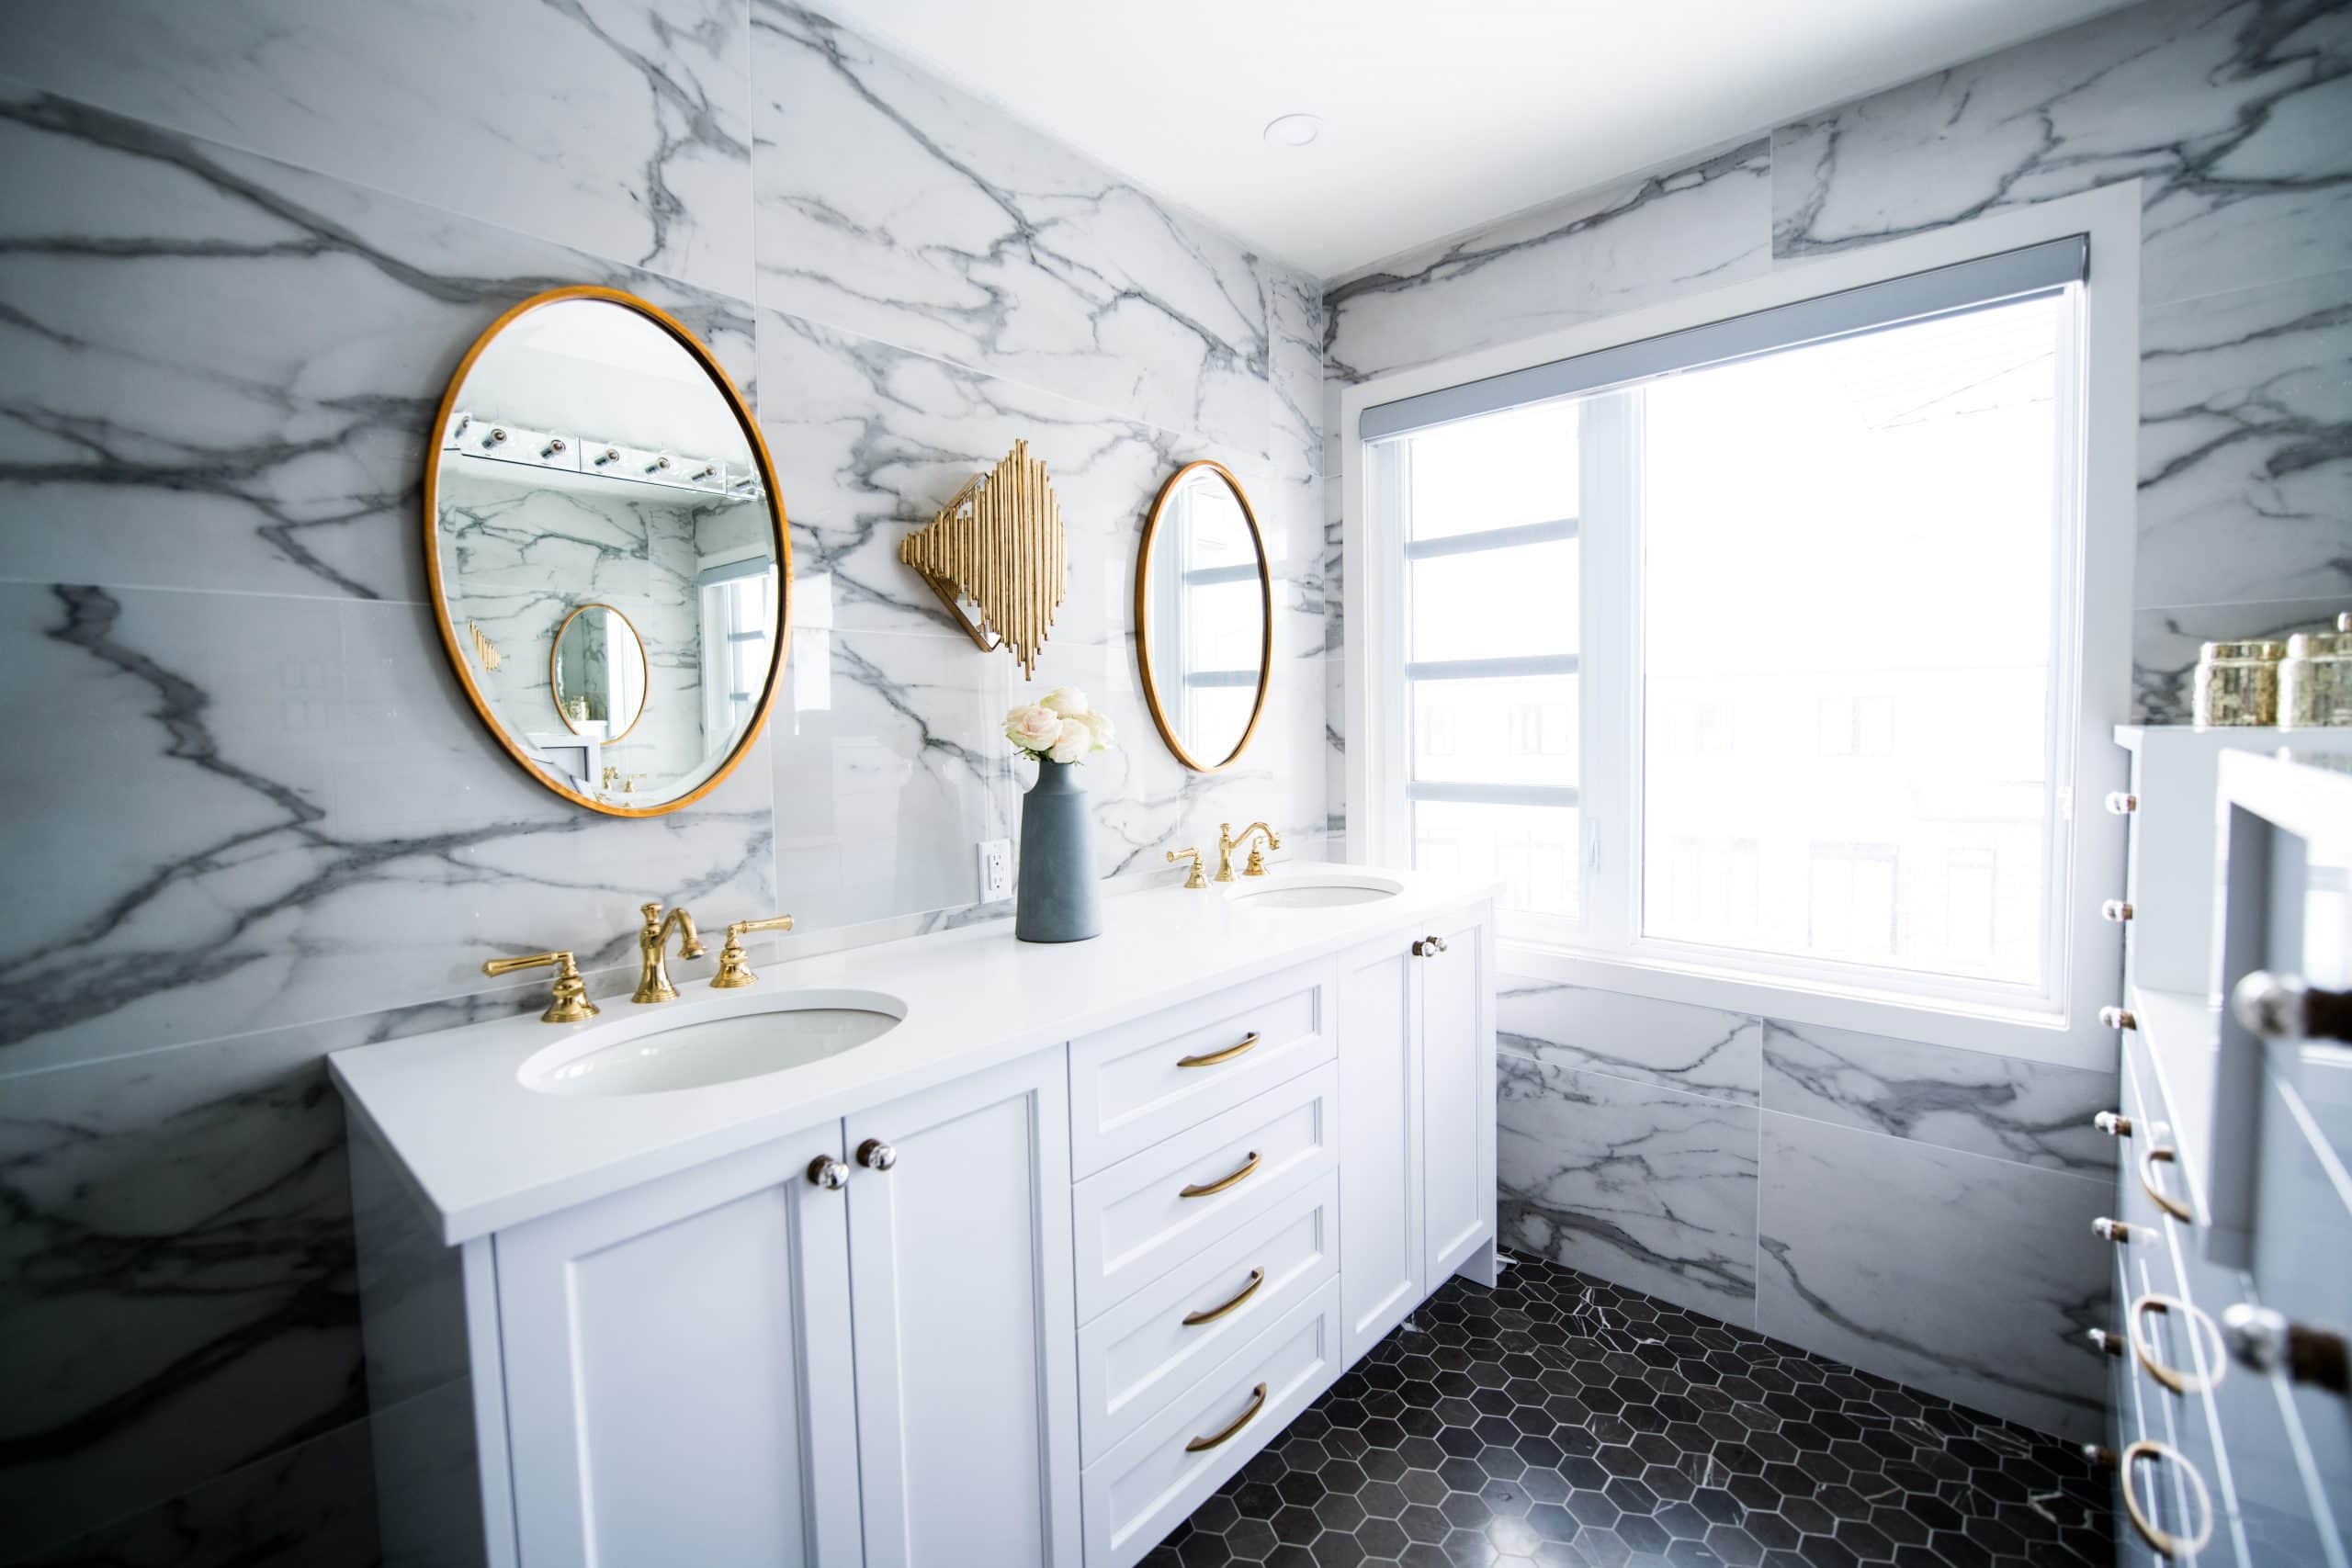
Choosing Bathroom Tiles
The use of tiles in a bathroom is an easy and functional way to impart personality into the space.
Your choice of materials will be determined in part by the aesthetic you want to achieve, as well as your budget and the amount of maintenance required.
Essential Steps to Get Great Results
Step 1. Cleaning and Preparation
In order to begin tiling a bathroom wall, you must first ensure that the surface you will be working on has been adequately prepared. It is essential that the wall you are working with is clean, smooth, and recently prepared. In that case, the finished product won't have the same level of professionalism that you'd expect. Repairing any mistakes made after tiling a bathroom can also add up to a significant financial burden. Therefore, it would be beneficial to spend some time on this aspect of the project.
If you plan on tiling a bathroom, you will need to make certain that the wall in the bathroom is stable, waterproof, and smooth before you begin. It is simple to accomplish this by using a tile backer board (the section titled "Apply a tile backer board" will provide additional information on how to do this). However, in order to proceed with this step, you will first need to prepare the wall that will be underneath it.
It is necessary to begin by removing any old adhesive, paint, or wallpaper that may be present. If you are unsure about how or where to begin the process of removing paint or wallpaper, we have two guides that break down the process for you that you can reference.
In order to get rid of any grime and grease that may be on the walls, it will be necessary to wash them with a TSP solution. Both your tile backer board and your tiles will have a better chance of adhering to the wall if you do this.
Step 2. Use a Gauge Stick to Lay Your Tiles Properly
Creating your own gauge stick is one of the simplest and least expensive ways to lay your tiles in the correct manner. A gauge stick is nothing more than a length of wood upon which the dimensions of the tiles you intend to use have been marked. After that, you can use this stick to properly space out your tiles on the floor.
Take a tile and position it so that it is horizontally aligned against the gauge stick. Put a mark on the stick to indicate where the tile ends. Continue doing this the whole way along with the stick until there is no more room. Remember to leave some space in between each tile so that you can use a tile spacer.
After you have finished this step, turn the tile so that it is standing vertically, and then perform the process again using a new stick. At this point, you should have a gauge stick that measures the length of your tiles in addition to a gauge stick that measures the width of your tiles.
Step 3. Apply a Tile Backer Board
It is possible to tile onto a surface that is both sturdy and dry by first installing tile backer board, which is a method that is highly recommended. Utilizing a tile backer board in your bathroom can provide you with a variety of advantageous results.
The tile backer board can be used with a wide variety of tiles, which is the first thing to point out about it. Tiles can be adhered to tile backer board regardless of the material that they are made of because this process is universal. Tile backer board offers a completely waterproof surface, making it an excellent choice for use in areas such as showers and bathtubs. This is perhaps the feature that is most important.
Consequently, if you are looking for a simple method to prepare the surface before you begin tiling, installing tile backer board on your wall is an excellent choice that you should consider. You should be able to find it in any of the better home improvement stores. Before going out to buy tile backer board, make sure that you have meticulously measured the area so that you can determine how much of it you will need to purchase. Always ensure that the boards are applied in accordance with the instructions that were provided.
Step 4. Map out Your Guidelines
To locate the exact location of the wall's centre, run a spirit level horizontally and then vertically along the length of the wall. This line will prove to be helpful because it can serve as a guide point, and it will ensure that your tiles have the appropriate appearance.
Now is the time to use that gauge stick that you made earlier in the process. Put the stick along the length of the line that you drew on the wall at one end of the section that you are working on. Directly onto the wall, draw the guidelines that should be followed along with the gauge stick that was used. When it comes time to apply the tiles to the wall, this will serve as a map for you to follow.
In most cases, you will need to cut a larger tile down to size in order to fit it into the edges and corners of the wall. It is important to make a marking on your wall using these smaller end tiles so that you will know what size to cut down your larger tiles to.
Step 5. Start Laying the Tiles on the Wall
Beginning the process of tiling your floor by working your way up from the bottom is the simplest way to get started. After positioning a tile flush against the wall, add a tile spacer to the side of it. Because of this, you will be able to leave space for the adhesive that will be used to secure your tiles to the wall.
Unless the tile is an end tile that completes the row, you shouldn't need to cut it. Tile cutters make it simple to reduce the size of a tile to the required dimensions. Simply use the pencil to mark the spot where the tile needs to be cut. If you want to avoid staining the tile, draw on the back of the tile rather than the front. If you take the time to ensure that the pencil mark and the tile cutter are properly aligned, you should have successful results.
Carry out these steps across the length of the wall. Tiling should be done in rows, so once you have completed laying out the tiles for the bottom row, you should begin applying adhesive to the tiles in that row. After that, you can start putting down the second row.
Step 6. Mix and Apply Your Waterproof Tile Adhesive
Learning how to use the adhesive properly is one of the most essential steps in mastering the art of tiling a bathroom. It is essential that you select an adhesive that is waterproof if you are going to be using it in a bathroom. In the event that this does not occur, there will be problems with mould in the future.
Because many modern tile adhesives already come pre-mixed, you won't have to spend a lot of time manually mixing the adhesive on your own. You will need to use a notched trowel in order to apply the waterproof adhesive properly. Doing so will guarantee that the adhesive is distributed uniformly across the entire area.
When you are installing tiles in the area around a bathtub or shower, apply the adhesive directly onto the tiles that will be placed there. You will have increased control as a result of this, and you will also be able to cut the tiles as required. You can apply the adhesive directly onto the wall if the area of the wall you are working with is relatively open and there are no obstructions in the way.
Step 7. Add Wall Trim to External Corners
When you are tiling a bathroom, you may come across an external corner. In this case, you will need to instal wall trims. It shouldn't be too difficult to put them in, thank goodness. The most important advantage of installing wall trim is that it will provide you with a finish that appears more high-quality and professional.
To make a length of wall trim suitable for your bathroom, all you have to do is take it and cut it down to the appropriate dimensions using a pair of scissors. You can secure it to the wall by utilising the same adhesive that you did when you attached the tiles to the wall.
Make sure the trim is firmly embedded in the wet adhesive by using a scraper. Check to see that the trim is properly fastened along the entirety of its length. Using a scraper to apply pressure while pressing the trim into the adhesive is one method for accomplishing this.
It is possible for a wall trim to be very effective in preventing leaks, particularly when it is installed in close proximity to showers and bathtubs.
Step 8. Mix Your Grout
The proper application of sealant and waterproofing is of the utmost significance in the humid environment of a bathroom. It is recommended that you set aside some time to ensure that the grout is mixed and applied in the correct manner.
Before you can begin to grout your tiles, you will first need to ensure that the tile adhesive has had sufficient time to dry completely. The process of mixing plaster and grout are very comparable to one another. Put your grout in a container that is clean and dry. After that, pour in some water. Begin to mix the grout, and if additional water is required, add it now.
In the same way that you can tell when plaster is ready to use, you will know that the mixture is ready to use when it becomes creamy and thick. Before you begin to apply it to the wall, you should wait a few minutes.
We have a wide range of Melbourne tiling renovations to help you choose in creating a new design for your house.
Step 9. Apply the Grout
You will need to make use of a trowel and a sponge in order to apply the grout. Put some grout on the sponge using a trowel, and then start working it into the wall so that it is directly on the tiles. Pay particular attention to working the grout into the spaces that are exposed between each tile.
Take your time and focus on completing one particular section of the work at a time. If you find that you have applied too much grout to a particular area, you can remove any excess with a clean sponge.
Before you can continue working properly, you will need to wait for the grout to fully embed itself into the surface. This should take about a quarter of an hour to complete on average. After the allotted time has passed, wipe the surface with a sponge once more. After that, you should proceed to add additional grout to the region that you just worked on. After you have finished the second round of grouting, you should let the area dry.
However, there is a great deal more information that will not be presented in this article. For example, I will not discuss borders, diagonal arrangements, shower floors, countertops, marble, or primitive tiles. You might also run into issues with rooms that are severely crooked or with rot that is hidden from view. Tile shops can be a great resource to help you if you find yourself in need of assistance.
Conclusion
A detailed guide on how to tile a bathroom is at your disposal. The only thing worse than an unevenly tiled wall is a shiny new set of bathroom accessories that has been affixed to it. Following the steps outlined in our manual is all it takes to develop your tiling skills to a professional level. Bathrooms that are on the smaller side shouldn't have large tiles installed. Bathrooms that are cramped for space benefit greatly from the use of medium- or small-sized tiles.
Even though porcelain and ceramic tiles are the most common in bathrooms, you are welcome to use any material you like. When tiling a bathroom, it is crucial to have enough tiles for the job. Always get ten percent more tiles than you think you'll need. Before tiling the bathroom, ensure the floor is stable, level, clean, and dry. The secret to a professional result is in the prepping.
Before beginning tile installation, it's helpful to imagine how the pieces will fit together. When choosing tile adhesive, it is important to always follow the manufacturer's instructions. Tiling on plywood usually requires a flexible adhesive, while tiling on concrete calls for a strong, high-bond adhesive. First, you shouldn't step or walk on the tiles until the adhesive has dried.
Tutorial on tiling a bathroom and using a tile cutter. Use a spirit level to mark the wall where tiles will go, and draw a horizontal line above the tub to serve as a guide. To create the cutting template, simply extend the guides with a square. You should begin tiling the top of the bath by cutting the first tile to size and installing it so that its centre is aligned with the vertical line. You should use horizontal and vertical spacers when laying the tiles.
Complete the wall's construction by making any tile alterations along its outer edge. Let the grout dry thoroughly before touching the walls after tiling. You can make grout by combining water and grout in a clean bucket until it reaches the consistency of cream cheese. Please wait five minutes before using. Before you start tiling a bathroom wall, make sure it is solid, watertight, and smooth.
The first step is to take down any existing wallpaper, paint, or adhesive. If you want your floor tiles to look nice and even, use a gauge stick to determine the appropriate distance between them. The use of tile backer board ensures that tiling can be done on a solid, dry surface. Tile backer board is ideal for use in wet areas like bathrooms and kitchens because of its waterproof surface. Make sure the boards are installed per the manufacturer's guidelines at all times.
Usually, you'll need to trim a larger tile down to size so that it can fit into the wall's tighter confines, such as its edges and corners. Use the smaller tiles to make a marking on the wall so you know where to trim the larger tiles down to. The majority of today's tile adhesives are sold in ready-to-use forms. The adhesive doesn't require extensive mixing by hand. When installed in close proximity to water fixtures like showers and bathtubs, wall trim can be very effective at preventing leaks.
Plaster and grout are very similar to work with when mixed. Dedicate some time to making sure the grout is properly mixed and spread. When the grout reaches a creamy and thick consistency, it's ready to be used; if more water is needed, add it at this time. Using a clean sponge, you can remove any excess grout if you apply it. There could be hidden rot or severely crooked rooms that cause problems. If you ever find yourself in need of assistance, tile shops are a great place to turn to for guidance.
Content Summary
- A comprehensive instruction manual for tiling a bathroom is provided for your use.
- On the other hand, mastering the art of tiling a bathroom doesn't have to be difficult!
- Therefore, you are free to select the type of tile that best suits your preferences.
- When it comes to successfully tiling a bathroom, having the appropriate number of tiles is essential.
- Before you start working on the bathroom, it is essential to take accurate measurements of the space.
- Check the manufacturer's instructions to learn if your tiles need sealing, how often you should seal them, and what kind of sealant to use.
- To help you determine where you need to set out your tiles:Create a gauging stick as your first step.
- Find the centre point of the wall.
- Take a measurement of the width of the first wall that you will tile.
- Make appropriate cuts after the tile locations have been marked out.
- Finish up by trimming the remaining tiles to size and affixing them to the wall along the top of the bathtub, using spacers once more.
- Finish building the wall, making any necessary cuts in the tiles along the perimeter.
- Remove the remaining tiles by cutting them.
- Cut around the soil pipe.
- After the walls have been tiled, wait until they are completely dry before grouting.
- The use of tiles in a bathroom is an easy and functional way to impart personality into the space.
- Both your tile backer board and your tiles will have a better chance of adhering to the wall if you do this.
- It is possible to tile onto a surface that is both sturdy and dry by first installing tile backer board, which is a method that is highly recommended.
- Utilizing a tile backer board in your bathroom can provide you with a variety of advantageous results.
- Consequently, if you are looking for a simple method to prepare the surface before you begin tiling, installing tile backer board on your wall is an excellent choice that you should consider.
- Tiling should be done in rows, so once you have completed laying out the tiles for the bottom row, you should begin applying adhesive to the tiles in that row.
- When you are tiling a bathroom, you may come across an external corner.
- The process of mixing plaster and grout are very comparable to one another.
- Put your grout in a container that is clean and dry.
- You will need to make use of a trowel and a sponge in order to apply the grout.
- Pay particular attention to working the grout into the spaces that are exposed between each tile.
- Take your time and focus on completing one particular section of the work at a time.
- After you have finished the second round of grouting, you should let the area dry.
FAQs About Tiling
Stone and porcelain tiles are the best for the shower floor. Avoid glazed ceramic tiles in this spot, as they tend to be slippery. Also, remember that non-vitreous tiles are not suitable for the shower floor. Only impervious or vitreous tiles should be used in the shower area, as they are relatively more waterproof.
It's best to start from the middle of the wall and work outwards. When marking the wall with your tape measure and pencil, make sure you use your spirit level to ensure all of the markings are level. At the end of this, you should have the position of all your tiles marked out on your bathroom wall.
Tiling is a time-intensive DIY project. It's not hard but it requires a lot of steps. It's important that you lay the tiles evenly the first time because tiling is almost impossible to reverse if you make a mistake. You might be able to adjust some tiles slightly after they have set.
When water penetrates from tile joints, it leads to debonding of tiles and you certainly don't want that to happen. When you consider a grout there are different types of grouts which you must choose from. For instance, for areas where water is a concern, you must pick water-resistant tile grouts.
For flooring, Vitrified tiles are the best bet since they are durable and can withstand heavy traffic. For walls, you can choose either ceramic or porcelain tiles as they are non-porous or do not absorb stains.