
Plastering can be difficult if you want a flawless surface on your walls or ceilings. Avoiding common mistakes that can result in a less-than-perfect finish requires taking the time to properly prepare the surface and following the correct techniques.
Learn how to get a professional-looking plaster finish by reading this article's advice on everything from surface preparation to plaster mixing and application. Whether you're a novice or a seasoned plasterer, these pointers will help you get the job done right.
Why Is A Smooth Plaster Finish Important?
There are many benefits to having a flawless plaster finish. First, it's a must if you want your surface to look polished and expert.
Plaster with a rough or uneven finish can be unsightly and make further improvements, such as painting or wallpapering, more challenging.
A smooth finish, on the other hand, can improve the visual appeal of space by giving it a more elegant and sophisticated appearance.
A smooth plaster finish can increase the surface's longevity and add to its aesthetic value. However, plaster can easily crack or become damaged in areas where it was applied unevenly or with gaps.
A strong and resilient surface can be made with a smooth and even plaster, decreasing the likelihood of cracks and other problems.
A smooth plaster finish also has the added benefit of being easier to clean. It is less likely that dust, dirt, or other debris will become embedded in the plaster if applied smoothly.
This may facilitate cleaning and upkeep, extending the period between washings and the fresh, clean appearance they impart.
Lastly, a high-quality plaster finish can raise a building's market value. Achieving a smooth and equal plaster finish can assist in boosting the perceived value of your house, whether you're planning to sell your home or want to make some changes to your present living area.
You can get a higher selling price or easily find tenants if you do this.
Tips For Getting A Smooth And Even Plaster Finish
Plastering is a skill that requires practice, patience, and the proper tools to achieve flawless results. Plastering ceilings, walls, and other surfaces are challenging for even seasoned DIYers.
However, you can get a polished result if you know a few tricks. Here are some plastering tips that will help you get a nice, even finish.
Prepare The Surface
Ensure the area to be plastered is clean and dust-free before applying the plaster. Get rid of dirt and grime with a damp cloth. Before applying the plaster, check for and repair any imperfections.
Apply A Base Coat
The base coat of plaster must be applied before the finishing coat. This will aid in creating a flat, even surface for the plaster to adhere to. Make sure the undercoat has dried thoroughly before applying the top coat.
Use The Right Plaster
Many different materials, such as lime, cement, and gypsum, can be used to make plaster. Plasters have a variety of applications, so it is important to select the one best suited to the surface you will be applying it.
Mix The Plaster
Plaster needs to be mixed thoroughly after the right kind has been selected. Plaster bags usually come with instructions on how much of each ingredient to use in each batch.
Use The Proper Tools
It's important to use high-quality equipment to ensure a professional result. For example, a brush can be used to even out rough edges after applying the plaster with a hawk and trowel.
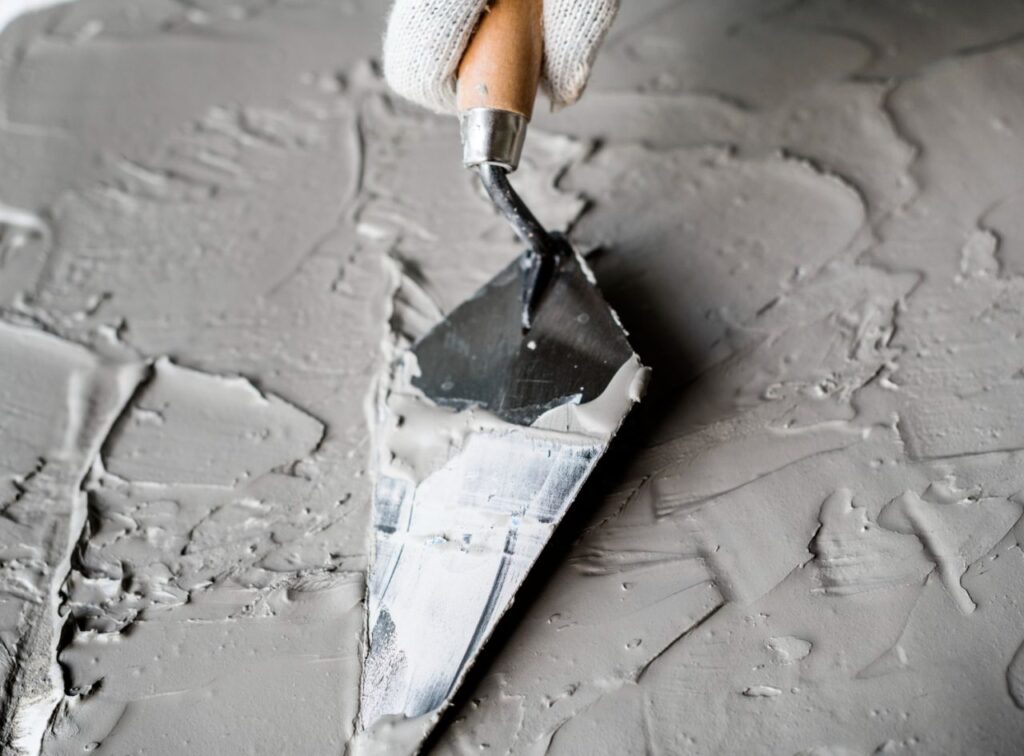
Apply The Plaster
Plaster should be applied using smooth, even strokes, as demonstrated in the images below. After applying it in a thin layer, use a trowel to smooth the plaster. Feathering the plaster's edges ensures a sleek appearance.
Allow Time For Drying
To sand the plaster successfully after it has dried, it must be allowed to dry completely. Plaster's drying time varies with both the material and the weather.
Sand The Plaster
The plaster must be allowed to dry completely before it can be sanded. Begin with a fine sandpaper grit and work up to a finer one. Use gentle, even strokes when sanding.
Use A Sealant
A sealant must be applied once the plaster has been sanded and smoothed out. This will provide a protective barrier against moisture and dirt and a hard, long-lasting coating for the plaster.
Most Common Plastering Mistakes
While there are only a few moving parts in plastering, a lot of things can go wrong. Nobody wants to finish a renovation only to find that they made the walls worse. If you want your walls to last, avoid making some of the most typical plastering mistakes.
Failure To Prepare The Surface Properly
Plastering should only be attempted on a surface that has been thoroughly cleaned and has no debris present. Inadequate surface preparation can cause an uneven or bumpy final product. Remove any loose paint or wallpaper from the surface, and sweep away any dust or dirt before beginning.
Improper Removal
Plaster removal is the initial phase of any plastering project. However, caution is advised. You could bring down the whole wall if the foundation is hazardous. Plastering over brick, for instance, might cause the bricks to break apart into large pieces when the plaster is removed.
The key is to proceed with caution.
First, make a small hole in the wall with a chisel, preferably near a corner, and look inside. If the plaster is easily peeling off, investigate the underlying material.
Proceed with the rest of the removal if you are confident the plaster is coming off cleanly and without damaging the underlying surface. If you don't find any problems, finish chiselling the wall as you started.
Incorrect Plaster Mixing
Plastering a wall requires a measured approach, as the consistency depends on how much water and plaster are mixed. Adding too much water or plaster can weaken the mix, making it brittle and prone to cracking or crumbling.
Be sure to mix the water and plaster thoroughly and use accurate measuring tools to get the right consistency.
Using Low-Cost Tools
You might think you'll save money by purchasing low-quality tools, but you'll spend more in the end. That is because a poor-quality result is guaranteed when using inexpensive tools.
You should get some good tools if you want a professional look when you plaster. That doesn't mean you have to go into debt; all you have to do is get your hands on high-quality goods from a reliable vendor. Your tools will perform better and last longer.
Over-Troweling The Plaster
Plaster is troweled when it needs to be smoothed out with a flat tool. When the plaster is troweled too much, it thins out and can crack in places. Therefore, trowel the plaster only as much as is required to get a smooth surface.
Failure To Allow The Plaster To Dry Properly
To paint or otherwise finish plaster, it must first dry and cure. The plaster may crack or bubble if you try to speed up the drying process. So before moving on to the next step, make sure the plaster has dried completely.
Failure To Clean Your Tools
It's tempting to put down your tools after a long day of plastering, relax with a cup of tea, and call it a day, only to find that you've left plaster all over your equipment.
You're going to have a major issue when you get back the next day. Plaster's hardened state may render your tools useless, and you'll need to scrape off twice as much material. Keep your tools tidy in between uses to avoid unnecessary hassle. They'll stay in better shape, and you can jump into your next session.
Using The Incorrect Type Of Material
When you start out doing home improvement projects, you might need to learn that there are different types of plaster, each with its strengths and weaknesses. Take your time with a DIY project after verifying the appropriate mixture; otherwise, you risk causing more harm than good.
Think about the moisture levels where the plaster will be used and whether or not it will be used for a decorative finish. Some factors that will decide the mix's composition are listed above.
Not Sanding The Surface
After the plaster has dried, sanding the surface is necessary for a smooth finish. Smaller smoothing out can prevent the surface from being uneven and rough. Smooth the plaster's surface with fine-grit sandpaper.
Ignoring The Environment
Weaker plaster and a longer drying time are possible consequences of working in a damp or humid environment. However, the plaster must dry properly, so ensure you're working in a dry, well-ventilated area.
Plastering Tools Will Be Needed
It's common knowledge that the right equipment makes all the difference when practising a specialised trade, such as plastering.
The best plastering tools are time-savers because they produce better results and can add a professional sheen to your work. Here at Gypsumtools, we've compiled a list of the top plastering tools that every professional in the field should have in their arsenal, including everything from trowels and snips to drills and saws.
Finishing Trowel
The finishing trowel is just as important as the pointing trowel for any plasterer. The plaster is spread more evenly and smoothed out with a wider, flatter blade, giving your surfaces a professional look. Since you will be using this tool frequently, purchasing one of the highest quality is prudent.
Trowels For The Inside And Outside Corners
The corner trowel is an essential tool for any skilled plasterer. Corner trowels make it easy and accurate to smooth out plaster in tight spaces like corners, which would otherwise be difficult to do with a standard trowel. Instead of fumbling around with a flat blade, inside and outside corner trowels will help you get the job done faster on the job site.
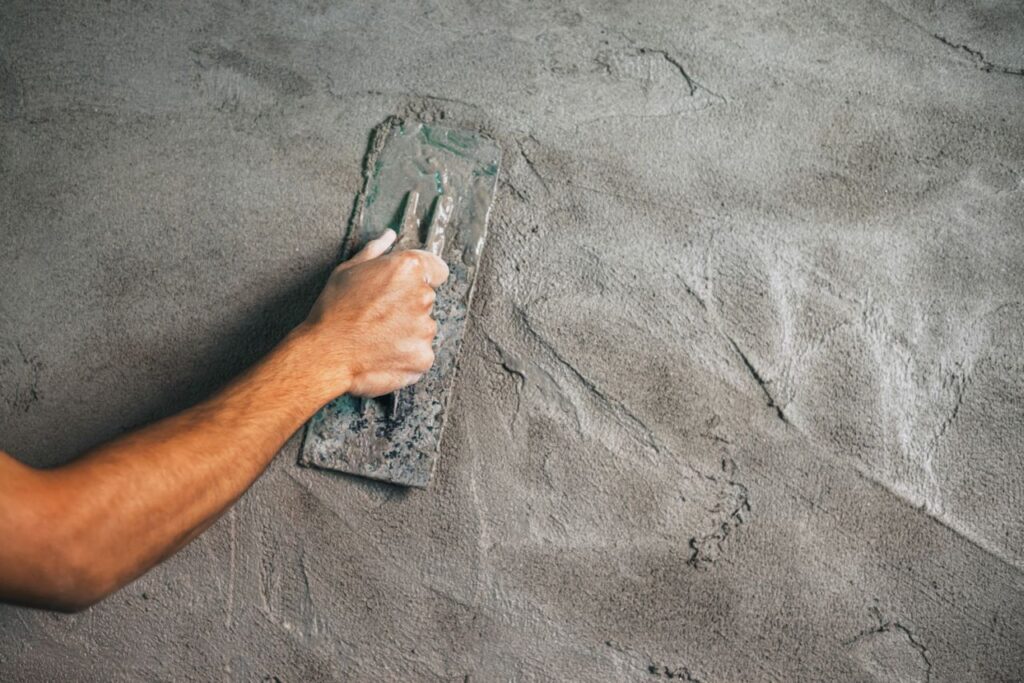
Plasterers Float
After applying the final coat of plaster to a wall or ceiling, you must smooth it out with a plasterer's float to ensure a professional look. Plasterers should always have this handy, as an uneven surface can be avoided by carefully smoothing down the top coat of plaster with a trowel.
Scarifier
To scratch away the render before applying the second layer, you'll need a scarifier, which is essentially a big metal comb. Scarifiers are essential for any plasterer because they allow you to comb lines into the render, strengthening the bond for the subsequent layer. Getting one of these is a must if you care about the look of your walls and ceilings.
Bucket Trowel
A bucket trowel is an indispensable tool for any plasterer. Using this implement to transfer the plaster from the mixing bucket to the plastering hawk is common practice. You'll need a sturdy bucket trowel as part of your toolkit to move the heavy plaster around. You can't do without it.
Hawk
You need to plaster correctly if you have a hawk. The hawk is the most important piece of equipment for any professional plasterer, as a portable surface for holding plaster while on the go. In addition, it facilitates the speedy and even distribution of plaster on ceilings and walls. A wide selection of plastering hawks is available; however, a smooth surface with rounded corners is preferable.
Mortar Stand
You might think this is unnecessary, but it's just another example of a no-brainer item that can improve productivity on the job. A mortar stand is an easily collapsible table designed to hold and make plastering materials and grout readily available. Again, always appreciate the power of the obvious methods!
Snips
A good pair of snips is an absolute must for modern plastering, as you will certainly need to trim and cut your beading. Ensure the snips you buy can easily snip through cold steel and stainless steel, two of the most common metals used for making beads. A pair of snips with a longer handle will give you more leverage, making short work of trimming up beading. Plasterers, like any other trade, need a reliable pair of snips.
Mixing Bucket
In the same way that the mortar stand has multiple purposes, so does a bucket. First, you'll need a good-sized bucket, at least 15 litres, though the exact volume will vary depending on the circumstances. Plastering requires a clean, dry bucket before mixing your plastering materials.
Conclusion
Plastering the walls and ceilings evenly and smoothly is essential for a finished, expert look. It adds to the aesthetic value of the area, extends the life of the surface, and makes the area look better.
Plaster with a smooth texture is less likely to trap dirt and dust, making it simpler to keep clean. An attractive plaster finish is another way to increase a building's worth.
Common errors while plastering include poor surface preparation, removal, plaster mixing, the use of cheap tools, excessive troweling, inappropriate drying, improper tool cleaning, and poor drying. If you follow these guidelines, you'll be able to plaster your home like a pro and improve its aesthetic value.
It's important to keep your tools organised and use the right kind of plaster to avoid problems.
The mix's composition can change depending on variables such as humidity, surface roughness, and climate.
It is essential to sand the surface after the plaster has dried. Plasterer's float use after the final coat application produces a polished finish.
Finishing trowels, corner trowels, a plasterer's float, scarifiers, bucket trowels, hawks, mortar stands, snips, and mixing buckets are all necessary tools for a skilled plasterer.
One uses a finishing trowel to distribute the plaster evenly and smooth the corners, while another uses a bucket trowel to move the plaster from the mixing bucket to the plastering hawk. For quick and even plastering of walls and ceilings while on the go, a hawk is an indispensable tool.
A mortar stand is a portable worktable with storage for plaster and grout.
Stainless steel and cold steel are no match for a good set of snips, making them an indispensable tool for modern plastering.
Plastering also requires a mixing bucket, preferably 15 litres in size. Investing in high-quality machinery and gear will help your plastering job go off without a hitch.
Content Summary
- Plastering requires proper surface preparation and following correct techniques.
- A smooth plaster finish is essential for a polished and professional look.
- Rough or uneven plaster can make further improvements challenging.
- A smooth finish improves the visual appeal and adds sophistication.
- Smooth plaster increases longevity and reduces the likelihood of cracks.
- Easier cleaning and maintenance with a smooth plaster finish.
- A high-quality plaster finish can increase the market value of a building.
- Proper surface preparation includes cleaning and repairing imperfections.
- Apply a base coat before the finishing coat for a flat surface.
- Choose the right plaster material for the specific surface.
- Thoroughly mix the plaster according to instructions.
- High-quality tools are essential for a professional result.
- Apply plaster using smooth, even strokes.
- Use a trowel to smooth and feather the plaster's edges.
- Allow sufficient drying time before sanding the plaster.
- Sand the plaster using fine sandpaper in even strokes.
- Apply a sealant for protection and a long-lasting coating.
- Avoid common plastering mistakes for a better result.
- Proper surface preparation is crucial to avoid an uneven final product.
- Be cautious when removing old plaster to prevent damage.
- Mixing plaster accurately is important for its strength and consistency.
- Invest in high-quality tools for better performance and durability.
- Avoid over-troweling the plaster to prevent cracking.
- Allow the plaster to dry completely before proceeding.
- Clean your tools between uses to maintain their effectiveness.
- Choose the appropriate plaster type for different applications.
- Sanding the plaster after drying is necessary for a smooth finish.
- Consider the environment for optimal plastering conditions.
- Quality plastering tools can enhance results and efficiency.
- A finishing trowel is essential for spreading and smoothing plaster.
- Corner trowels are helpful for tight spaces and accurate smoothing.
- Use a plasterer's float to achieve a professional look.
- A scarifier is necessary for scratching the render before the second layer.
- A bucket trowel is useful for transferring plaster and mixing.
- The hawk is a crucial tool for holding and distributing plaster.
- A mortar stand improves productivity and accessibility of materials.
- Snips are necessary for trimming and cutting beading.
- Ensure snips can cut through different types of metals.
- A mixing bucket is essential for preparing plaster materials.
- Plastering requires a clean and dry bucket for mixing.
- Proper plastering techniques require practice and patience.
- Novices and experienced plasterers can benefit from these tips.
- A smooth plaster finish improves the aesthetic value of a space.
- Plastering mistakes can lead to a poor final result.
- Removing loose paint or wallpaper is crucial before plastering.
- Carefully examine the underlying material before plaster removal.
- Mixing plaster accurately ensures its strength and durability.
- Invest in high-quality tools for better performance and longevity.
- Over-troweling the plaster can lead to thinning and cracking.
- Allow the plaster to dry completely before proceeding with the next step.
To achieve an even plaster finish on corners and edges, apply a thin plaster layer using a corner trowel or angle float. Next, you should use a straight edge or corner tool to smooth out the plaster and create a straight edge. Finally, it would be best if you feather the edges of the plaster outwards to blend it with the surrounding surface, ensuring a smooth and even finish.
Some common mistakes to avoid when trying to achieve a smooth and even plaster finish include the following:
- Not preparing the surface adequately.
- Applying too thick of a layer of plaster.
- Using the wrong type of plaster for the job.
- Not allowing enough time for the plaster to dry and cure properly.
- Not using the correct tools and techniques for smoothing and feathering the plaster.
Poor ventilation, uneven mixing of the plaster, and not keeping the plaster moist while it sets can also lead to an uneven finish.
To ensure a consistent texture across a large area when plastering, you should work in sections and consistently apply the plaster. This means using the same technique and tools for each section to ensure a uniform finish.
Additionally, it is important to maintain a consistent thickness and moisture level throughout the entire area, which can be achieved by properly mixing the plaster and keeping it moist while it sets. Finally, taking breaks and allowing the plaster to dry between sections can help to avoid any inconsistencies in the texture of the finished surface.
To achieve a glossy finish on a plastered surface, you should use a high-quality plaster specifically designed to produce a shiny finish. Additionally, it is important to properly prepare the surface by ensuring it is clean, smooth, and free from any imperfections. You should apply the plaster using a smooth and even technique, avoiding any bumps or ridges that could interfere with the glossy finish. Once the plaster is dry, fine-grit sandpaper can smooth out the surface and create a glossy shine. Finally, applying a sealer or polish can help to enhance the shine and protect the surface from damage.
Ventilation is very important during the plastering process to achieve a smooth finish. Proper ventilation helps maintain a consistent temperature and humidity level, which can significantly impact the plaster's drying and curing time. The plaster can become dry and moist with adequate ventilation, leading to cracking, shrinking, or uneven texture.
Also, poor ventilation can cause moisture to build up on the plaster's surface, creating watermarks and other imperfections. By ensuring good ventilation, you can help ensure the plaster dries and cures evenly, resulting in a smooth and uniform finish.