
The smooth walls and ceilings you've always wanted are finally within reach. It is also crucial when getting walls ready for finishing touches like paint. Plaster can be sanded down to a smooth finish, making it ideal for creating a level surface.
If you need help with how to sand down plaster, whether you need special tools, or if dust-free sanding is right for you, we're here to answer your questions and provide guidance.
Keep reading if you want to know how to clean and sand plaster.
Sanding Plaster
Plaster can be easily sanded down to a smooth finish. It also has the bonus of being completely safe for human consumption. That's why seeing a 2-mm layer between the cement and the paint is so common during refurbishment or finishing activities. However, sanding is necessary to achieve the perfect smooth and uniform surface condition.
This can be accomplished in some ways. To begin, you have the option of either dry or wet sanding.
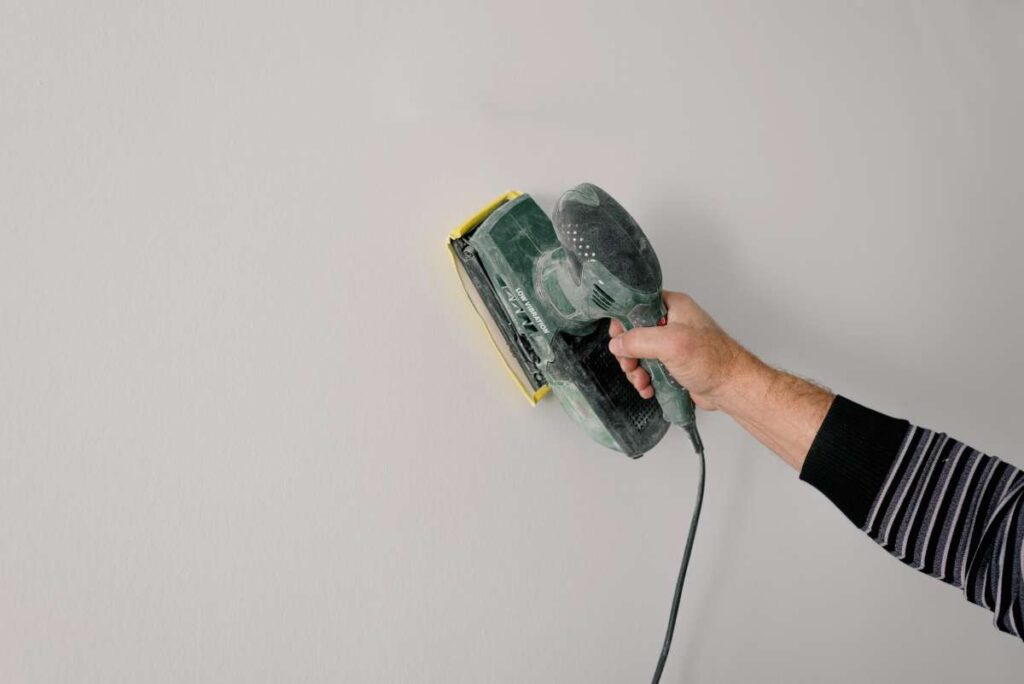
For the former, you can choose hand sanding with sandpaper or abrasive mesh (or a dedicated plaster sanding block) and automated sanding with a machine.
Plaster sanders are specialised electric tools used for sanding down plaster specifically for this purpose. However, wet grinding calls for some extra know-how and specialised equipment.
More information on these approaches will be provided later in this guide, but for now, know that when sanding, it is always best to begin at the ceiling. Sand in a downward and uniform motion to prevent scratches and uneven wear.
If the plaster is sanded down, it can do its job. Keep in mind how crucial this is!
How Do You Tell If Your Plaster Is Smooth?
There are a variety of approaches to take. Using your hands to feel for bumps and divots in the plaster is the quickest and easiest method. This will give you a general idea of where to start looking for minor, aesthetic issues that need fixing.
Once the trouble spots have been identified, the walls can be illuminated with a flashlight or lamp. Then, put it to the surface and observe the shadow it casts. Wall areas needing repair, such as those with lumps and bumps, will stand out more starkly.
Sanding Plaster Safety Precautions
Plaster sanding is a lot riskier than it looks. Plaster dust will be released into the air in large quantities while sanding. Inhaling this can irritate the linings of your respiratory tract, eyes, and mouth. If this persists for a long time, it could have devastating consequences.
A face mask like the N95 should always be worn when working in dusty environments. In addition, wear safety goggles if you also protect your eyes.
It's best to wear protective gear like gloves and long sleeves to avoid getting plaster dust on your skin. To avoid getting dust in their hair, some people choose to wear a plastic hat or nett.
Sanding A Wall After Plastering
After finishing a plastering job, it is essential to sand it thoroughly to get a smooth, professional look. Sanding is an essential first step to ensure a smooth, even finish when painting or wallpapering over plaster.
From setting up your work area to the final touches, this guide will show you exactly how to sand a wall after plastering.
Getting The Required Equipment And Materials
Having all the necessary equipment and supplies on hand is important before beginning the sanding process.
What you'll need is listed below.
- Paintbrush or roller
- Dust mask
- Painter's tape
- Safety goggles
- Paintbrush or roller
- Sandpaper (coarse and fine grit)
- Vacuum cleaner or broom
- Sanding block or power sander
- Drop cloths or plastic sheeting.
Getting The Work Area Ready
Sanding a wall after plastering is time-consuming, so properly setting up the area is essential. Get started by removing any obstacles, like furniture or decorations, from the workspace.
This makes concentrating on the work at hand easier because there are fewer distractions. Drop cloths or plastic sheets can shield the room's furnishings from dust and debris if complete furniture removal is not an option.
The next step is to safeguard your home's flooring and furniture.
Protect the rest of the furniture, the floor, and anything else you don't want dust or debris to get on while you sand.
Cover them with plastic sheets, drop cloths, or other protective covers to keep dust and debris at bay. You won't have to worry about cleaning up the mess afterwards; your stuff will be safe, too.
Having all the required equipment and supplies on hand is crucial before beginning any task.
Having all the tools and supplies, you'll need close at hand, including various grits of sandpaper, sanding blocks or machines, a damp cloth for cleaning, a vacuum cleaner, goggles and a dust mask are examples of safety equipment. When you have everything you need on hand, sanding goes more quickly and without as many interruptions.
Using Coarse Grit Sandpaper First
Remove large imperfections and excess plaster by sanding with coarse grit sandpaper. Here's what you should do:
- You can use a sanding block, or a power sander wrapped around the sandpaper.
- Sand the wall down from the top corner, applying consistent and firm pressure.
- The sandpaper should be moved in a circular or back-and-forth motion to ensure the entire surface is being worked on.
- If there are any pronounced flaws, like ridges or bumps, you should sand them down until they disappear.
- Keep sanding until the wall is smooth and uniform in texture and any major flaws have been fixed.
The Use Of Fine Grit Sandpaper
Use fine-grit sandpaper after smoothing out the rough spots with medium grit for a professional look. The next steps are as follows:
- If you're using a sanding block or electric sander, switch out the coarse-grit sandpaper for finer-grit sandpaper.
- Use a circular or back-and-forth motion to sand the entire wall similarly, ensuring uniform coverage.
- Make the spots where you used the coarse sandpaper blend in with the rest of the surface as much as possible.
- Avoid creating uneven areas by sanding too much. Sandpaper is designed to perform the work, so go easy on it.
- Keep sanding until you achieve a consistent, smooth texture on the wall.
Addressing Nooks And Crannies
Sanding requires careful attention to details, especially in awkward areas like edges, corners, and tight spaces. Here are some strategies for tackling those problems head-on:
- Sand the edges and corners by hand with a folded piece of sandpaper and your fingers.
- Use a corner/edge sanding attachment on your power sander to get into tight spaces.
- Sand these spots thoroughly to look smooth and match the rest of the wall.
Getting Rid Of Dust And Debris
Sanding a wall creates a rough surface, so cleaning it thoroughly before painting or wallpapering is important. Here's what you should do:
- Loose dust on the walls and furniture should be swept or vacuumed.
- Use a damp sponge or cloth to wipe the wall and collect any lingering dust.
- Wait until the wall is completely dry before continuing.
Examining The Surface
Sanded surfaces must be inspected for imperfections before being covered in paint or wallpaper. Follow these directions:
- Light up the wall from various perspectives using a powerful flashlight or work lamp.
- Check the area for imperfections like indentations, scratches, or uneven spots.
- Use a sanding block or sandpaper with fine grit if you find any flaws.
- Dust the wall again and check it out to see if you're satisfied with its smoothness.
Using A Primer
Priming the wall before painting is not required but will result in a better seal and paint adhesion. What you must do is as follows:
- Pick a primer that works with the paint or wallpaper you intend to use.
- Apply a light, even coat of primer with a paintbrush or roller to the freshly sanded wall.
- Wait for the primer to dry as the manufacturer directs before painting or wallpapering.
Common Mistakes To Avoid
It is important to be aware of typical errors that can lower the quality of your work when sanding a wall after plastering. If you know these common pitfalls and take precautions to avoid them, you can guarantee a successful outcome.
Here are some mistakes that frequently occur:
Over-Sanding
One common error that occurs when sanding a wall after plastering is to sand it too much. It happens when more material is removed from the surface than is necessary during sanding.
Over-sanding is discouraged for the following reasons:
- Uneven Surface: Unevenness in the surface's smoothness can result from excessive standing. This can lead to noticeable texture differences, giving the wall a patchwork appearance. When sanding, keeping a level head and applying the same amount of pressure everywhere is crucial. This aids in producing a smooth and even surface.
- Plaster Thickness Loss: If you sand too much, you might have less plaster than you started with. This could be a major issue if the plaster is thick enough or if there are any weak spots. Excessive material removal can cause unevenness, compromise the wall's structural integrity, and cause cracks or dents. If you want to keep the wall in one piece, you must be careful not to over-sand the plaster.
- Wastage of Time and Effort: The finish on the wall will be better if you over-sand it, and you'll save time and energy in the process. If you put in less effort, you'll slow your overall progress and become more frustrated. Patience and the right sanding methods will provide you with the smooth finish you want without wasting too much time or effort.
Utilising Incorrect Sandpaper
Using the incorrect sandpaper when sanding walls can produce less-than-desirable results and make the job easier than it needs to be. Therefore, selecting the appropriate grit of sandpaper for the task at hand is crucial.
Consider the following information about why regular sandpaper is not a good choice:
- Removal of Imperfections Is Ineffective: The various sandpaper grits each target a different range of flaws. Plaster walls may respond poorly to sanding using too coarse sandpaper for their current condition. However, sanding with grit too fine for major flaws can take a long time without improving the surface. It's important to choose sandpaper appropriate for the severity of the flaws you'll be fixing.
- Uneven Sanding Results: Sanding results may be unsatisfactory if the wrong sandpaper grit is used. Using a sandpaper that is too fine can leave the surface uneven because it cannot remove the rough spots or irregularities completely. On the other hand, if you start with too coarse sandpaper, you avoid removing too much of the surface material, leading to an uneven and consistent finish. A homogeneous and smooth surface can be attained by gradually working from coarse to fine grit.
- Risk of Plaster Damage: Sandpaper with too much grit might scratch the plastered surface. Plaster is easily damaged, and using too much coarse sandpaper can result in uneven removal of the plaster layer or deep gouges and scratches. Additional repairs may be needed if the wall's structural integrity is compromised. Selecting sandpaper that allows for efficient sanding while still protecting the plaster is essential.
Neglecting Safety Precautions
Neglecting safety measures while sanding walls is an extremely dangerous practice. You put your health and the health of others at risk if you don't prioritise safety. Following safety procedures is crucial for a trouble-free and secure adventure.
Ignoring safety measures can have serious consequences, as shown below.
- Respiratory Risks: Inhaling the fine dust particles produced by sanding can be harmful. If you don't wear a dust mask or other respiratory protection, you risk developing asthma or lung damage, among other respiratory problems. Wearing a dust mask or respirator that fits properly is essential for protecting your lungs from airborne particles.
- Skin Protection: Sanding produces uneven surfaces, which can cause skin irritation, cuts, or abrasions if you come into contact with them. When working with sharp objects, rough surfaces, or abrasive substances, gloves protect your hands from hazards like cuts, scrapes, and burns. When working in hazardous conditions, taking precautions against skin damage is important by donning a sturdy pair of gloves.
- Electrical Safety: It's important to take care when sanding close to any electrical outlet or fixture. Electric shocks and fires can result from working with sanding tools while wet or from disregarding other electrical safety precautions. Before sanding, ensure all electronics are unplugged and move away from any power outlets.
Rushing The Process
It's common to rush through the sanding process after plastering, leading to poor results and more work later. To succeed, you must approach the task slowly and methodically.
Here's why you shouldn't rush through the sanding process:
- Insufficient surface Preparation: If you're in a rush, it's easy to overlook or completely skip over some of the most important steps in surface preparation while sanding. The plaster surface may have yet to be evaluated, debris may not have been removed, or small flaws may not have been fixed before sanding. Poor surface preparation can cause sanding irregularities, imperfection retention, and a subpar finish.
- Missed Imperfections: Plaster imperfections are often overlooked because of how quickly they can be repaired. Even after the sanding process is complete, these flaws, such as bumps, cracks, or uneven patches, may still be noticeable. A smooth and flawless outcome results from careful inspection and correction of flaws.
- Overstanding Possibility: If you're in a hurry, you might sand too much or press too hard on the surface. If done too many times, more material can be removed by sanding, leading to an uneven surface or even plaster damage. Proper sanding techniques and a regulated approach are essential for achieving the optimum level of smoothness without going overboard.
Neglecting Dust Removal
If you don't take the time to clean up the dust as you sand, the final result of your wall will suffer. In addition, sanding creates dust, which can be a problem for finishing touches like painting or wallpapering if it needs to be carefully removed.
Here's why ignoring dust removal is a bad idea:
- Imperfections on the Surface: When dust particles settle on a wall, they can cause unevenness and bumps. Applying paint or wallpaper over a dusty surface makes the flaws more noticeable, creating an uneven and unappealing finish. A smooth, flawless surface is easier to achieve if dust is removed between sanding passes.
- Adhesion Problems: The adhesive properties of paint and wallpaper are inhibited by dust. Eventually, paint or wallpaper applied over a dusty surface will peel, bubble, or flake because the dust particles interfere with the adhesion. Dust must be removed thoroughly to get the best adhesion and longest results.
Conclusion
It is essential to sand the plaster once it has dried in order to create a smooth surface and get the walls ready for the final touches like paint. Sanding plaster to a smooth finish makes it suitable for human consumption.
Dry sanding, using abrasive mesh or a specialised plaster sanding block, or wet sanding, using water, are the two most common approaches to smoothing out plaster.
Wet grinding is more complex and needs specialised training and tools. If you don't want to damage the surface or cause uneven wear, sand from the ceiling down.
Use your hands to feel for bumps and divots in the plaster to see if it is smooth. Put some light on the walls and have a look at the shadows. Wall imperfections, such as bumps and lumps, will stand out more prominently.
Plaster dust can irritate the respiratory system, the eyes, and the mouth, making sanding plaster riskier than it seems. Protect your skin, hair, and eyes by using a face mask, safety goggles, gloves, and long sleeves. If you want to paint or wallpaper over freshly plastered walls, you should sand them first to provide a smooth, even finish.
To prepare the work space, lay down drop cloths to cover the floors and relocate any decorations or furniture that might be in the way.
To prevent dust and debris from settling inside furniture and fittings, cover them with plastic sheets, drop cloths, or other protective coverings. Having the right tools and materials on hand is crucial before beginning any project.
Tools such as sandpaper in different grits, sanding blocks or machines, a moist cloth for cleaning, a vacuum cleaner, goggles, and a dust mask are all part of this set. When all the equipment and materials you need are on hand, sanding goes more quickly and smoothly.
The first step in removing big defects and excess plaster is to sand the wall down from the top corner using consistent and strong pressure and coarse grit sandpaper. Remove any glaring defects by lightly sanding them away. Keep sanding until the wall is uniform in texture and smooth, and any serious imperfections have been addressed.
For a finished effect, use fine grain sandpaper after smoothing down the rough parts with medium grit. To get a uniformly smooth finish with a sanding block or electric sander, start with a coarse grit and work your way up to a finer grain sandpaper.
When sanding a wall after plastering, it is essential to pay special attention to corners and crevices. Use a corner/edge sanding attachment on your power sander, or fold a piece of sandpaper and your fingers to get into tiny spots while sanding by hand.
Before you start painting or wallpapering, you should clean the walls thoroughly. Before painting or wallpapering, give the wall a thorough cleaning with a damp sponge or towel to remove any leftover dust.
Before painting or wallpapering, it's crucial to check the surface for flaws. Examine the wall for dents, scratches, or other signs of wear by shining lights at different angles. If necessary, use a sanding block or fine-grit sandpaper.
When sanding walls, the wrong sandpaper might give you uneven results and make the work simpler than it needs to be. When trying to smooth out irregularities without damaging the plaster, regular sandpaper is not the best option.
Failing to take necessary safety measures might have serious consequences. If you stick to these steps after plastering, you'll have a much easier time sanding. Neglecting breathing protection, skin protection, and electrical safety throughout the sanding process might have dire effects. If you want to keep your lungs safe from airborne particles, you need to wear a dust mask or respirator. When dealing with dangerous materials like sharp objects, rough surfaces, or abrasives, gloves are a must.
Working around live wires and other electrical components requires extreme caution. Poor results and extra effort down the road can be the result of trying to rush the process. The results of haste include inadequate surface preparation, missed defects, and an awareness of the potential for overworking. Achieving a clean, perfect finish and protecting final touches like paint or wallpaper from harm require thorough dust clearance. To ensure optimal adherence and longevity of paint and wallpaper, extensive dust removal is required before to application.
Content Summary
- Learn how to sand a wall after plastering for smooth and level surfaces.
- Sanding plaster is essential for creating a perfect finish before painting.
- Discover different methods for sanding plaster, including dry and wet sanding.
- Choose between hand sanding with sandpaper or using a plaster sanding block or machine.
- Start sanding from the ceiling and work downward in a uniform motion.
- Use your hands to feel for bumps and divots in the plaster to identify areas that need fixing.
- Illuminate the walls with a flashlight to identify problem areas more clearly.
- Take safety precautions when sanding to protect your respiratory tract, eyes, and skin.
- Wear a face mask, safety goggles, gloves, and long sleeves to minimise exposure to plaster dust.
- Set up your work area by removing furniture and covering the floor and furniture with plastic sheets or drop cloths.
- Gather all the necessary equipment and materials before starting the sanding process.
- Begin sanding with coarse grit sandpaper to remove large imperfections and excess plaster.
- Use a sanding block or power sander to apply consistent pressure and work in a circular or back-and-forth motion.
- Continue sanding until the wall is smooth and any major flaws have been fixed.
- Switch to fine-grit sandpaper to achieve a professional look and ensure a consistent texture.
- Blend the areas sanded with coarse-grit sandpaper with the rest of the surface using fine-grit sandpaper.
- Pay attention to edges, corners, and tight spaces by sanding them carefully with folded sandpaper or specialised attachments.
- Clean the wall thoroughly after sanding by sweeping or vacuuming loose dust and wiping with a damp sponge or cloth.
- Inspect the sanded surface using a flashlight to identify any remaining imperfections.
- Address any flaws by sanding with fine-grit sandpaper, dusting the wall, and reevaluating the smoothness.
- Consider using a primer before painting or wallpapering for better adhesion and sealing.
- Avoid common mistakes such as over-sanding, using incorrect sandpaper grit, neglecting safety precautions, and rushing the process.
- Over-sanding can result in an uneven surface, loss of plaster thickness, and wastage of time and effort.
- Choose sandpaper with the appropriate grit for the severity of flaws and to avoid damaging the plaster.
- Prioritise safety by wearing a dust mask, and gloves, and taking precautions around electrical outlets.
- Take your time during the sanding process to ensure proper surface preparation and address imperfections.
- Clean up dust regularly to avoid imperfections on the wall surface and ensure good adhesion of paint or wallpaper.
- Remove dust between sanding passes for a smooth and flawless finish.
- Proper sanding techniques and a regulated approach are essential for achieving optimum smoothness.
- Use a primer compatible with your chosen paint or wallpaper for better results.
- Rushing the sanding process can lead to overlooked imperfections and over-sanding.
- Thoroughly inspect the sanded surface to identify and correct any flaws before finishing touches.
- Dust particles can cause imperfections and affect the adhesion of paint or wallpaper.
- Remove dust thoroughly to achieve a smooth and long-lasting finish.
- A smooth and level surface is ideal for applying paint or wallpaper.
- Sanding plaster is necessary for creating a professional look and achieving a uniform texture.
- Take safety precautions to protect yourself from plaster dust and potential health risks.
- Properly setting up the work area helps in focusing on the sanding task and minimizing distractions.
FAQs About Plastering
The time it takes to sand a wall after plastering can vary depending on several factors. Generally, completing the sanding process can take anywhere from a few hours to a day or two. The exact duration depends on the wall's size, the plastered surface's complexity, the skill of the person sanding, and the tools being used. It's important to ensure the plaster is completely dry before sanding to achieve the best results.
Yes, you can use an electric sander for sanding. An electric sander is a convenient tool that can make the sanding process faster and easier. It is commonly used for sanding walls, furniture, and other surfaces.
Electric sanders come in different types, such as orbital sanders and random orbital sanders, each suitable for specific applications. When using an electric sander, following the manufacturer's instructions, wearing appropriate safety gear, and using the correct sandpaper grit for the desired finish are important.
Sanding is necessary after plastering for a few reasons:
- Plastering can leave behind uneven surfaces, bumps, or imperfections on the wall. Sanding helps to smooth out these uneven areas and create a more even and consistent surface.
- Sanding helps to remove any excess plaster or joint compound that may have been applied during the plastering process. This ensures a clean and polished finish.
- Sanding prepares the surface for painting or wallpapering by creating a smooth and receptive surface to the new finish to adhere to.
Overall, sanding is important in achieving a professional and flawless result after plastering.
Sanding plaster
- For sanding plaster, use a medium grit of 80.
- For finishing plaster, use a fine grit of 120.
- For super finishing plaster, use an extra fine grit of 180.
- For ultra-finishing plaster, use a super-fine grit of 240 to 320.
If you accidentally sand too much and remove more material than intended, there are a few steps you can take to address the situation:
- Evaluate the damage: Assess the extent of the excess sanding and determine how it affects the overall appearance of the surface. If it's a minor issue, it might be easily fixable.
- Fill the gaps: If there are noticeable gaps or indentations due to over-sanding, you can use a suitable filler or spackle to fill them in. Apply the filler, smooth it out, and let it dry. Then, sand the filled area lightly to blend it with the surrounding surface.
- Feather the edges: If the excess sanding has created an uneven transition between the sanded area and the surrounding surface, you can use fine-grit sandpaper to feather the edges. Gently sand the edges to create a gradual transition, blending the sanded area with the rest of the surface.
- Repaint or finish: Once you have addressed the over-sanding issue and achieved a more even surface, you may need to repaint or reapply the finish. Make sure to match the colour and texture of the surrounding area to achieve a cohesive appearance.