
Have you given any thought to the possibility of installing batteries in conjunction with your solar panels? The planning and design of your own do-it-yourself battery bank is a fairly straightforward process, whether it's for an off-grid mountain cabin or a battery backup for your grid-connected homes. However, for someone who has never done it before, it may seem a little strange at first.
Renewable energy sources are becoming more and more affordable for consumers, but the purchase of solar panels may still be out of reach for the majority of people. The problem is that it is expensive to produce and maintain commercial panels, but if you are daring enough or skilled enough, you might want to try your hand at building a solar panel on your own. It may sound impossible, but it is an exciting and challenging project to embark upon, and let me tell you that it is more than possible to build solar battery storage at home on your own.
People are increasingly making their own solar panels, and the most common reasons for doing so are to experiment, have fun, or save money by taking advantage of the relatively low cost of solar energy. Students often make solar panels as a part of their projects, and adults often do the same thing in order to save money, though some people do it just for fun. If you are reading this essay, it is safe to assume that you are considering the manufacture of your own solar panel, which is a very courageous endeavour. You are free to pursue instruction on how to construct your own solar panel at any time you like. The following is a detailed, step-by-step explanation of how to complete the task.
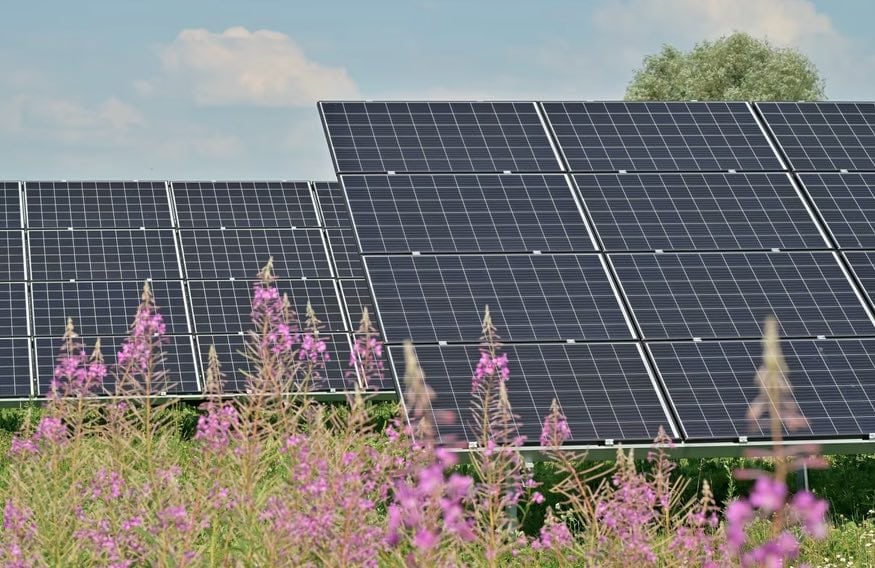
Solar panels can make use of an energy storage solution known as a battery bank. During the day, solar power systems produce electricity, which must be stored so that it can be used later on during the night when there is no sunlight.
What Different Kinds of Batteries Are There to Choose From?
Your battery bank could accommodate either lead-acid or lithium-ion batteries depending on your preferences. However, lithium-ion batteries have longer lifespans, higher efficiencies, and higher energy densities than their lead-acid counterparts. Lead-acid batteries are more common and cost less than lithium-ion batteries.
Should I Buy a Battery Bank or Construct One Myself?
You can add a battery bank to your home solar energy system by either purchasing one or building one yourself; however, hiring an installer to set up your battery bank for you will likely increase the total cost of the battery bank.
On the other hand, putting together a battery bank by yourself can be a time-consuming process. Therefore, if you have any doubts about your ability to accurately calculate your energy needs or work safely with electrical wiring and equipment, or if you simply want to save yourself some time, it is best to have a professional solar installer set up your battery bank.
What Is a DIY Solar Generator?
A solar generator is a piece of equipment that captures energy from the sun and transforms it into a form of electricity that can be used by our appliances at any time.
Do It Yourself is abbreviated as DIY. This means purchasing a ready-made product that requires your own personal assembly. You can select the best parts and build your device according to your needs while saving money when you do it yourself thanks to the DIY movement. The best part about doing things yourself is how much you can actually learn as you go along.
The DIY solar kit has 3 main functions:
- Harvest solar energy
- Store energy
- Convert solar energy into usable electricity
It is portable, has a plug-and-play design, is long-lasting, and requires no maintenance. In addition to this, its power and size can be adjusted as needed.
Calculate Your Load
If you want to build your own battery bank, the first step is to figure out how much power you regularly consume, frequently referred as the electricity load. A load's weight can be determined in two ways:
- To begin, you can investigate the electricity you've used in the past. If you're already wired into the power grid, you can easily calculate your daily average electricity consumption by taking the sum of your power consumption over the past year and dividing it by the number of days in a year.
- You probably don't know how much energy you've used in the past because you can't keep track of it if you're not hooked up to the grid. If that's the case, you'll need to figure out how much power you'll actually consume by tallying up the wattage of all the appliances in your home and predicting how many hours a day you'll have them turned on.
Don't miss this stage since, as you could probably guess, it will take some time and there are going to be number of figures involved. It is crucial that you get these calculations accurate to the best of your ability because they will decide the size of your complete battery bank.
The Parts And Components To Build A DIY Solar Generator
Solar generators are simple machines that require only primary components in order to operate effectively.
Portable Solar Panels
Your do-it-yourself solar generator kit cannot function properly without the solar panel. Solar energy will be converted into DC (direct current) electricity by this device. Choose portable or foldable solar panels. They have a distinct design that is rugged, compact, and convenient for use in the open air.
Solar Charge Controller
You will need a maximum power point tracking (MPPT) solar charge controller in order to get the most out of your solar panel. It is the best at tracking the sun's variable power and will provide a steady and clean output current to charge your battery. In addition, it is the best at following the sun.
Battery
You will need a battery for your do-it-yourself solar generator in order to have constant access to electrical power. It will store the solar energy you produce and then provide power when it is required. Lead-acid and lithium-ion are the two different types of battery technologies that are currently on the market.
GEL and AGM are both names for lead-acid batteries, but they are essentially the same thing. They are not only inexpensive to purchase but also require no upkeep. Having said that, we strongly advise that you switch to using a lithium battery instead of the one you currently have.
When it comes to storing solar energy, lithium-ion batteries, also known as LiFePO4 batteries, are far superior to GEL or AGM batteries. Lithium-ion batteries can also be found under the name LiFePO4. In comparison to lead-acid technology, they have a higher initial cost, but they have a longer life span, greater reliability, and a higher energy density (which makes them lighter). Your decision is one that you won't come to regret.
Case
It is essential to ensure the longevity of your do-it-yourself solar generator by shielding it from dust and moisture as much as possible. In addition to this, it combines all of the components into a single, lightweight case that can be brought along on all of your journeys. We have chosen three high-quality cases ranging in size from the smallest suitable for use on camping trips to the largest suitable for use with backup systems in the home.
The battery and the inverter are the two components that contribute the most weight. It is estimated that the total weight of your do-it-yourself solar generator for a camping trip will be less than 14 kilogrammes (31.08 lbs), less than 20 kilogrammes (44 lbs), and less than 30 kilogrammes (66.22 lbs) for home backup systems (66 lbs).
Steps in DIY-ing
Step 1 - Draft a Plan and Construct a Frame
Before anything further can be done with the panel, its dimensions and layout must be decided. The only real restriction is your own sense of ambition, though this may vary depending on where you intend to instal the panel. Plywood, or any other robust and lightweight material, can serve as the framework for your panel.
As the project's planner, your job is rather simple at this point. Take measurements of your panel and write down how much of each material you'll need to build it. To further protect your plywood board from UV radiation, you should paint it with siding and deck paint.
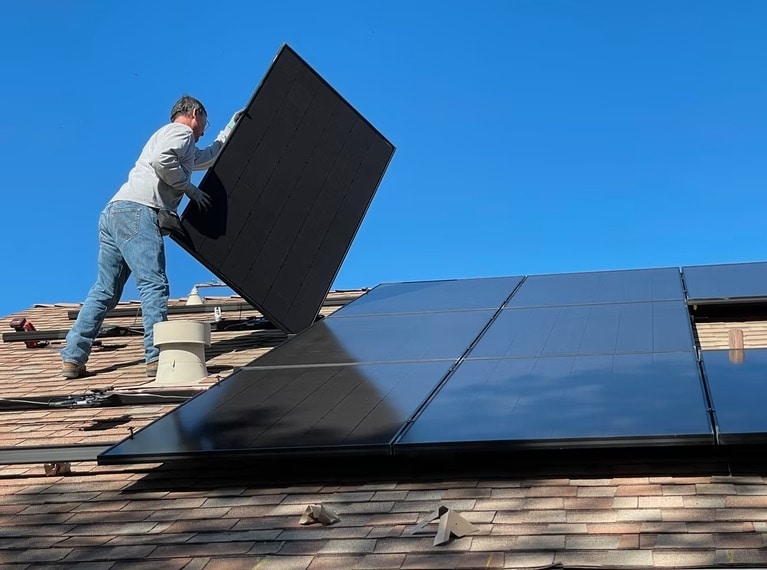
Step 2- Construct Your Solar Panels
After getting your solar panels, you need to assemble them. After that, you'll need to buy solar cells, which will be the most expensive part of the project; nonetheless, this is still a much lot more affordable than buying a whole solar panel from a merchant and spending on installers.
Some online articles supply templates on this topic frequently because it is so well-liked by students today. Also, don't forget about the need of planning ahead when it comes to solar panel construction.
Due to the high difficulty of producing solar panels at residence, you will need to invest in solar panels. There is no need to worry, though, because everything we discuss is readily available with a click of a mouse. Everything you need, including tools, will be provided for you.
Step 3 - Determine the Appropriate Inverter Sizing
A solar energy system that relies on batteries must have an inverter to convert the power stored in the batteries from direct current (DC) to the alternating current (AC) used by most of our household appliances and electronics.
Instantaneously switching DC power to AC is the job of inverters. Since inverters can't store energy, you'll have to drain your batteries every time one of your devices needs power so that the inverter can send it along. So, make sure your inverter can handle the maximum load you'll ever throw at it at once.
Add up the power consumption of all the gadgets that could be used at once to get an estimate of this number. You'll get the most reliable data this way.
Step 4 - Join the Wire Using Solder
The solar cells should be strung on the frame before the wires are soldered together. Writing about something is far easier than really doing it, but both require patience. A perfect solution would involve using the same quantity of wires to link each cell's positive and negative terminals.
Wires need to be inserted into the predrilled holes in the frame and connected to the minus and plus terminals. After making each connection, you should check the current reading. Due to the complexity of the procedure, you may find that you require a helping hand from a buddy.
Step 5 - Plug in and Power Up
All the action begins right now. After obtaining this knowledge and building a solar panel, you realise the most interesting part is electricity generation. Get your hands on a battery bank battery, an inverter, and a voltage regulator now so you can move forwards with the build.
If you want to succeed, you must follow these three stages in order: First, connect the solar panel to the voltage regulator, and then attach the battery to the other side of the device. When the battery is hooked up to the inverter, power can be supplied to the apparatus.
Step 6 - Installing the Junction Box
As soon as you've completed installing everything, you should move on to installing a junction box. The junction box is strongly advised as it blocks current from travelling in the wrong direction. Backflow of energy is undesirable for solar panels, as you presumably already know if you are familiar with the manufacturing process of solar panels. Newer charge controllers typically include a backflow preventer as standard equipment, so we didn't have to instal one. It is highly suggested that you add a backflow preventer to your charge controller if it does not already have one. Installing it outside the junction box allows for easier access in the event of a malfunction.
If you want everything to go properly throughout the assembly, you'll need to keep checking the current to make sure it stays constant at each stage. After you have activated the backflow blocker and the junction box, you can mount the panel on the roof or wherever you like.
Will I Benefit From Using a Charge Controller?
It is very likely that you will need a charge controller, which is also sometimes referred to as a charge regulator, in order to manage the flow of charge from your solar system to your battery. Your battery runs the risk of being harmed if it is overcharged and you do not have a charge controller.
The maximum power point tracking (MPPT) and the pulse width modulated charge controllers are the two varieties of charge controllers (PWM). The vast majority of charge controllers are of the pulse width modulation (PWM) variety; however, these controllers charge batteries less effectively than MPPT controllers. PWM controllers, on the other hand, are available at a lower price point than MPPT controllers.
Utilizing the sizing tools that are made available on the websites of the manufacturer is the simplest way to choose the appropriate charge controller for both the battery bank and the solar array. If you want to size your charge controller yourself, however, you will need to take into account the wattage of your solar array as well as the voltage of your battery bank. The amperage figure that you'll need to use to determine the size of the charge controller can be obtained by dividing the wattage of the array into the voltage of the battery bank.
For example, if you have a 4,000-watt array and your battery bank is 48 volts, you would divide 4,000 by 48 to get a quotient of 83.3 amps. This is the amount of current that can be drawn from the array. You should look for a charge controller that is rated at approximately 100 amps because most charge controllers should have an amperage that is 20 to 25 per cent larger than the existing system you're planning around.
You are now prepared to generate clean energy anywhere, silently and without producing smoke or noise. Your homemade portable power station is small in size, simple in design, risk-free requires no upkeep, and will serve you well for many years.
If you want to get the most out of your do-it-yourself solar generator, we suggest positioning your solar panels so that they receive the maximum amount of sunlight possible and installing a ventilator inside the housing of the generator so that it can be cooled.
Naturally, it isn't a simple undertaking; however, the end result is well worth the effort. It is not only possible but also strongly advised that you construct a fully functional solar panel in your own home. Experiment with it, do as the instructions say, and try to think on your feet as you go, and you will be astounded by the outcome. Why don't you make the switch to solar power when you know it's the way of the future?
Conclusion
A battery bank is a type of energy storage device that can be used in conjunction with solar panels. Solar power systems generate electricity during the day, but that energy must be stored so that it can be used at night when there is no sunlight. Self-contained solar battery storage systems are not only feasible, but also quite easy to construct. Solar generators are devices that convert solar energy into usable power. You can supplement your residential solar power setup with a battery bank that you either buy or construct yourself.
Having a professional handle the installation of your battery bank will likely drive up the final price. Because of their simplicity and reliance on a few key parts, solar generators have low production costs and environmental impact. If you want to use your homemade solar generator continuously, you'll need a battery. Compared to lead-acid batteries, lithium-ion batteries (also known as LiFePO4 batteries) are superior. An average do-it-yourself solar generator for a camping trip will weigh less than 14 kilogrammes (31.08 lbs).
Once that is done, the next and most costly step is to purchase solar cells. It's still a great deal cheaper than purchasing an entire solar panel. For a solar power system to use the energy stored in its batteries, an inverter must be used to transform the DC power into AC (AC). There is no load that an inverter cannot handle. The build is complicated, so you might need a friend's assistance.
It is not ideal for solar panels to experience a reverse flow of electricity. Most modern charge controllers will have a backflow preventer built in. Pulse width modulated (PWM) controllers account for the vast bulk of the market. In comparison to MPPT controllers, PWM controllers are more affordable. You're now ready to produce clean energy anyplace, without making a sound or emitting any smoke.
You need to find a charging controller with a rating of about 100 amps. The amperage of the charge controller you choose should be 20–25 percent higher than the current system you're working with.
Content Summary
- DIY battery banks can be easily planned and designed, whether for an off-grid mountain retreat or as a backup for grid-connected residences.
- Although the cost of renewable energy is decreasing, the majority of people may not yet be able to afford to instal solar panels.
- However, if you are brave or experienced enough, you may want to try your hand at constructing your own solar panel because it is so expensive to make and maintain commercial panels.
- The most popular motivations for DIY solar panel production are the desire to experiment, the want to have some lighthearted fun, and the desire to save money by taking advantage of solar energy's low cost.
- It's safe to assume that, if you're here reading this essay, you're thinking about making your own solar panel.
- If you want to learn how to build your own solar panel, you can do it whenever you like.
- What follows is a comprehensive, detailed, step-by-step description of how to accomplish the goal.
- A battery bank is a type of energy storage device that can be used in conjunction with solar panels.
- You have the option of using lead-acid or lithium-ion batteries in your battery bank.
- Installing a battery bank for your home solar energy system may be done in a number of ways, the most affordable being doing it yourself with the help of a kit. However, having an expert put up your battery bank would certainly increase the total cost of the battery bank.
- However, building your own battery bank from scratch can be a lengthy process.
- To sum up, it's preferable to have a professional solar installer set up your battery bank if you have any reservations about your abilities to precisely assess your energy needs or work safely with electrical wiring and equipment.
- A solar generator is a device that converts solar energy into usable electricity that can be used by our devices at any time.
- Thanks to the do-it-yourself (DIY) trend, you may select the best parts and create your device according to your needs at a significant savings.
- An overview of the three primary uses for the do-it-yourself solar kit:
- Use the power of the sun Conceal a means to store energy Turn sunlight into usable electricity. It can be taken anywhere, is easily set up, lasts a long time, and needs very little in the way of upkeep.
- The first stage in creating a personal battery bank is calculating the electricity load, or the amount of power you use on a daily basis.
- In such situation, you'll want to estimate your daily electricity usage by adding up the wattage of all of your home's appliances and projecting the number of hours a day you'll have them running.
- You need to be as precise as possible with these calculations, as they will determine the total size of your battery bank.
- Without the solar panel, your do-it-yourself solar generator kit will not work.
- Look into solar panels that fold up or are easily transported.
- If you want to get the most out of your solar panel, you'll need a solar charge controller that supports maximum power point tracking (MPPT).
- It excels at following the sun's varying strength and will supply a consistent, pure current to charge your battery.
- If you want to use your homemade solar generator continuously, you'll need a battery.
- When needed, it will release the power stored from your solar panels.
- Lead-acid and lithium-ion are the two major types of battery technology that are now on the market.
- Lead-acid batteries go by a few different names, but GEL and AGM refer to the same substance.
- However, we recommend that you replace your present battery with a lithium-ion one.
- Lithium-ion batteries, also known as LiFePO4 batteries, are preferable to GEL or AGM batteries when it comes to storing solar energy.
- Another common name for lithium-ion batteries is LiFePO4.
- That's a choice you won't come to regret.
- Your homemade solar generator will last much longer if you take precautions to keep it free from dust and moisture.
- In addition to this, it unites all of the components into a single, lightweight case that can be brought along on all of your excursions.
- We have picked three high-quality cases ranging in size from the smallest appropriate for use on camping excursions to the largest suitable for use with backup systems in the house.
- The battery and the inverter are the two components that contribute the most weight.
- It is expected that the entire weight of your do-it-yourself solar generator for a camping trip will be less than 14 kilogrammes (31.08 lbs), less than 20 kilogrammes (44 lbs), and less than 30 kilogrammes (66.22 lbs) for home backup systems (66 lbs) (66 lbs).
- The panel's size and layout must be determined before anything else can be done with it.
- The framework of your panel can be made out of plywood or any other strong and lightweight material.
- It's easy going so far as project planner.
- You should calculate the amount of each material you'll need to construct your panel based on its dimensions.
- Siding and deck paint will provide additional protection for your plywood board from the sun's rays.
- You must put together your solar panels when you have obtained them.
- The importance of forethought in solar panel installation cannot be overstated.
- Your best bet is to buy solar panels rather than attempt to manufacture them at home.
- In order to power most of our gadgets and appliances, which run on alternating current (AC), a solar energy system that relies on batteries must contain an inverter.
- Inverters convert DC power into AC power instantly.
- In order for an inverter to supply electricity to a device, the battery must be discharged each time the gadget requires power.
- Make certain your inverter is capable of supporting the highest load you anticipate using it for at any one time.
- To get a ballpark figure, just add up the power needs of all the devices that might be used simultaneously.
- This is the best way to acquire accurate information.
- Fourth, crimp or solder the wire ends together.
- It's important to solder the wires together before stringing the solar cells on the frame.
- Wires must be attached to the minus and plus terminals and threaded through the holes in the frame.
- Now is when everything really starts to happen.
- After learning this information and constructing a solar panel, you may find that electricity generation is the most fascinating aspect.
- It's time to get your hands on some battery banks, inverters, and voltage regulators so you can continue with the construction.
- To achieve your goals, you must move through these three phases in sequence: First, connect the solar panel to the voltage regulator, and then attach the battery to the other side of the device.
- As long as the device's battery is connected to the inverter, it can run on battery power.
- The final step in the process is to put in a junction box for the wires to connect to.
- If you're familiar with solar panel production, you know that a reverse flow of energy is not ideal for the finished product.
- If your charge controller does not already have a backflow preventer, you should get one immediately.
- If something goes wrong, you'll have simpler access to it if you put it somewhere other than the junction box.
- The panel can be installed on the roof or anywhere else after the backflow blocker and junction box have been activated.
- In order to regulate the current that flows from your solar panels to your battery, you will almost certainly require a charge controller, which is also known as a charge regulator.
- Overcharging without a charge controller can cause serious damage to your battery.
- There are two types of charge controllers: maximum power point tracking (MPPT) and pulse width modulated (PWM).
- It is easiest to select the proper charge controller for the battery bank and the solar array by using the sizing tools provided on the websites of the manufacturer.
- However, the wattage of your solar array and the voltage of your battery bank will need to be considered if you wish to size your charge controller yourself.
- By dividing the array's power output by the battery bank's voltage, you may get the amperage number that will be used to select an appropriate charge controller.
- For instance, if your battery bank is 48 volts and your array is 4,000 watts, you would divide the two numbers to achieve an ampacity of 83.3.
- The maximum current that can be extracted from the array is this value.
- Most charge controllers should have an amperage that is 20 to 25 percent larger than the present system you are designing around, so a charge controller rated at about 100 amps would be a good starting point.
- You're now ready to produce clean energy anyplace, without making a sound or emitting any smoke.
- Minimal in size, straightforward in construction, risk-free, requiring zero maintenance, and good for many years of use, your homemade portable power station is everything you could want from a DIY portable power source.
- Do it yourself solar generators can be optimised by arranging the panels where they will receive the most sunlight and by putting a ventilation within the generator's inclosure to dissipate heat.
- Of course, it's not going to be easy, but the payoff will be great.
- Creating a fully operational solar panel in your own home is not only doable but also highly recommended.
- Try it out, follow the guidelines, and use some quick thinking as you go, and you'll be impressed with what you learn.
FAQs About Solar Panels
The four main types of solar batteries are lead-acid, lithium-ion, nickel-cadmium, and flow batteries. Lead-acid batteries have been around for the longest and are known for their low prices and reliability, but they require regular maintenance.
A 400 amp-hour 6-volt battery can provide around 2.4-kilowatt-hours of power. A three-day battery bank planned to provide 90 kilowatt-hours of electricity to an average American household. The previous example battery can provide2,4 kilowatt-hours, while 38 batteries would be needed.
A solar panel can be connected directly to a 12-volt car battery but must be monitored if it's more than 5 watts. Solar panels rated higher than 5 watts must not be connected directly to a battery but only through a solar charge controller to protect against over-charging.
You will need at least one 450-500 12V battery or two 210 12V batteries to supply 5000 watts of power for 30-45 minutes. If you'd like an hour of 5000 water of power, you'll need a 750ah 12V battery.