
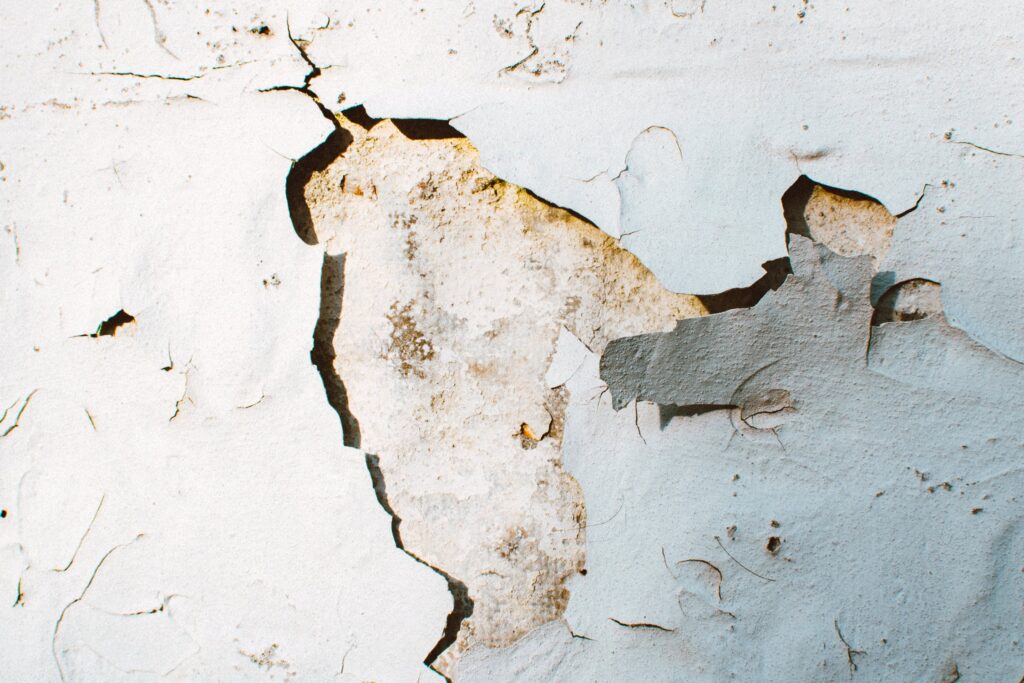
Plaster not only provides a long-lasting, glossy surface for walls and ceilings, but it also holds up well to regular use. However, after a period of time, damage may inevitably occur due to the inevitable movement of furniture, knocking down of walls, and other such activities. Walls that are normally plastered can suffer from cracks, missing chunks, and damaged corners, while walls made of plasterboard are more susceptible to holes. Skim coated plasterboard can also experience the onset of fine cracks.
Wall damage is common after wallpaper is removed because of the force used to remove it. The result could be a wall riddled with bullet holes. The walls should be skimmed by a professional if you don't plan to cover them with wallpaper. This advice is moot if you intend to cover the wall with paper. Expect to spend around $12 /m 2, with the total cost increasing if you factor in the cost of any other minor plaster repair work you need done. By learning to do these smaller tasks on your own, you can save a lot of money and time.
Like any other profession, welding requires the right equipment. Be sure you have fresh plaster on hand before starting your patching plaster job. The adhesive properties will no longer work if it's too old. This could make things more challenging for you as you try to fix the plaster. Many different plaster repair products are commercially available. Bear in mind that just because something claims to dry quickly doesn't mean you'll have enough time to deal with the situation.
Using pre-mixed plaster may seem like a good idea because it saves you time and effort. On the flip side, you could discover that you have more than you need to complete your task! You might end up throwing away the extra food because it won't last forever. It's preferable to make your own so you can regulate the dosage and avoid wasting any of the active ingredients. You can get the best possible price for the upkeep work if you go about it this way. It takes some practise to get good at this, so study the rules carefully so that you can always be consistent.
The finished plaster should have a high degree of rigidity. Therefore, it is much less difficult to handle and apply to your walls. Too much fluidity and you risk it running down the walls or dripping onto your head as you try to repair the ceiling. Hitch Property Constructions has a wide range of plaster painting services.
How to Fix Loose or Cracked Plaster
Repairing loose or cracked plaster is typically more efficient and less expensive than replacing the affected area with new drywall or blue board. To repair a fracture by filling it with joint compound is futile, as the break will eventually reopen. Restoring the lath-and-plaster joint is crucial.
Homeowners and contractors alike have relied on metal plaster washers for this purpose for decades. These screws fasten drywall to lath, which in turn tightens the plaster. However, the washers and tape stick out from the plaster, so you'll need some practise before you can successfully cover them with joint substance and additional layers of tape.
Repairing Plaster Walls
Drill a Hole in the Plaster
- The plaster should have a hole drilled into it about 2 inches away from the crack using a 3/16-inch masonry bit. Stop drilling when you contact lath; the bit won't go through lath, so pull it out and start a new hole about 3 inches away from the original and 2 inches from the crack. Try to get a lath strip in each hole you make. A miss will cause the bit to enter the right side of the chuck.
- To prevent injecting primer or adhesive into such holes later, mark them with a pencil as a pointer and then drill roughly half an inch higher or lower.
- Keep going until there is a sequence of holes, each about 4 inches apart, on both sides of the crack. It's important to use a vacuum to remove all of the plaster dust from the crevices.
Prime and seal
- Wearing protective eyewear and gloves, you should now spray a steady stream of acrylic conditioner into all of the holes, except for the ones you've just indicated. A couple gentle squeezes should be all that's needed.
- Be sure to spray the borders of the crack as well, and then clean up any drips with a damp sponge. The milky conditioner needs 10 minutes to fully penetrate the wood and plaster.
Inject the adhesive
- Stick the tube's tip into a drilled hole. Softly depress the trigger of the caulking gun until the smooth glue completely fills the gap and overflows the nozzle.
- Repeat the process for any unlabeled holes. Sponge the wall down with water to remove any paint drips.
Secure the wall
- You can use a 1 5/8-inch drywall screw and a 2-inch plastic washer to secure the lath to the wall by screwing through the adhesive. The lath is compressed against the back end of the plaster, and the screw secures it there with the help of the washer.
- Washers should be spaced between 8 and 12 inches on either side of the fissure.
Wipe and wait
- Apply some water on a sponge and use it to soak off any remaining adhesive.
- Remove the screws and scrape off the washers when it has cured for a day or two. (Save these for when you need to fix the plaster.) If any dried adhesive has worked its way through the cracks, scrape it off.
Fill the crack
- Use a tiny amount of joint compound that sets to fill the crack and any gaps. When the compound is still wet, smooth it out with a trowel; after it starts to dry, wet it again and repeat.
- When the compound has dried, sand it lightly and prime and paint the surface.
How To Repair Repairing Cracks
- Patch up the damaged plaster with a Stanley knife. You need to make a hole in it till the first split disappears. The V-shaped groove you create with the blade in this manner is ideal for filling.
- As soon as the fractures have been excavated, vacuum the groove to remove any remaining dust and debris.
- Most vertical and overhead filling activities need for a filler powder mixed with water to make a hard paste. Just how rigid are you? We'll know it's ready to get to work whenever a filling knife's worth won't spill out onto the floor when used for this.
- Lightly wet the area that will be filled with a plant sprayer. This improves the filler's ability to stick.
- Make sure the filler reaches the bottom of the groove by smoothing it in. The filler should sag slightly over the groove, but any surplus on either side should be removed before it dries. Once the area has dry, give it a light sanding with medium-grit paper before proceeding to the next step, which is the embellishment.
- Experiencing harm of this nature is not uncommon. Because of the pull of gravity, applying filler and hoping for the best is usually not successful. There's also the chance that passing pedestrians will knock the newly restored corners out of place. Step four in fixing this corner is to blend your filler as instructed.
- To roughly achieve the desired shape, fill in the corner with the filler. After the filling has dried, wrap the entire corner with masking tape. The tape shields and secures the filling. Someday, a little sanding will be all that's needed to fix up those dinged-up corners. A plastering corner bead, which is fastened to the wall below the existing plaster level and subsequently plastered (rather than filled) up to, can be used to replace larger areas of missing corners.
- The installation or replacement of a door frame (as illustrated here) can cause significant damage to a wall and cause plaster fragments to fall out. Repairing this kind of damage is best done with multiple applications of plaster rather than a hit-or-miss filling technique.
- Vacuum the area to get rid of the dust and dirt, and then use a hammer and sculpture if required to remove any loose plaster bits.
- To improve the plaster's chances of sticking to the wall, you can apply a PVA mixture to it.
- To properly combine the plaster, just do as the manufacturer says. You want it to be as smooth as silk, without any lumps or excess runniness. To proceed with the repair, a thin coat of plaster (about 2–3 mm) should be applied to the affected area. Plaster will leak from the patchwork if you try to fill it all at once.
- Once the plaster has started to cure, you can make these light scratches in the design with a trowel.
- Plaster should be mixed as before and applied with a plastering float after the first coat has dried. Once the form is complete, you should walk away from the task for 10 minutes before removing the float and finishing the surface.
- It's not easy to patch these holes because there's sometimes a gap behind the board where the patch doesn't stick. A plumber dug this hole because he was stumped as to where to run the pipes that supply the radiator. Plasterboard holes, however, are easily repaired.
- Make a plasterboard patch that's 25 millimetres longer in length and the same width as the hole. Apply a bead of "instant grab" around the perimeter of the board and thread a long screw into the centre of the damaged section.
- You may help the glue "go to work" by jiggling the plasterboard patch around in the hole for a few seconds after you've inserted it. Once the adhesive has set, fill the area around the plasterboard insert to make the repair look seamless.
Things You’ll Need to Buy
- For the most visible parts of the house, invest in a high-quality low-sheen acrylic paint. Looking for plaster patching on your property? Look no further! Hitch Property Constructions has you covered.
- Using a Kitchen/Bathroom paint in a bathroom, or laundry room is a good idea due to the paint's higher resistance to moisture.
- There's a chance you'll need a roller and some high-end brushes, too.
- It's possible that you'll also need drop sheets, cleaning supplies, masking tape, and whatever'stencilling' tools you decide to use. The paint store where you shop ought to be able to point you in the right direction.
- Remove any dirt, grime, or oil from the area. If your walls are damaged, you can find a fine layer of "plaster dust" on them. This must be finished before moving forwards.
- After using a soft broom to remove any loose dust from the walls, you should apply one coat of sealer binder that has been diluted by about 5 percent with turpentine so that it can penetrate the plaster.
- It's important to roll the paint on from top to bottom and then use a brush to cut in the top, bottom, and borders.
- Sand the walls lightly with 120 grit sandpaper from top to bottom once you're done with them to achieve a smooth finish.
- As soon as the holes have been filled with Pollyfiller and allowed to dry, you should sand them down and apply a percentage of acrylic undercoat to the bare spots. Dust must be removed from the sanded area before the next layer (colour) may be applied.
- Make sure any non-painting surfaces are protected with masking tape, a drop cloth, or plastic.
- When applying the matte finish to the walls, tackle one section at a time. Make a cut just below the cornice at the top of the wall, continue the cut down each wall and across the floor, and finally roll the walls so that they are at the same height.
- It would be ideal if the paint could be spread evenly from the ceiling to the floor.
FAQs About PLaster
When applied to a flat surface, the coat of plaster is giving an extremely smooth finish, so it's perfect for interior surfaces. Cement rendering involves a much higher proportion of sand for additional strength. The sand is also usually much more coarse, which helps increase the strength of the cement render.
plaster, a pasty composition (as of lime or gypsum, water, and sand) that hardens on drying and is used for coating walls, ceilings, and partitions. Plastering is one of the most ancient building techniques.
By applying plaster, you will give your walls a strong, smooth, durable finish. Not only that, but a well-plastered room will help to keep old walls in good condition, provide the perfect base for paint and help with soundproofing.
Gypsum is a superior finish compared to cement plaster. However, it is advisable to go with gypsum plaster for the internal walls and ceilings and use cement plaster for the exteriors of the building.
Plaster can be easily painted with the same techniques as drywall. Even with a good coat of primer, plaster walls are notoriously thirsty for paint. Using a roller for open spaces and brushes around trim and borders, spread an even coat of your choice of paint. Don't try to completely cover the wall in one go.
Conclusion
Plastering problems include hairline fractures, missing plaster, and chipped corners in normally plastered walls. Fine cracks can appear on skim coated plasterboard as well. Plaster repair is often more practical and less expensive than installing new drywall or blue board over a damaged area. Placing joint compound in a fracture in an attempt to mend it is a waste of time because the crack will eventually reopen. Repairing the space between the lath and plaster is essential.
Content Summary
- Wall damage is common after wallpaper is removed because of the force used to remove it.
- The walls should be skimmed by a professional if you don't plan to cover them with wallpaper.
- This advice is moot if you intend to cover the wall with paper.
- By learning to do these smaller tasks on your own, you can save a lot of money and time.
- Like any other profession, welding requires the right equipment.
- Be sure you have fresh plaster on hand before starting your patching plaster job.
- This could make things more challenging for you as you try to fix the plaster.
- Many different plaster repair products are commercially available.
- Using pre-mixed plaster may seem like a good idea because it saves you time and effort.
- The finished plaster should have a high degree of rigidity.
- Therefore, it is much less difficult to handle and apply to your walls.
- Repairing loose or cracked plaster is typically more efficient and less expensive than replacing the affected area with new drywall or blue board.
- Restoring the lath-and-plaster joint is crucial.
- These screws fasten drywall to lath, which in turn tightens the plaster.