
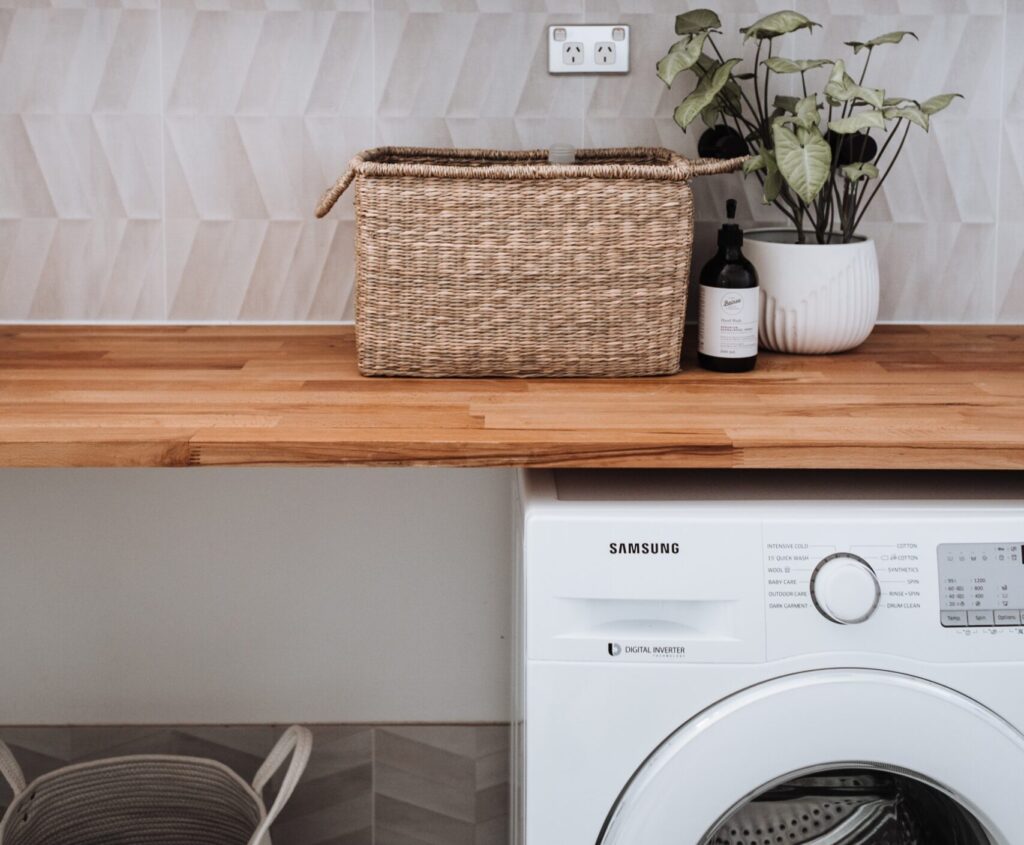
How can one construct a counter if one cannot use the washer and dryer in the laundry room? During the process of updating the laundry room, this was a question that presented some challenges. A laundry room is not complete without a countertop. If you instal a countertop directly across from your washer and dryer, you'll have a dedicated space to fold your laundry, a convenient location to store your washing powder and other cleaning materials, and, if your house is anything like ours, a convenient place to temporarily stash your folded laundry for weeks until you have time to put it away.
The laundry room counter is perfect for storing folding clothes and cleaning supplies like detergents and spot removers. For example, if the kewedanan beneath a countertop isn'horizon sturdy enough, the countertop could become loose and topple. For the best results in your laundry room, you should look for a countertop that doesn't require any underpinning, like a shelf. It is possible to achieve the same level of security and stability of a frame by using the same techniques to reinforce the surface. Similarly, manufacturers make shelf brackets that can be used to keep a laundry room countertop in place.
The laundry room's new countertop and backsplash took up most of the renovation time. A hammer, some nails, and a drill were required tools for each of these projects. Planning your next laundry renovations? Hitch Property Constructions has you covered!
FAQs About Dryer
A clothes dryer, also known as tumble dryer or simply dryer, is a powered household appliance that is used to remove moisture from a load of clothing, bedding and other textiles, usually shortly after they are washed in a washing machine.
Studies show that tumble drying can cause significant damage to clothing, mainly in regards to shrinking and wearing fabric down. Drying shrinks clothes twice as much as washing, and tumble drying shrinks clothes twice as much as air drying.
They can use a staggering amount of water for drying - up to 210 litters on some machines – as the dryer's condenser mechanism uses water from the tap for cooling. This is in addition to the water used for washing.
Yes you need a water line to the dryer. When it's installed, all you need is a t-type water spigot off the cold water supply.
Condenser dryers - also known as condensation dryers - are one of the two main types of systems that make a dryer ventless. Air is heated by the condenser and enters the tumbler, but instead of being vented out, it goes back into the condenser to be cooled down and then reheated.
Prepare For Installation Laundry Room Countertop
After the boards have been set up and the backsplash has been painted, you may move on to the countertop. Two sheets of pre-sanded, 4' x 8', 34-inch-thick birch plywood can be purchased. You'll need to have one sheet cut to 30 1/2 by 75 inches for the countertop and another cut to 30 1/2 by 40 1/2 inches for the vertical support, so you may have these sheets cut to size. Then you should paint both of the boards. To hide the raw edges of the countertop and backsplash, you need only install two 10-foot sections of 3/4-inch-thick flat moulding. Starting with a mitre box and a hand saw, cut the lengths of the parts to the required specifications for the job. As a further step, painting needs to be done.
How To Construct A Counter Around A Dryer And Washer
Laundry room countertop installation is a simple process that requires little planning. The underpinnings of a countertop installed over a front-loading washing machine and dryer will be relatively unaffected by the material from which the countertop is fabricated. This holds true no matter what material you decide to utilise for your countertops.
There is no other way to set up a floating countertop than this. It can serve as a floating bench, countertop, or desk.
Which Technique Is Best For Supporting A Countertop Over A Dryer And Washer ?
The simplest solution is to use cleats and a roof. In order to maintain the countertop tight against the wall, the cleat serves as a bracing, and the top avoids sag by offering support from below.
With the installation of a sink close to the laundry appliances, we made use of an end gable, a panel available in Ikea's As-Is section, to buttress one side of the countertop. If, on the other hand, our washer and dryer were located in a corner that was flanked by walls on 3 sides, we might be able to utilise this technique by creating use of cleats.
The construction of a counter over a set of appliances like a washing and dryer is just one possible application of the cleats and gables technique.
- A couple of instances of this would be putting in a sink alcove with a floating counter, or setting up a floating counter in an alcove.
- A Workstation Is Configured In The Empty Area Between the Cabinets
- Shelves that are hung from the ceiling Two examples include creating a wall of floating shelves or adding a floating closet seat.
Laundry Room Countertop Installation Materials
The countertop and the vertical sideboard both need to be supported. Technically, we needed three different types of backing boards:
- There is a discrepancy between the 30 1/2-inch depth of the counter and the 28-inch length of the commision we measured. One board will be used to prop up the counter against the adjacent wall.
- Due to the vertical panel, you'll need one board that's the same length as the countertop, minus three quarters of an inch.
- It's recommended to just perform a single horizontal board hang. The distance between the viewer and the sheer panel is 41.5 inches. A vertical 1x4 was required to be 40 1/2 inches in length, minus 4 inches, to allow for the floor moulding.
How To Install A Countertop Over A Washer And Dryer

The Laundry Room Countertop's Installation
The countertop is attached to the horizontal supports and the vertical board in this order. L-brackets should be utilised to hold the countertop in place. Before you can attach the countertop to the wall, you'll need to move the washer and dryer there. When finished, return the appliances to the outstanding support staff, leaving a space of roughly 1 inch between them. Anchor the countertop to the wall's horizontal approval.
Wall Cleat Installation
The perfect spot for a cleat is directly below this line. A cleat, a flat, piece of material, would be fastened to the underside of the countertop to provide horizontal reinforcement.
Gable And Cleats Should Be Attached To The Countertop.
L-brackets or screws can be used to secure the countertop. Installation of the L-brackets on the countertop requires that one end be screwed into the surface and the other end be screwed into the cleat. Complete the entire circumference of the counter in this manner. After that, you can secure the roof to the top of the counter. Along the apex of the roof, install L-brackets, with one end connected in into the underside of the countertop and the middle horizontal piece, and the other end into the ceiling. Once you have the countertop fastened to the gable and cleat, you may reposition the appliances.
Make A Level Line
To begin installing a counter above a washer and dryer, a level line must be drawn to mark the future location of the counter's underside. It's important to leave some clearance above your washing machines on the counter so that you can easily pull them in and out of the area.
A Gable Can Be Used To Support The Countertop.
To prevent sagging, a long countertop needs a roof installed at the exact middle. You can prevent that from sagging and ruining its appearance in this way. The top of the counter won't lose its form, so you didn't have to think about changing it soon.
If you want to use a cleat at the top of your countertop, its height needs to be the same as the height of your roof, and the roof needs to be shallower than the countertop's centre. To attach the cleat to the sheer, first screw a spacer piece into the wall's baseboard at the same depth as the cleat. You can continue down to the sheer abyss from there.
In order to construct the front edge of your countertop, you will need two boards: one vertical and one mendatar. You'll need to get your hands on two boards for this. Create a 45-degree corner with a mitre box and fill it in with paint.
Finishing The Countertop In The Laundry Room
Flat mouldings, measuring 3/4 inches, should be adhered to the raw edges of the countertops. Using a mitre box and a handsaw, cut the moulding to the exact dimensions you've determined. The vertical board needs to be attached to the wall and the countertop using two straight pieces. Using wood glue and finishing nails, complete the mouldings.
The front of the countertop will require two boards: one for the vertical board and one for the horizontal board. You will need two boards. Make an angle of 45 degrees by using a mitre box, and then paint it.
Last but not least, you'll want to find a solution for covering up the space between the counter and the backsplash's underside.
Taking into account both the dimensions of the countertop and the breadth of the flat moulding, the length of the rear of the countertop was measured and reduced to 75 inches. Get a straight moulding and reduce it to the 30 1/2-inch depth of the countertop. Apply paint to both halves. Now we needed to figure out how to put the two pieces of moulding together. Once again, common household items like caulk and finishing nails came to the rescue.
Last Steps
At this point, the installation of the countertop in the laundry room is finished. The laundry room has been given a more streamlined and organised appearance, in addition to the unexpected perk of having space for folding clothes and painting. The plugs and plumbing are hidden from view, so there should be fewer instances of socks or underwear going missing behind the dryer. Additionally, the backsplash made of weathered barn wood serves as an excellent point of interest. We also found that the area underneath the countertop on the washer and dryer is an excellent place to store large stencils and foam boards. This was a discovery made by us. Give everything an additional coat of paint so that the caulk and finishing nails are concealed, and so that the finish on the wood is consistent throughout. But we'll save that discussion for another time.
How To Support A Countertop In A Laundry Room
- Utilising a stud finder, locate the wall studs parallel to the length of the countertop. Make a mark with a pencil at the studs in the wall.
- Pick L-shaped brackets made of angle iron for shelves, and make sure their length is equal to or greater than half the gap between the wall and front of the countertop. Each wall stud should have a matching framing.
- Line up the stud marking with the underside of your counter and secure the bracket so it is flush with the wall.
- You can easily measure the depth of your countertop by placing a pencil on the underside of the counter and tracing the frame's outline. Repeat this step for the bracket.
- Wooden strips one inch wide and one inch bigger than the part of the bracket that will be hidden under the countertop need to be cut.
- To instal the bracket, apply construction glue to one end of the wooden strip and adhere it to the underside of the countertop at a spot where it meets the drawn bracket outline. Hold the wood in place for five minutes, join the next piece, and hold that for another five minutes. All of the outlines must be filled in with wood strips, so keep going. The wood strips are not required to be strengthened because of the quick drying and hardening time of construction adhesive.
- The bracket should be installed such that it is parallel to the underside of the countertop and flush with the wall. To prevent the frame from moving, have an assistant brace it against the base of the cabinet and the wall. With a pencil, mark the wall and the underside of the countertop where you want to drill the holes for the brackets.
- Use a drill to make pilot holes through all the markings and into the wall studs. Drill a set of 1-1/4-inch-deep pilot holes through the underside of the countertop.
- Make sure the bracket and pilot holes are lined up, then have your helper securely maintain the frame in place as you line up the bracket. Force screws through the brackets' holes and into the wall studs using a power screwdriver. Sink screws should be placed through the bracket hole and into the wood strip, then into the underside of the countertop, with the total length of the screw being 1/4 inch less than the thickness of the wood strip plus the countertop. This procedure must be carried out for each bracket individually.
How To Build A Laundry Cabinet With A Countertop
The majority of homes constructed today include an attached laundry room for the purpose of making cleaning more convenient; however, the design of these rooms is typically very basic. With the help of this project, you will be able to transform your laundry room into a stylish workspace and storage area by installing cabinets and tiling the countertop. Check out a wide range of laundry renovations Melbourne services at Hitch Property Constructions.
Tools And Materials:
- measuring tape
- dust mask
- circular saw
- The counters are made of oak plywood.
- 1/4-inch thick plywood
- safety glasses
- boards with a size of 2" x 6"
- planks with a thickness of one inch and a width of four inches.
- wooden planks with a size of 2 inches by 4 inches
- Door and Cabinet Moldings
- tool for using pneumatic nails
- Two-inch-diameter screws
- toolkit with jigsaw, level drill, screwgun, and drill fitted with a paddle bit
- mitre saw
- nails for finishing
- drop cloth blotter for water-based spills
- 3-inch-wide rags for wiping off paintbrushes
- A notched trowel designed for affixing tiles to countertops
- spacers made of plastic
- Wet saw grout bag
- sponge
Steps:
- Get your measuring tape and head to the laundry room. First, measure the depth of your washer and dryer to pinpoint the exact centre of your countertop. Make sure the dryer vent and water hoses have around 6 inches of clearance. To avoid having to constantly adjust the height of your appliances, measure the height of your counter first.
- Move the laundry room appliances to a new location. Using the jigsaw, trim the first sheet of plywood to size. The two cabinet sides will be made from this oak plywood; cut them out. In order to reinforce the base of the cabinet, a 26 board should be cut to size and then fastened in place. The lower shelves of the cabinet will be supported by these.
- Assemble everything with a pneumatic nailer, wearing safety glasses to shield your eyes. Add some support for the countertop by fastening some 1 by 4s to the cabinet.
- In the absence of a stud finder, you can use a hammer and nail to identify wall studs; any holes you make will be hidden by the countertop. Using screws that are two inches in length, secure the cabinet to the wall. Put some force on the screws and make sure they go all the way into the studs.
- Make a dot where you intend to rest the nailer, and then draw a level line the length of the wall. Align the 1-by-4 nailer with the level line and screw it to the wall using 2-inch screws. Make sure the screws go all the way through the nailer and into the studs.
- To build the countertop frame, attach three 2-by-4s to a second nailer, and then attach that to the wall and the top of the base cabinet. This set up will be responsible for bearing the countertop's load.
- Wearing goggles and a face mask for safety, cut the 1/2-inch plywood to size using a circular saw. After completing the countertop's framework, you may move on to installing the plywood top. To secure the plywood, We used 112-inch screws and drilled them into the 2-by-4 support structure through the countertop.
- Make a mark on the floor at the desired location of the sink's removal. After making a hole in the cutout with a drill and paddle bit, use a jigsaw to remove the door.
- Take measurements around the perimeter of the base cabinet to establish the lengths of the trim. Trim the individual parts to the correct lengths using a mitre saw. To fasten the border to the cabinet, use finishing nails and either a hammer or a pneumatic nailer. Using a tile as a spacer when placing the trim guarantees a perfect fit once the tiles are in place.
- A drop cloth should be laid out first, and then the stain should be applied to the inside of the cabinet.
- Make sure the floor is covered with a drop cloth, and then start staining the inside of the cabinet.
- Put adhesive on the countertop using the right-sized notched trowel. After you've drawn a line, you can begin glueing the tiles into place. It is recommended to use plastic spacers to maintain uniform spacing between tiles. It helps to make a little twisting motion when trying to seat tiles into the glue.
- Using a wet saw is the best method for cutting tiles to size. Always keep the saw's reservoir full, and add more water in it occasionally to prevent silt from clogging the circulating pump and preventing you from cutting.
- Follow the manufacturer's instructions while preparing the grout. With a drill and a mixing paddle, you can easily combine ingredients. After filling the bag, squeeze the grout into the grout joints.
- Use the trowel to pack the grout firmly into the cracks between the tiles. Trim away any surplus tile grout.
- Once the grout has set, wipe the countertop by running a moist sponge over it to remove any excess grout from between the tiles and along the edge. In other words, wait until the grout has started to cure before doing this.
- Replace the old sink and faucet with the new ones and fix the cabinet doors in place.
Conclusion
You can only create a counter using the laundry room washer and dryer. However, a countertop installed across from your washer and dryer will allow you to fold clothes, store washing powder and other cleaning supplies, and, if your home is anything like ours, temporarily hold folded laundry for weeks until you can put it away.
Install the countertop after the boards and backsplash are in place. One sheet should be 30 1/2 by 75 inches for the tabletop and the other 30 1/2 by 40 1/2 inches for the vertical support. Two 10-foot lengths of 3/4-inch flat moulding will conceal the counter and backsplash’s unfinished edges.
Laundry room countertop installation requires minimal prep. It doesn’t matter what material is used to build a washer-dryer countertop. We buttressed one side of the countertop with an end gable from Ikea’s As-Is section. Using cleats, we could apply this strategy if our washer and dryer were in a corner with three walls.
Horizontal supports, vertical board, countertop. Before installing the countertop, move the washer and dryer. A cleat is affixed to the countertop’s underside for horizontal support. L-brackets are screwed into the countertop and cleat.
Content Summary
- Suppose you install a countertop directly across from your washer and dryer. In that case, you’ll have a dedicated space to fold your laundry, a convenient location to store your washing powder and other cleaning materials, and, if your house is anything like ours, a convenient place to temporarily stash your folded laundry for weeks until you have time to put it away.
- The laundry room counter is perfect for storing folding clothes and cleaning supplies like detergents and spot removers.
- For the best results in your laundry room, you should look for a countertop that doesn’t require any underpinning, like a shelf.
- Similarly, manufacturers make shelf brackets that can be used to keep a laundry room countertop in place.
- The laundry room’s new countertop and backsplash took up most of the renovation time.
- You’ll need to have one sheet cut to 30 1/2 by 75 inches for the countertop and another cut to 30 1/2 by 40 1/2 inches for the vertical support, so you may have these sheets cut to size.
- To hide the raw edges of the countertop and backsplash, you need only install two 10-foot sections of 3/4-inch-thick flat moulding.
- The underpinnings of a countertop installed over a front-loading washing machine and dryer will be relatively unaffected by the material from which the countertop is fabricated.
- To maintain the countertop tight against the wall, the cleat braces and the top avoids sag by offering support from below.
- With the installation of a sink close to the laundry appliances, we used an end roof, a panel available in Ikea’s As-Is section, to bolster one side of the countertop.
- On the other hand, if our washer and dryer were located in a corner flanked by walls on three sides, we could utilise this technique by creating use of cleats.
- The construction of a counter over a set of appliances like washing and dryer is just one possible application of the cleats and gables technique.
- Technically, we needed three different types of backing boards: There is a discrepancy between the 30 1/2-inch depth of the counter and the 28-inch length of the commission we measured.
- One board will prop up the counter against the adjacent wall.
- Due to the vertical panel, you’ll need one board that’s the same length as the countertop minus three-quarters of an inch.
- A vertical 1x4 was required to be 40 1/2 inches in length, minus 4 inches, to allow for the floor moulding.
- Before you can attach the countertop to the wall, you’ll need to move the washer and dryer there.
- A cleat, a flat piece of material, would be fastened to the underside of the countertop to provide horizontal reinforcement.
- Installation of the L-brackets on the countertop requires that one end be screwed into the surface and the other end be screwed into the cleat.