
It is possible to transform the appearance of a painted wall into a masterpiece. Painting walls has become one of the most popular ways to decorate one's home. Painting the walls of a room gives it a one-of-a-kind look that can have a major impact on the homeowner's choices in other areas of interior decoration and design. When it comes to sprucing up the inside of your home, painting the walls is the one and only option that can't be matched by any other way.
You can find a large variety of paints and paint equipment kits at local markets, specialised paint stores, and even hardware stores. Professional painters often choose to utilise paint sprayers over brushes and rollers because of the greater flexibility they offer. However, with the advent of the garden sprayer, painting walls has become a simple task. The spray-painted walls have such a lovely finish, and their contribution to the home's upbeat ambience is obvious.
Spray paint is the go-to for professional painters when they have a huge project to complete, whether it be a residential or commercial inside walls and ceiling painting, because it helps them to get a professional look in less time.
If this is your first time using spray paint, you should practise at least 2 times or thrice before starting your project. This will make it possible for you to learn the right techniques for using spray paint. Spraying on paint is an approach that requires little technical know-how or skill to execute. Are you looking for the best company to maintain your home's paint in good condition? There's no need to look any further! When you hire Hitch Property Constructions, you have nothing to worry about.
Ceiling or Walls? That Is the Question.
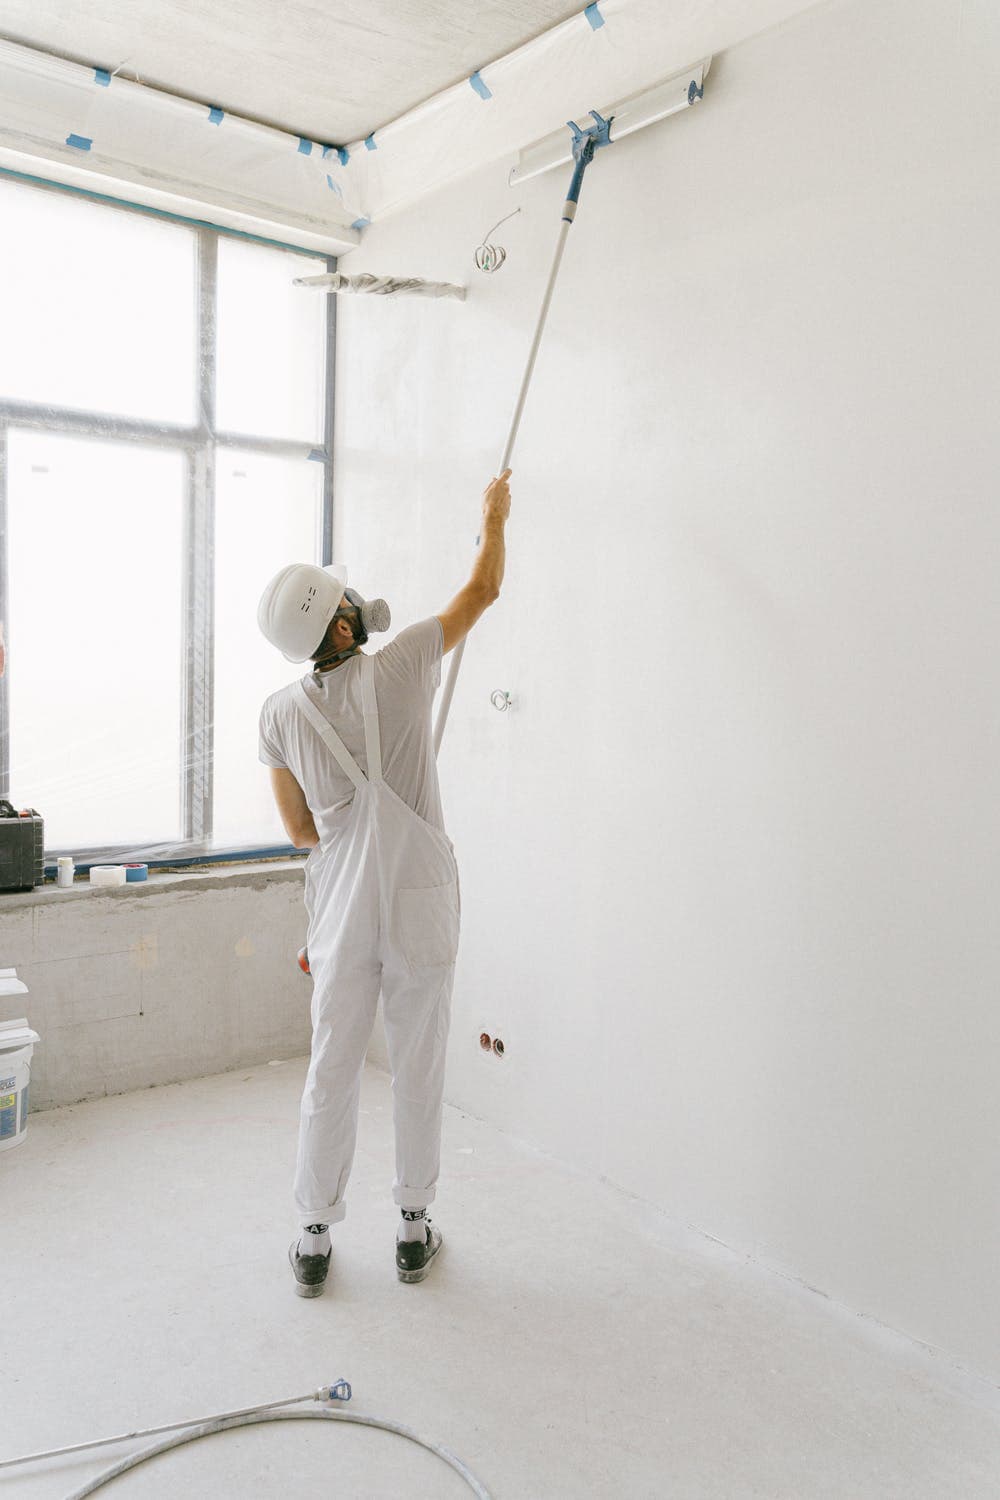
Painting the ceiling first is a good practise while using a painting sprayer since it protects you from paint dripping down from above. The walls can be painted after this has dried. Be sure to protect the walls and floors from paint overspray by covering them before beginning work on the ceiling. The walls will need to be painted twice if you paint the ceiling first since paint will certainly splash onto it. You can use either a paintbrush or even a paint roller to get the desired finish in those hard-to-reach spots.
Step-by-Step Instructions for Spray Painting Interior Walls
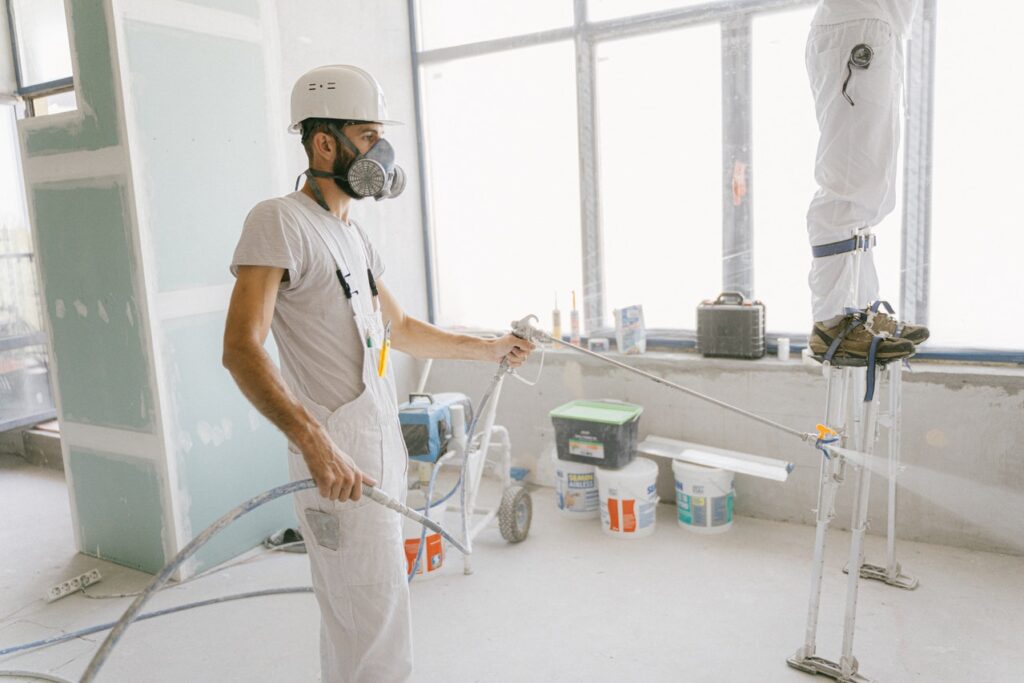
To avoid discomfort while painting walls, stand about 300 millimetres back from the sprayer. Now, paint one corner of the wall before moving on to the next section. When you're done with the corner, paint one wall at such a time instead of trying to tackle several at once. In other words, once you've broken through one barrier, you should continue on to the next. Holding the spray nozzle at a 90-degree angle, spray the inner walls of building as far as you can.
It's best practise to have your brush strokes slightly overlap in both the horizontal and vertical direction when painting. With this technique, you may achieve a more professional-looking, uniform coating on your walls. Wait for the wall to dry thoroughly when you're done painting it. The process can be repeated as many times as necessary to reach the desired outcome.
To Succeed, Plan Ahead
Always have a good supply of drops cloths , tarps and painter's tape on hand before beginning a painting project. Putting painter's tape on the hardware, covering the trim from around windows, doorways, ceilings, and floors, and taping off the glass are all necessary steps in getting the areas ready for painting.
To avoid getting paint on your flooring, you should protect them with drop cloths or other floor coverings before you begin painting. Door frames must be covered so that paint doesn't be blown into neighbouring rooms.
Keep your pets safely away from the area you're painting and in another room.
Do not forget the safety gear!
When using a paint sprayer on the inner walls of a room, paint particles will float in the air and, if you're not careful, will settle on your hair and clothing. To avoid getting painting in your eyes, wear goggles, and to prevent paint from staining your clothing, wear old clothes or cover them with something else. If you don't want to risk putting paint in your eye, goggles are a must.
Sprayer loading
For the best results from your paint sprayer, always thin your paint according to the manufacturer's instructions. Make sure there's enough paint in the can, and then choose a brush with a tip that will give you the coverage you want.
Practice makes perfect.
Make sure the oil sprayer is full and perfect your technique before attempting to spray the walls. You can see if the paint is the right consistency and if you are maintaining the spraying at the right distance to the surface by testing your technique. These tests can be done anywhere, even on a piece of cardboard, but they don't even have to be done in a clinical setting.
Make Sure There's Adequate Airflow
Ensure there is enough air flow in the room before you begin spraying the paint. Doing so is a necessary safety measure. If you don't want to get sick or have a headache from breathing in paint fumes, make sure to open windows and run electric fans to circulate the air in the room.
Paint
The best method to begin painting is to spray from floor to ceiling. If you want a professional look, spray the paint in a sweeping motion rather than a straight line. At the first evidence of paint dripping, stop what you've been doing and adjust your sprayer to use less paint.
In order to get the correct hue and coverage, numerous coats of paint should be applied. It is important to give paint ample time to cure between coats. Paint sprayed on with a sprayer dries rapidly between coats, but if you're going to be waiting for a while, it's best to empty the paint and wipe out the nozzle to keep it from drying in there.
Getting Walls Ready for Paint
If you want a professional look after you paint, you must first prepare the wall or ceiling surface. Cracks, holes, recently plastered walls, old repainted walls, stuck wallpaper, oily stuff, and so on are all items that could be discovered. If you want to paint successfully, you need to make sure that nothing can go wrong with your surface beforehand. Few simple measures are required to ensure that the functional walls and ceilings are properly prepared for the application of smooth paint.
To achieve this goal, first dust the walls and ceiling using a dry duster to remove any dust, filth, or debris. Ensure that the areas you intend to paint are completely dry. Before painting, make sure the walls are smooth and even by repairing any imperfections with high-quality putty, such as tads of wallpaper, flaky paint, crusty plaster, gaps, fractures, etc.
Repair holes and cracks by first washing them with sugar soap, then filling them with putty to create a smooth surface. Let them dry thoroughly in the open air. A fresh sheet of sandpaper can be used to gently sand the wall and remove any peeling paint, giving the wall a smoother appearance. You can use a solution with sugar soap to remove any traces of grease, pigment, dirty fingerprints, etc. Clean the wall surface with the hot water, and then give it a few hours to dry thoroughly before touching it again.
In the event that wallpaper is there, it can be scored without damaging the plaster by using an orbital scorer or a stripping knife.
Wallpaper is easier to remove if you soak the walls in hot water to soften it, and then peel it off with a stripping knife. If you need to get rid of any remnants of the bonded wallpaper, all you need to do is sand off a tiny bit with some sandpaper.
If you want your painting job to go off without a hitch, it's a good idea to move all of the furniture out of the room beforehand. As paint drips and runs, it's important to cover the floor with drop cloths to prevent damage. At Hitch Property Constructions, we provides a wide range of home maintenance services.
It is important to keep the following in mind as you go throughout the practise session:
- Aim for a space of around 300 millimetres between both the sprayer as well as the wall.
- The sprayer should be held at a 90-degree angle at all times.
- Spraying should overlap by a third to half of the area being treated.
- Don't speed up or slow down.
- Be ready at all times with your thumb just on trigger.
If indeed the sprayer is placed too close to the wall, it is likely to drip and run. Painting walls at in an angle causes the paint to pool in one spot due to the spray's concentrated flow. Overlapping will help you cover more ground, but you may still have to apply two coats.
When spray painting, keep moving ahead at a steady pace. You'll wind up with runs if the paint is too thick. When you release the trigger, paint may spray out, potentially ruining your work. Holding the paint trigger down and moving at a steady speed can yield far better results.
Initiate Work on Painting the Roof
When painting both walls and ceilings, it's best to start with the ceilings so you may take advantage of several advantages. When you wash the ceiling after you've finished painting the walls, you risk getting paint splatter all over your new paint job. The result will be shoddy walls. This means you'll have to repaint your walls because the first attempt didn't cover properly. To acquire the greatest possible finish when painting, you may need to employ the usage of both a brush as well as a paint roller. Get a strong stepladder for painting the ceilings and walls while you're at it.
We recommend using the spray gun when applying spray paint for a more efficient and expert finish. If you're only going to be painting the ceiling, then you should tape off the upper walls of a room before you start painting to catch any paint that could run or drip.
Paint sprayers and spray guns can be loaded with the fresh paint mixture and used to begin painting the ceiling. Make back-and-forth or up-and-down motions with the sprayer, keeping it parallel to a ceiling. Try to overlap your spraying strokes ever so slightly as you glide the spray across the ceiling.
Spray the next coat in a horizontal motion, either side by side or after you've completed the initial vertical stroke. Let the base coat dry before applying a second. To get the best results, it's best to coat something twice using the same technique as the first time around, and keep going until you're satisfied with the results. This technique of painting, known as cross-coating, is crucial to achieving a flawless final product. Don't rush the drying process; after you're happy with the result, you should wait several days before inspecting the ceiling.
The spray gun's pressure should be started low and increased slowly to the desired level. Applying too much force at the outset of painting could cause excessive runs, that would prohibit you from reaching full coverage and it would waste paint. Keep twenty centimetres of space between the spray gun's nozzle and the ceiling for a professional finish.
Cover the wall's perimeter with plastic and glue it to the wall with painter's tape or masking tape if you want to paint the ceiling a different colour than the walls.
Painter's Tape: How to Use It
DIY painters can never have too much painter's tape. It helps you make things that look more polished and get clear, precise lines. Most people are under the impression that if they tape off the ceiling, the floor, and the trim before they begin painting, the finished product would be faultless. It takes practise to master the art of applying and removing painter's tape for optimal results.
Before you start masking your walls to keep paint any getting on them, learn all you need to know concerning painter's tapes and how to apply painter's tapes from the specialists at Five Star Painting.
Which Masking Tape Is the Best for Painters?
You should pay close attention to the quality of the painter's tape you use. If you're going to cover your windows with plastic, the best tape to use is blue painter's tape because of its exceptional stickiness. When spraying the baseboards, this green Frog tape does a great job of shielding the floors from the paint. Yellow Frog adhesive is great for putting over surfaces that might not be completely dry, such as pricey wallpaper or freshly painted walls.
Depending on the job at hand, you can choose from painter's tape with varying levels of adhesion and breadth. Painter's tape's efficacy is affected by a number of factors, including the type of paint, the position of the paint, and the current condition of the surface. Make sure you have the right kind of painter's tape for your job by following these tips:
Stickiness of Painter's Tape
That nature material your project will dictate the level of adhesion required.
- If you need to tape something down to a surface with a lower adhesion level, like wallpaper and paint with a fake finish, you can leave it there for longer without worrying about damaging the surface.
- For maximum flexibility, it's best to go with a medium adhesion level, which works well in both indoor and outdoor settings. This tape has a potential retention period of two weeks.
- Materials that are exposed to the elements or are rough and textured benefit greatly from a strong adhesive. Also, you can use it to fasten drop cloths with great success. Take off that tape so soon as you can, within a week at the latest.
Painting Tape Width
Find painter's tape with a width of 1.41 inches or 2.9 cm to apply to windows, trimming, and moulding. If you utilise these widths of tape, you'll have plenty to create a neat finish. In tight quarters, use artist's tape with a thin width. Hanging plastic or tarps to cover floors and ceilings is best done with wide craftsman's tape that is at 2 to 2.5 inches wide. No desire to buy a selection of widths Then a tape roll with a width of 1 1/2 inches should suffice.
Is there a Difference Between Painter's Tapes & Masking Tape?
No, to put it briefly. Painter's tape or masking tape may seem and feel the same, but their purposes are very different. Painter's tape is designed to be taken off without left any sticky residue. In the presence of paint, it is unlikely to shrink or develop wrinkles. Masking tape has a tendency to create a sticky residue or to wrinkle whenever it comes into touch with paint if it is left just on surface for too long.
If you're in a bind, masking tape can do the trick, but it's likely to leave a sticky residue if it's left just on surface for too long. You can get help from Hitch Property Constructions in a wide range of service areas with their specialised selection of home renovations.
What Color of Masking Tape Should I Buy?
UV radiation degrades painter's tape and glue over time, however blue painter's tape can withstand this. If you're doing any kind of work outside, this is the tape you should be using. If you're doing your task inside, the tape's breadth and adhesive strength are more important than the colour.
Techniques for Using Painter's Tape
Dust and filth on a surface will prevent painting from sticking. Wet a rag and run it around the masked area to remove dust and other debris that could interfere with adhesion. Press the adhesive thoroughly into the surface by dragging a small, flexible craft knife alongside the length of the tape after it has been applied. This is an essential procedure, and you should not skip it or try to use your bare hands instead of the palette knife.
FAQs About Home Painting
It is recommended that a 411 spray tip be utilised when painting larger surfaces, such as ceilings or tables, with lacquers or paints/interior materials. This is due to the fact that a wider spray pattern is required. A spray tip with a 515 nozzle would work the best for painting rooms or houses.
You will need to mask off entire rooms or walls if you plan on spraying paint or texture on the surface. Using a wide strip of painter's tape (three inches or more in width) to tape off the ceiling's perimeter is the simplest way to accomplish this task. Only the top edge of the tape should be adhered; the bottom edge should be left uncovered.
First, spray the walls, and then move on to the ceiling. Wait until the paint on the walls is completely dry, then cover them with tape and plastic before spray painting the ceiling. When you spray the ceiling first, it is much simpler to mask the ceiling than it is to mask the walls, even if you turn the ceiling upside down.
Even if the ceilings are going to be sanded, the first coat of ASU paint should always be back-rolled after the spray application. This is the absolute bare minimum requirement. Back-rolling subsequent coats is highly desirable because it improves the consistency of the soft texture and the ability to scatter light evenly.
Spray painting is the quickest way to get the job done, but in order to get beautiful results from spray painting a ceiling, you still need to know how to spray paint a ceiling. You will require a paint sprayer that does not use air as well as ceiling spray paint. Put on some goggles, a face mask, and a safety goggles, and then use a strainer to get the paint into the sprayer. Only then should you start painting.
Conclusion
Professional painters often use spray paint when they have a large assignment to accomplish. Applying paint via spraying is a method that calls for little in the way of specialised training or experience. The spray-painted walls have a beautiful finish and clearly contribute to the home's ambience. Applying paint to the ceiling first is a recommended practise when using a painting sprayer since it prevents paint from falling on your head. Always use drop cloths or other floor coverings to shield walls and floors from paint overspray.
Content Summary
- It is possible to transform the appearance of a painted wall into a masterpiece.
- Painting walls has become one of the most popular ways to decorate one's home.
- Painting the walls of a room gives it a one-of-a-kind look that can have a major impact on the homeowner's choices in other areas of interior decoration and design.
- When it comes to sprucing up the inside of your home, painting the walls is the one and only option that can't be matched by any other way.
- The spray-painted walls have such a lovely finish, and their contribution to the home's upbeat ambience is obvious.
- Spray paint is the go-to for professional painters when they have a huge project to complete, whether it be a residential or commercial inside walls and ceiling painting, because it helps them to get a professional look in less time.
- If this is your first time using spray paint, you should practise at least 2 times or thrice before starting your project.
- This will make it possible for you to learn the right techniques for using spray paint.
- Spraying on paint is an approach that requires little technical know-how or skill to execute.
- Painting the ceiling first is a good practise while using a painting sprayer since it protects you from paint dripping down from above.
- Be sure to protect the walls and floors from paint overspray by covering them before beginning work on the ceiling.
- The walls will need to be painted twice if you paint the ceiling first since paint will certainly splash onto it.
- Paint one corner of the wall before moving on to the next section.
- Holding the spray nozzle at a 90-degree angle, spray the inner walls of building as far as you can.
- Wait for the wall to dry thoroughly when you're done painting it.
- Always have a good supply of drops cloths , tarps and painter's tape on hand before beginning a painting project.
- Putting painter's tape on the hardware, covering the trim from around windows, doorways, ceilings, and floors, and taping off the glass are all necessary steps in getting the areas ready for painting.
- To avoid getting paint on your flooring, you should protect them with drop cloths or other floor coverings before you begin painting.
- Keep your pets safely away from the area you're painting and in another room.
- Do not forget the safety gear!